Search the Community
Showing results for tags 'arena'.
-
The Art of the Alchemist: Control, Survival and Influence in the Arena So, you've chosen the Alchemist. You've probably been told your job is to keep your team's health bars full. Forget that. Topping the healing charts is a fool's errand. True mastery of the Alchemist isn't about being a reactive heal-bot; it's about becoming a proactive playmaker who controls the flow of battle. This guide will change your mindset. Your contribution won't always show up on the final scoreboard, but your presence will be the decisive factor between a bitter loss and a hard-fought victory. ────────────────────── Part 1: The Core Philosophy - Beyond the Health Bar and Skill Set Bigger Heals Don't Win Matches: This is the first and most important lesson. If you're constantly forced to deplete your heals, it’s not a sign of your skill, but a symptom of a larger problem: your team is already losing. Massive healing is a bandage on a mortal wound. Most deaths occur not from a lack of healing, but from poor positioning, wasted cooldowns, or a successful enemy ambush. Your job is to prevent these situations, not just clean up after them. An Alchemist is not meant to carry a team through sheer healing output. You are the strategist, the enabler, the one who tips the scales. Health Bars are a Resource, Not a Score: You and your allies do not need to be at 100% health at all times. The arena is a game of strategy and timing. Your enemies are watching, waiting for the perfect moment to strike. A teammate at 70% health isn't a liability; they are bait. They are a beacon of certainty in a chaotic match. The enemy team sees an "opportunity," and in their eagerness, they might overextend, burn key skills, or break their formation. This is the moment you've been waiting for. By letting your ally draw out the enemy's intentions, you gain the upper hand, ready to counter their predictable attack. Uncertainty is your greatest foe; don't waste your skills healing non-lethal damage when you could be saving them for a decisive counter-play. The "Distortion Seal" Fallacy: Let the Play Come to You: You are not a machine gun using every skill the moment its cooldown finishes. This is a critical lesson, perfectly illustrated by the skill "Distortion Seal". It's a common flaw to see players equip this powerful, situational skill and have it completely ruin their playstyle. Why? Because they adopt an awful mentality: they feel they must use it. They ruin their positioning, tunnel their focus, and neglect everything else, playing solely for that one perfect moment to use "Distortion Seal". Often, you will end a match without ever needing to use the skill. A good opportunity simply never arose. That is normal. The skill is a tool, not an obligation. If it becomes second nature to you, you will use it only when you need it, without thinking. If you find yourself hunting for a moment to use it, you are missing the entire point of this guide. Let the game present the opportunity; don't warp your strategy trying to force a situation just for one skill. ────────────────────── Part 2: Build What Works For You There is no single "perfect" build. While some skills offer more opportunities to influence a match, their true effectiveness depends entirely on how well they fit your personal playstyle. Some skills require you to get close to the enemy, while others allow you to keep a safe distance. If you are a cautious alchemist who excels at positioning from afar, don't force yourself to use a high-risk, close-range skill just because a guide told you to. Instead if you thrive in chaos, embrace the skills that let you disrupt from the inside. Don't copy a build; craft one. True mastery comes from a set of tools you wield with instinct, not a list you copied from someone else. The first and foremost step of expertise is knowing why things are done in a certain way ────────────────────── Part 3: Know your limits Before you can control the battlefield, you must master yourself. This means deeply understanding a fundamental question: How hard are you to kill? You need to know, instinctively, how much damage you can take from any given enemy. How many skills do you need to burn to survive a Shadow's ambush? Can you absorb a Mage's combo without using your shield? This knowledge is what allows you to establish priorities. Often, you will face a nightmare scenario: both you and an ally are in critical condition, and both of you are being targeted. A panicked Alchemist heals themselves. A good Alchemist makes a calculated choice. The ultimate level of skill is to confidently choose to heal your ally while you are taking damage, knowing with absolute certainty that you can survive the attack. To others, it looks like you are living on the edge of your seat. To you, it's just another calculated risk. How do you gain this confidence? Practice 1v1 matches. Duel every class. Learn their burst patterns. Let them hit you. See how much damage their skills do to you, with and without your defensive cooldowns. This practice will remove the guesswork from your gameplay and give you the ice-cold resolve needed to make the right call under extreme pressure. ────────────────────── Part 4: Come Prepared Before we discuss a single skill or strategy, understand this: your commitment to winning doesn't begin when the match starts. It begins with your preparation. The arena is not a place for honor codes. Everything is allowed. Your enemies will use every scroll, potion, and item at their disposal to win, and you must adopt the same winning mentality. When a match is tight, a single, well-timed consumable is the difference between victory and defeat. Do not be cheap with them. Do not save them as a last resort. A cornered enemy won't hesitate, and neither should you. Incorporate consumables into your core playstyle. Use an anti-stun scroll proactively before you expect a Shadow to open on you. Use a defensive consumable to confidently take a deadly combo. When you treat these items as part of your standard toolkit rather than a panic button, they make a colossal difference. ────────────────────── Part 5: The Alchemist's Journey How you play the Alchemist must evolve as you climb the ranks. The tactics that kept you alive in early arenas will get your team killed in the endgame. Early Game: The Cat and Mouse Chase In low-to-mid-level arenas, it's common to see the entire enemy team mindlessly chase the Alchemist. This creates a chaotic scrum where survival is key. Many Alchemists develop a "cowardly" and purely defensive playstyle here. While it might work initially, this is a bad habit that must be broken. Endgame: The Calculated Threat In high-level arenas, everything changes. A single skilled DPS can wipe a team, so committing three players to chase a single, kiting Alchemist is a suicidal mistake. It leaves them wide open to being decimated by your teammates' AoE and crowd control. Instead, the enemy team will adopt a more calculated approach: Dedicated Hunter: One player, often a Shadow, will be assigned the specific task of harassing and killing you. Opportunistic Strikes: The team will largely ignore you, focusing on your allies, until you make a mistake and present a clear opportunity for a kill. Your playstyle must adapt. The passive, "run and hide" approach is no longer viable. It hurts your team's offensive pressure and leaves them vulnerable. It's time to become a playmaker. So always keep in mind this: Just because something worked before, it doesn't mean it will always work. Be flexible and change as the meta changes ────────────────────── Part 6: Reading the Battlefield Open your eyes. The enemy's intention is clear long before they attack. Do not underestimate them; even when they're brawling with your allies, their eyes are dead set on you. But your primary threat is almost never the enemy currently engaged with your DPS. Your real worry is the player in the back, the one who is quiet. Always be wary of the enemy who saves up their skills. They are saving them for you. Learn to Read the Signs: The Guardian: They engage and control appearing to be busy, but will hold their movement skills, waiting patiently for you to step just inside their leap range. Being the hardest to kill allows them to be as calculating as you are. The Hunter: A Hunter playing passively, not using all their skills on cooldown, is not being lazy. They are waiting for a clear shot at you. A quiet Hunter is a dangerous Hunter. The Mage: They will preventively flank, moving to the side of the fight. They aren't repositioning for fun; they are creating a new angle to bypass your frontline and hit you. If you lost sight of them. Be wary, mirror their movement to keep your team between you and them. The Shadow: It is not a question of if they will attack you, but when. Assume you are their only target. Finding the intention of your enemy team allows you to always find the best positioning even before the fight starts The Mirroring Technique Mirroring is a dynamic skill you will develop over time. The principle is simple: move, and watch who moves with you. Before the fight breaks out, your early movements are a probe. The enemy player who subtly shadows your path from a distance is revealing their hand. They are your designated threat. This simple act of observation tells you who is targeting you from the very start. Its common to see guardians mimic your path choices from the distance, if you catch this early you can choose a favorable path if forced to advance. (An unwanted scenario is when the guardian using this mirroring stops your from advancing completely, you will have to walk forward, so be quick witted and choose the less worst situation) Against a Hunter class this is often an easier task. A Hunter's primary weakness is their lack of mobility. By actively mirroring them and maintaining distance, you can completely deny them the opportunity to ever get in range. They will hardly force their way through your team's defensive lines unless they see a clear shot. Your proactive positioning, therefore, becomes a shield for your entire team, eliminating the Hunter as a threat before they can even fire their first arrow. Mirroring turns you from a passive observer into an active interrogator of the battlefield. Once you know who is coming for you, you can counter them. ────────────────────── Part 7: Positioning - The Golden Rules of the Arena Your position on the battlefield is more important than your healing rotation. Try to master these rules but break them when needed. Rule #1: Maintain the Equidistant Triangle Imagine a triangle connecting you and your two allies. Your ideal position is in the middle, roughly equidistant from both. This is your "home base." You are close enough to heal anyone at a moment's notice. They’re within range to rescue you if you get ambushed. This may seem like common sense, but in the heat of battle, it's the first thing to fall apart. As long as you maintain this formation, your chances of being isolated and stun-locked are drastically reduced. This requires disciplined teammates who understand the concept as well. Rule #2: The 5-Block Bubble Never, ever stand on top of your teammates. Most AoE (Area of Effect) skills have a radius of about 5 blocks. Expert players will salivate at the chance to catch two or more players in a single stun or burst of damage. Force yourself to be strict about maintaining this 5-block distance from each ally. The Exception: Be aware of enemy Guardians. They can close distances instantly and bring together two players who are further from each other if done well. If a Guardian is on the enemy team, anticipate their jump and extend your safety bubble to 7 blocks. Knowing when to shift this distance is a hallmark of a great player. Rule #3: Bushes are not for Living Let's be clear: hiding in a bush before a fight even starts is the worst thing you can do. The enemy team saw you go in and if they didn't, its not hard to guess. You are not being clever; you are isolating yourself and taking yourself out of the fight. Bushes have specific, tactical uses: Breaking line-of-sight to cancel a targeted spell. Dropping aggro from hunter pets. Making a sudden movement to break pursuit or bait a misstep. Use them for a split-second advantage, then get out. Do not camp in them. Just forget about bushes as a hiding spot altogether. Rule #4: The Calculus of Risk Your survival often comes down to simple math: one enemy is manageable, two is a potential death sentence. Certain class combinations are designed to lock you down and burst you. You must learn to recognize and position yourself against them. The unbreakable rule is this: Position yourself to be in the attack range of only ONE enemy at a time. Your positioning is a constant balancing act: stay equidistant from your allies while avoiding being equidistant from your enemies. Understand the threat level of different pairs: Guardian + Hunter: DEADLY. This is the ultimate kill combo. The Guardian's control locks you down completely for the Hunter's inescapable burst. Avoid this scenario at all costs. Guardian + Shadow: Manageable, but Dangerous. Both are close-range, which makes them easier to track. You may have an opportunity to hit both with a single AoE stun or get a helping hand from your team before the damage becomes fatal. Guardian + Mage: Manageable. A Mage's damage often takes longer to ramp up and your magic defense is in most cases high enough, giving you a slightly larger window to survive. Any other dual DPS combination: Consider them all potentially lethal and apply the same rules. If being in range of two enemies is unavoidable, you have two choices: Choose Your Poison: If you must risk it, make sure you are exposed to a "safer" combination that you know you can handle. Funnel the Threat: This is the high-level play. If two enemies are coming for you, reposition so they are both forced to attack you from the same direction. This creates a clear escape path behind you and allows a single well-aimed stun or defensive skill to control both threats simultaneously. Forcing them to walk over each other in the attempt to get to you is the kind of game control that can give your team a noticeable advantage. Rule #5: Know Your Terrain - Avoid the Dead Zones The arena is not just an open field; it is a landscape of kill boxes and escape routes. Your first task is to identify the "dead zones", the places where your options disappear. Every corner of the map is a potential death sentence. The moment you are forced to turn, you slow down, your path becomes utterly predictable, and you are trapped against the geometry. For that brief second it takes to walk past the wall, you are a sitting duck. Skilled enemies know this. They don't need to predict where you're going; the wall is doing it for them. Therefore, you must treat corners like poison. Your default path should cut across open space, giving you multiple escape vectors. Never hug a wall or run into a narrow corridor unless you have a specific, tactical reason. This leads to a high-level, counter-intuitive play: sometimes, it is safer to turn and face your pursuer than it is to run into a dead zone. A well-aimed stun to create a window to reposition through or past them is often a lower risk than getting trapped in a corner where you are guaranteed to die. A bad position is a death sentence; a risky confrontation is an opportunity. Rule #6: Always plan your scape route If things go bad, you need a safe route, this should heavily influence how you position yourself. Taking into account: Guardians wide area of control Hunters range Proximity to bushes Proximity to allies You cannot out plan a Mage's Blink or guess the invisible Shadow's location. Their mobility and invisibility are designed to bypass traditional positioning. Don't waste mental energy trying to map an escape route from a threat that can appear on top of you at will. Your defense against them is different: it relies on preemptive use of your defensive skills, maintaining your "5-Block Bubble" from your allies, and trusting your team's formation to react. Positioning comes from managing to understand the prevoius mentioned rules, finding a balance between them until naturally and intuitively your positioning starts to have an immense effect in your survavility, its hard to countuisly calculate the best placement with so many things to keep in mind. At first, you will have to think about them consciously. But with practice, these rules will fuse together. You will begin to feel a dangerous position before you can logically explain why it's bad. Your feet will naturally carry you to the safest spot without a second thought. This is when true mastery of positioning is achieved. It's when the rules disappear and only intuition remains. When your positioning becomes second nature, your mind is freed from the burden of self-preservation, allowing you to focus on what truly matters: controlling the battlefield and winning the game. ────────────────────── Part 8: Advanced Warfare - The Proactive Alchemist Once you've mastered positioning, you can begin to manipulate the enemy team. Visual Presence: Be Seen, Be a Threat A hidden Alchemist is a useless Alchemist. When your team engages, you must be visible. Your presence alone divides the enemy's attention. An enemy DPS deciding whether to attack your ally or you is an enemy whose damage and focus are split. Taunt with Your Position: Intentionally move to a place where you are a tempting, but risky, target. This can pull one or two enemies out of formation, creating an opening for your team. The 70% Health Bait: As mentioned before, intentionally staying below full health while remaining in a safe, but visible, position is a powerful psychological tool. An enemy might get greedy and try to finish you, overextending right into your team's trap. This is comes handy when the battle is tied and someone needs to break the stalemate. Show your threat: Even when you are out of skills, you should be proactive and approach the combat zone. A retreating Alchemist is an open book. You are broadcasting a clear message to the enemy team: "I am helpless. My skills are down. Kill my allies now." This is a green light for them to unleash everything they have, knowing you cannot respond effectively. Be disciplined, when you are out of skills, stay visible. Stay close to the fight. Your confident positioning creates crippling doubt in the enemy's mind. They see you, and they hesitate. "Does he have his shield? Is this a bait? I should wait for my full combo to be ready to guarantee the kill?". By the time they finally decide to commit, you are ready for them. Aggressive Positioning: Bending the Battle Line When playing with aggressive allies who dive deep, you must be even bolder. Your place isn't in the backline; it's flanking the enemy or even carefully stepping through them. This high-risk, high-reward playstyle can shatter an enemy's strategy. Body-Block and Distract: By getting in the middle of their lines, you can disrupt enemy targeting and force them to hit you with skills intended to finish your DPS. You must remember, you have more defense than your allies, don't be afraid to step over your enemies when half of the attacks were already unleashed. The possibilities of positioning are more when you know when your enemies cannot deal deadly damage to you and use this to your advantage to distribute some of the damage meant to your allies. Force Mistakes: Your unconventional position can cause panic, leading enemies to waste their skills or crowd themselves in a disadvantageous position. Force direction changes: AoE skills are dangerous. It's often said “The best defense it's a good offense" your enemies know this, but by positioning on a different angle than your allies the risk of your dps accidentally falling on AoE skills is lower. Rotate your position: Whether you are going left to right, or right to left, when you have aggressive teammates, chances are that they will get deep in enemy lines. This is the moment you have to go even deeper. The positions rotated and their backs are now your team front. Make sure to dynamically swap positions when needed. Battle Awareness: Your Stun is a Weapon Your skills are more than just heals and shields. They are tools of control. Timing is Everything: Use your Shield not before an engagement, but during it to apply shackles. Use your Main Heal not just to restore health, but to cleanse a stun or damage-over-time effect after it's been applied. Interrupt the Enemy: Sometimes, the best way to save your low-health ally is not to heal them, but to stun the enemy before they can land the finishing hit. Trust that your allies will have a movement skill to get away and they only need a small window to run or to actually start a counter attack. Close the Combo Gap: Pay attention to your allies' crowd control. Time your own stuns to land just as theirs are wearing off, creating a longer, inescapable chain. Target their alchemist: Stalemates between teams with good healers are hard to break. In this scenario alchemists will target each other to interrupt a healing at a critical moment. The better Alchemist will be the one that manages to win the match with a well placed stun. Free the path: Pay attention to your allies objectives, more than often they will have to walk through difficult areas, such as an area protected by a guardian. Time your stuns so your ally can slip past the guardian without being interrupted. Your survivability depends on your allies, but their ability to win depends on you. Be the Alchemist that doesn't just heal, but makes plays. ────────────────────── Part 9: The Final Piece - Synergy and Resilience Ultimately, your mastery is incomplete until you understand your own team. Different compositions demand different strategies. With Mages: They are fast and relentless. They will blink across the map and expect you to be right there with them. Your positioning must be predictive and aggressive, ready to support them the moment they engage deep in enemy territory. With Guardians: Your Guardian is the playmaker who initiates on their terms. Your job is to enable them. Stay behind them, be patient, and let them set the trap. Getting ahead of your Guardian can spoil their surprise and ruin the entire engagement. With Hunters: They fight on a rhythm of engage and retreat. Understand this style and flow. Support their advance and cover their retreat. Don't overextend trying to chase a fight they've already disengaged from. With a Shadow: A Shadow is a lone wolf. You will not follow an invisible ally into the unknown. Your job is to play a smart 2v3 with your other visible teammate. A good Shadow is self-sufficient in their opener, but keep an eye on their target's location. When your Shadow is invisible, remember: for all intents and purposes, you are outnumbered. Play accordingly. The Alchemist's Burden Synergy is a two-way street. You can play your part perfectly, but you must also hope your allies play their roles well. Choose your team carefully. There's an old saying in the arena: when you win, it's thanks to the DPS; when you lose, it's the healer's fault. This is often a joke, but it holds a grain of bitter truth for many. This is why an Alchemist requires resilience. Focus on your role. Play by these rules and fulfill your part with the utmost precision. If a battle goes wrong despite your perfect execution, you have done your job. Don't stress too much. Master the craft, control the fight, and above all, enjoy the game.
-
Greetings! Introducing a new guild on the block - Absalom! The guild is named after my rather notorious warlock from Warspear-Sapphire. I am the founder of Sithlords on that server, which is the best MC guild to this day. I stopped playing warspear quite a few years ago, but have somewhat recently begun spending a lot of time in Skylore. I aim to make this guild a great and notorious guild similar to how Sithlords was run in warspear (if any of you are familiar with that). We will have an active discord, and eventually cause havoc on the server, farming bosses, spamming arena, and overall having a great time irritating the neighbors. Drop me a line in game @PopRevolt or come say hi on our discord channel which can be found at the bottom of the guild's official website: https://www.absalomguild.com/ Hope to see some early adopters who have faith in my vision and leadership abilities, as I am looking for some assistants to collaborate with and make this guild the best it can be! Cheers!
-
I know a few balance changes are going to be implemented in the next update.. But i want to give my thoughts just in case. Before the last update, the alchemist class was perfectly balanced in terms of overall contribution at Arena and it also had different playstyles related to the skills being used. Normally the skills used for arena would be as follow: Even though 1 skill was avaliable to be exchangeable due to the high meta importance of the other ones, it still forced alchemists to adopt different playstyles to make use of it. Such thing was possible because those skills were similar in terms of importance or difficulty to use: Thanks to that, the alchemist became a class fun to use, master or engage with. But that dissapeared after the last update. The issue: -Potion Making skill The balance of the four skills shown before was broken, Potion making skill became a high value option, so much that made the other ones worthless to use. It gives a safeguard if HP goes low, its a range skill, can heal from 1% to 100% with just one tap, they cant be destroyed, and they have low CD. It has no counterside at all. So this set of skill became the META option for the alchemist: Besides the disruption in the balance between the skills that killed the diversity of playstyles. There was also a disruption in the balance of classes. The alchemist class wasnt one that had survability issues, in fact it was one of the classes with the highest amount of it. So buffing the potion making skill gave additional instant heal to the class, and it was absolutely unnecesary. Certainly the skill has to be nerfed or be completely deleted from the game. My suggestions/options are: 1- Add a Slow/speed Debuff of 10 seconds to the caster each time it is used. (Speed its a key factor to the survability of the alchemist, so it balances the cost/benefit ratio) 2- Allow the potion entities to be deleted by scrolls 3- Give a higher cooldown, at least 30 seconds 4- Make the skill to be close range only, so the alchemist can only drop potions at 5 meters around his character. 5- Revamp the skill: Drops a huge cauldron of potion at the selected area that gives defense and gives health periodically to the players around it every 5 seconds. ----------------------------------------------------------------------------------- I also want to give another suggestion: This skill has instant root of 2 seconds, and gives root again after 5 seconds. But no one ever will happen to stay in it for more than 5 seconds, this makes the innate effect of the skill to be completelly useless. Reduce the timer from 5 sec to 3 seconds. ------------------------------------------------------------------------------------ And finally just a request to fix a typo that has been around for more than half a year already: Haste and speed up, has been incremented from 6 seconds to 10 seconds many months ago, but it was never corrected
-
Hello all, newer player here, roughly been on for about a month(?) now, maining a Nox Mage (Lvl14)...just want some general tips, advice, etc if anyone could offer? Couple key points; tips for arena? Holy hell, why is it so hard to win? Skillwise I Godstomp every player I've encountered, but it just doesn't matter I get wrecked by bads. Also, is there a efficient way to level up faster WITHOUT spending money in their greedy and overpriced shop?
-
Un nouveau crédo sur Skylore, pour la communauté française. Nous recrutons des joueurs motivés et organisons des tirages mensuels pour tenter de gagner des diamants. Pour l’instant je suis le seul membre actif mais les inscriptions sont ouvert. La condition est de rester franc et d’avoir une activité journalière sur Skylore. Cordialement discord: https://discord.gg/PYbY7zaXAA
-
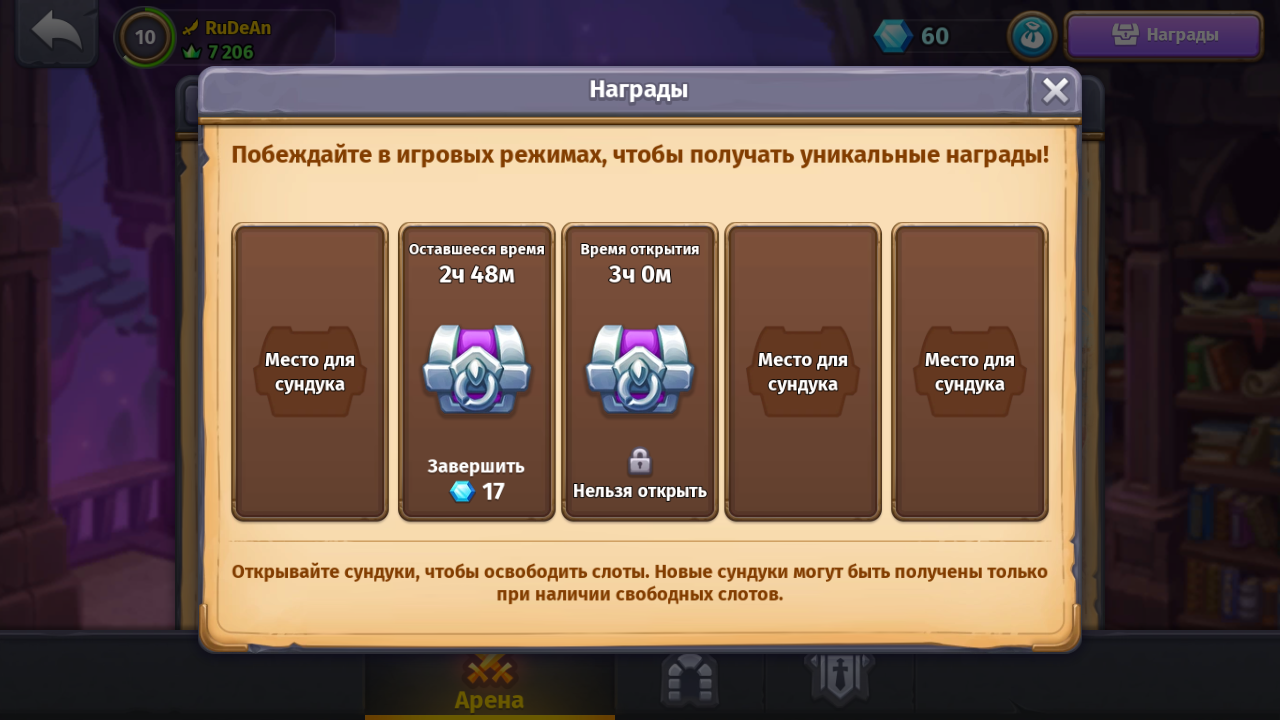
A big complaint I have heard from Players is how useless the Chest rewards from the arena are. A great way to assist with this is the ability for players to fuse Arena chests.This wouldn't only allow for better rewards but also help increase the amount of time player spend online to further regenerate Vigor and assist with player progression. The added gear will help high level player create multiple item set for different combat sitnations (ie.pvp, raids, farming ) Another suggestion would be to create a queue list so players can queue up with a specific class or classes. Me personally, i find it difficult when playing a guardian and than get queued with 1-2 other guardians 4 games in a row. This would be a huge eases of life for players.
-
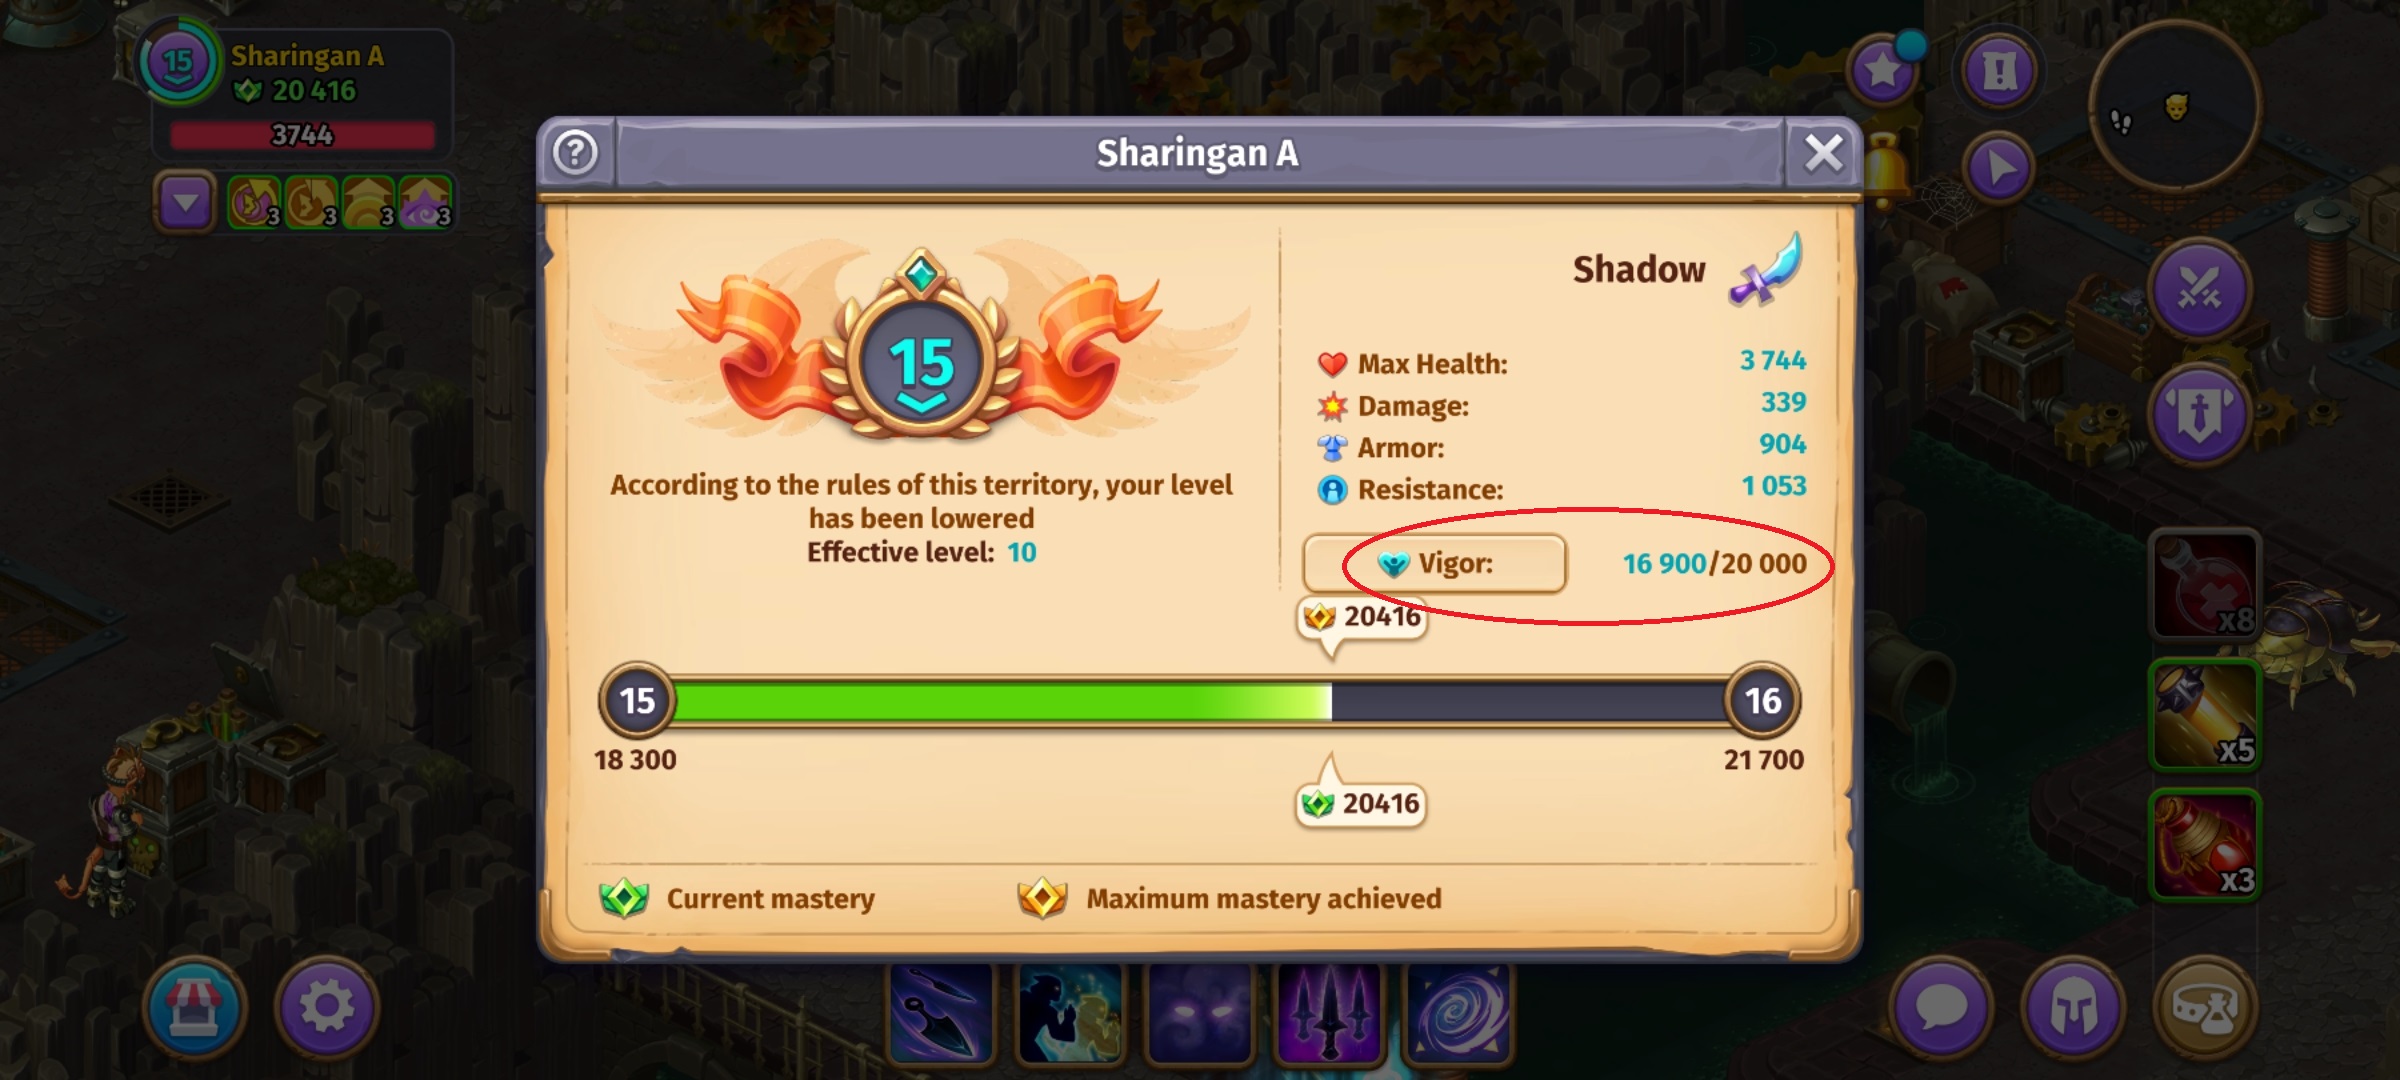
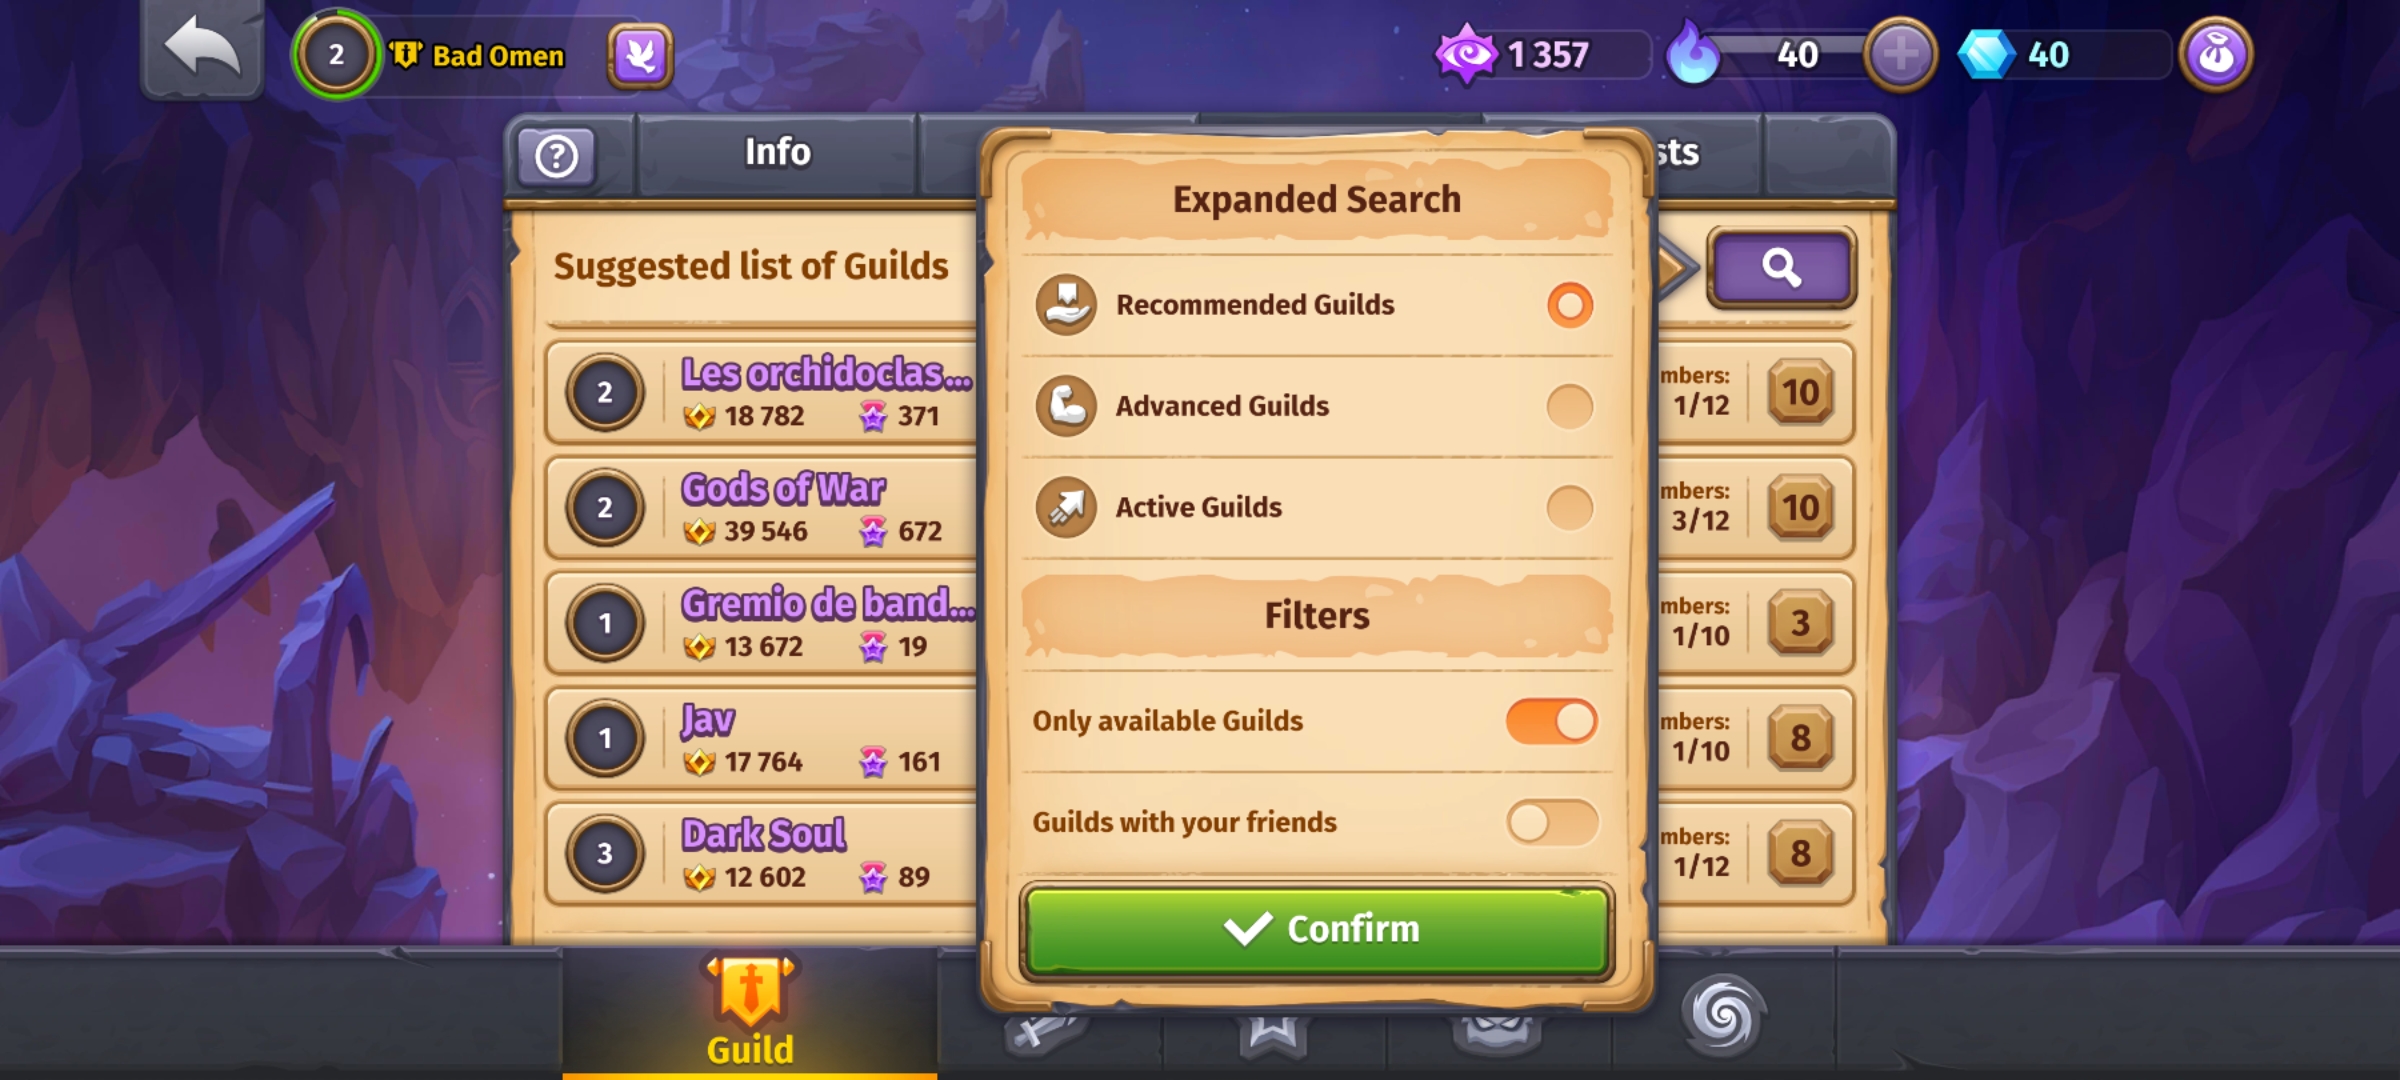
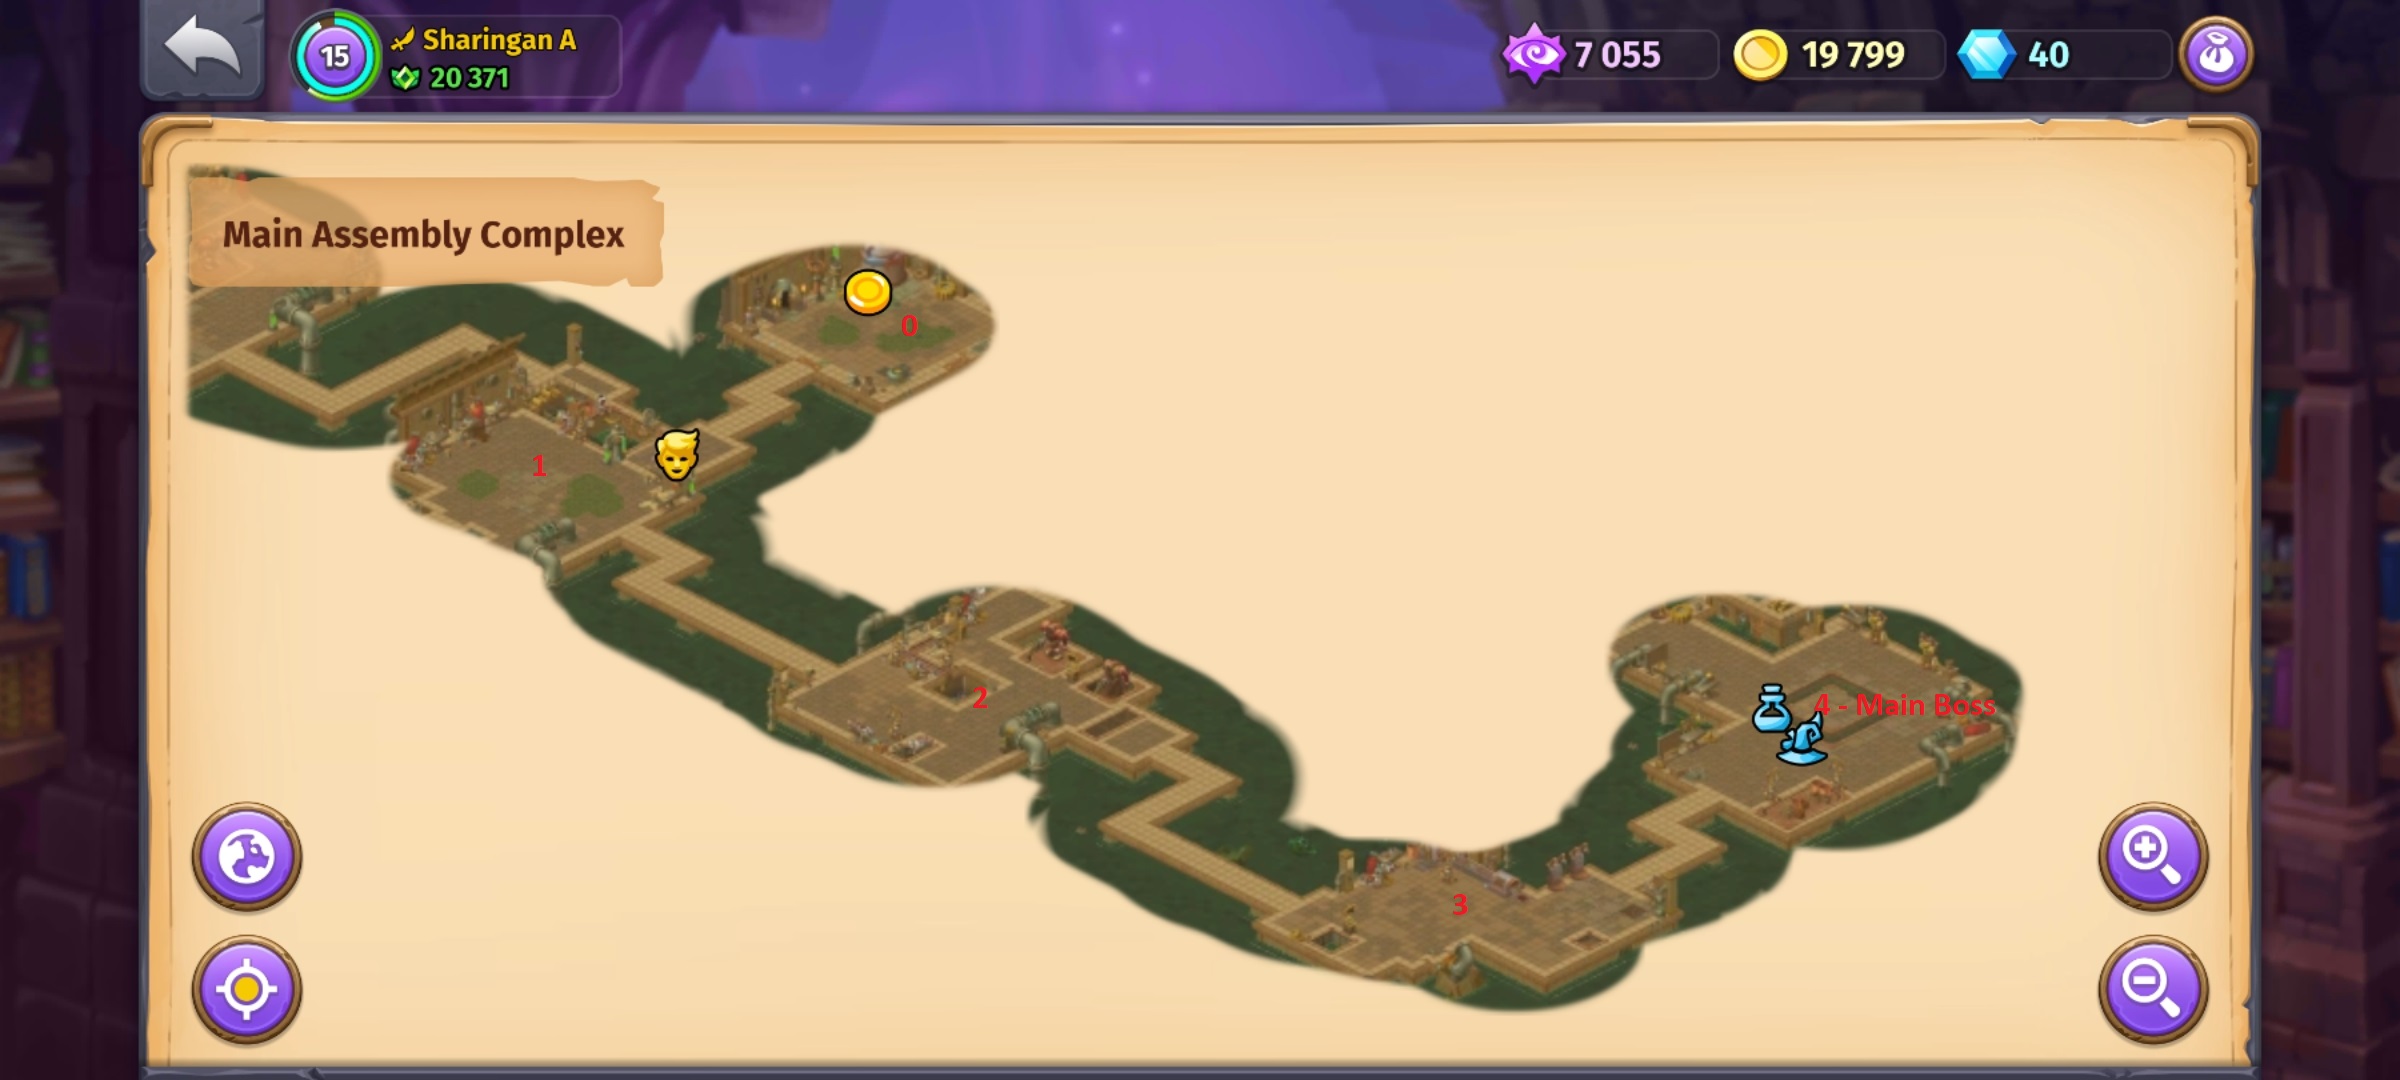
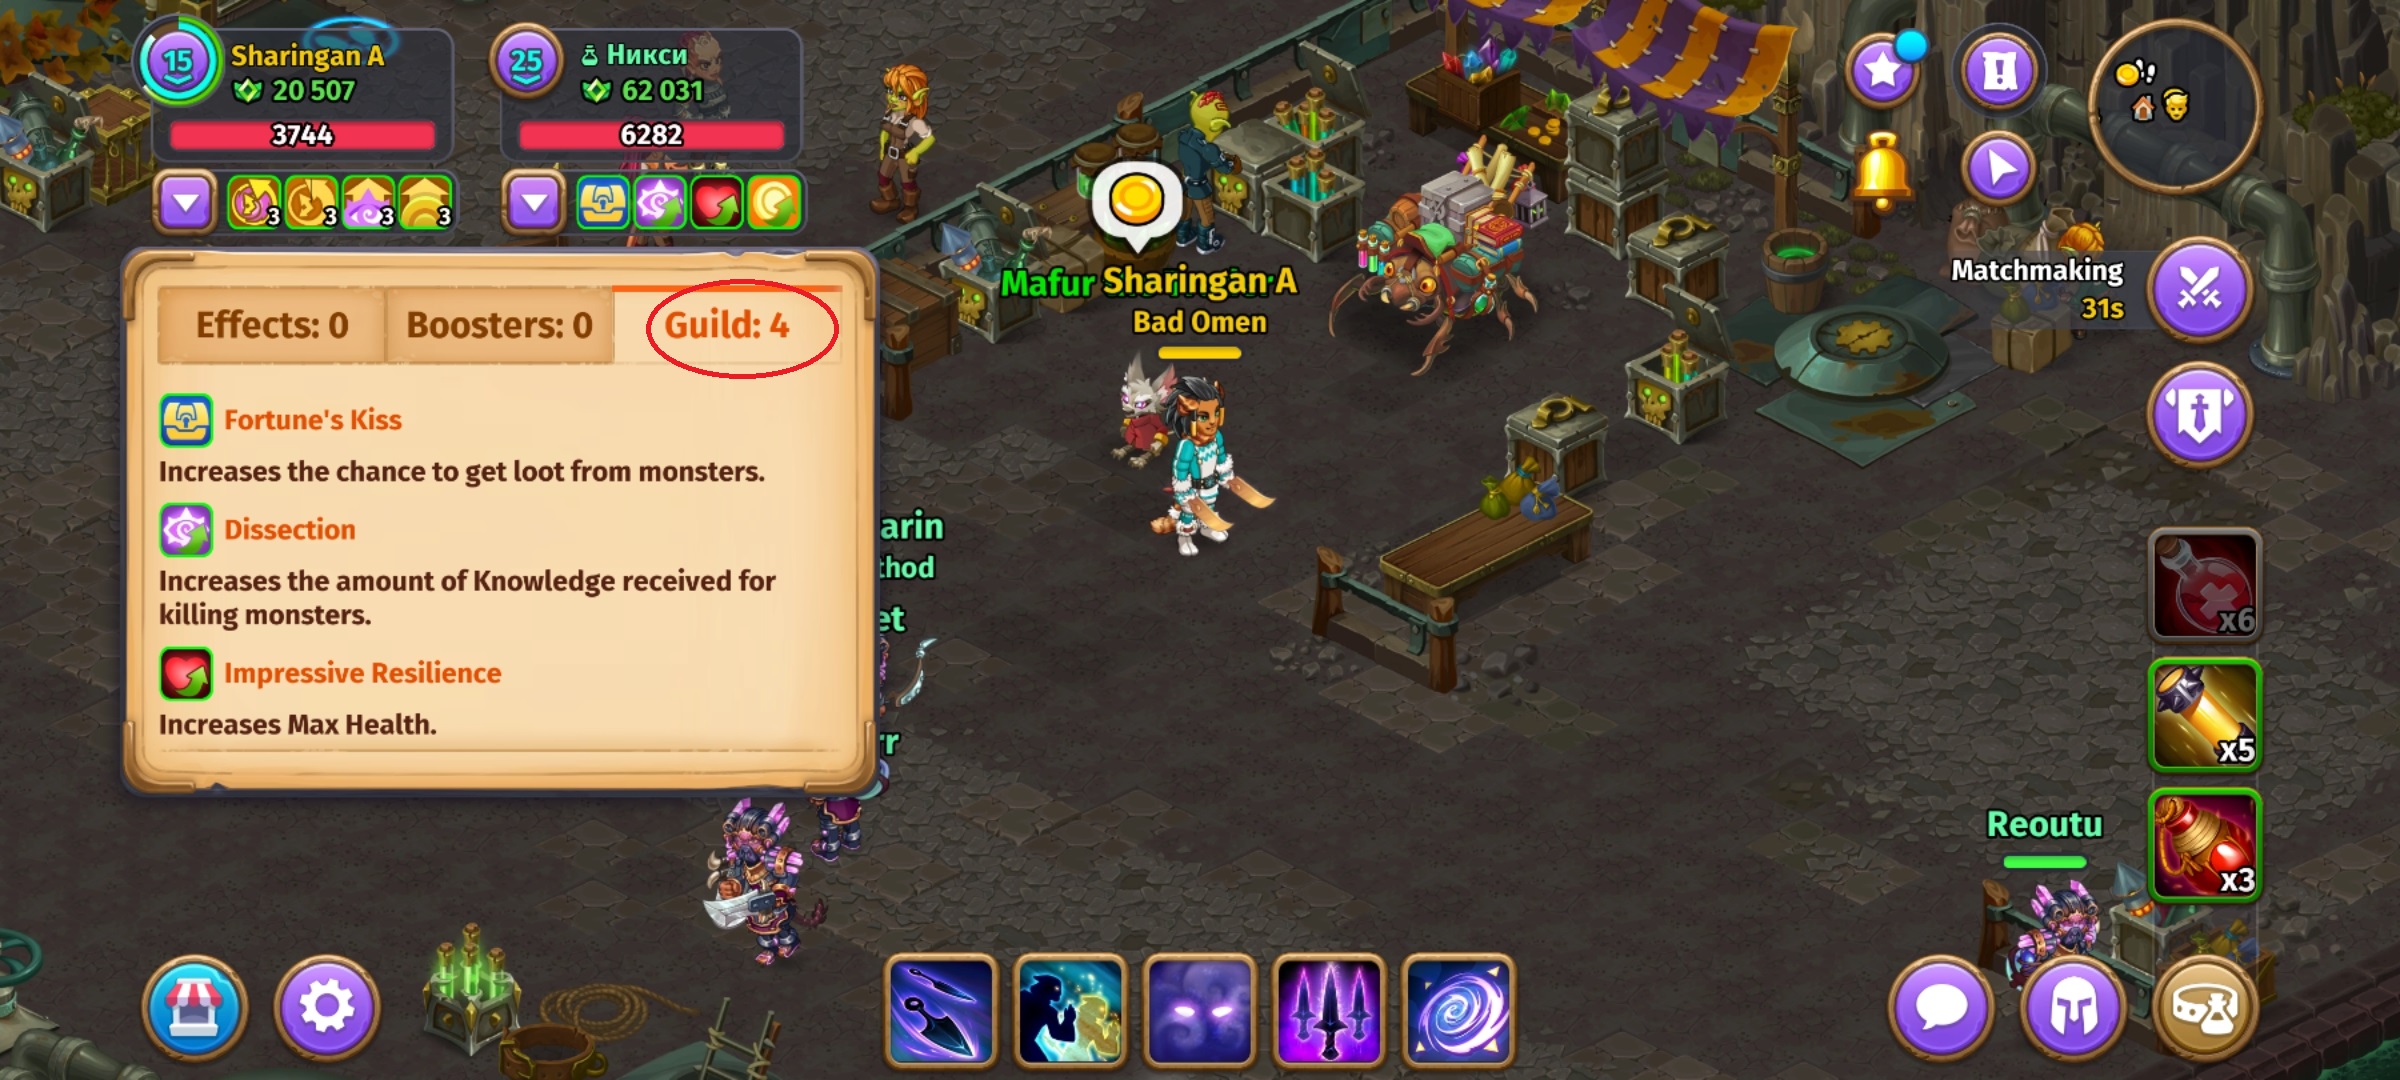
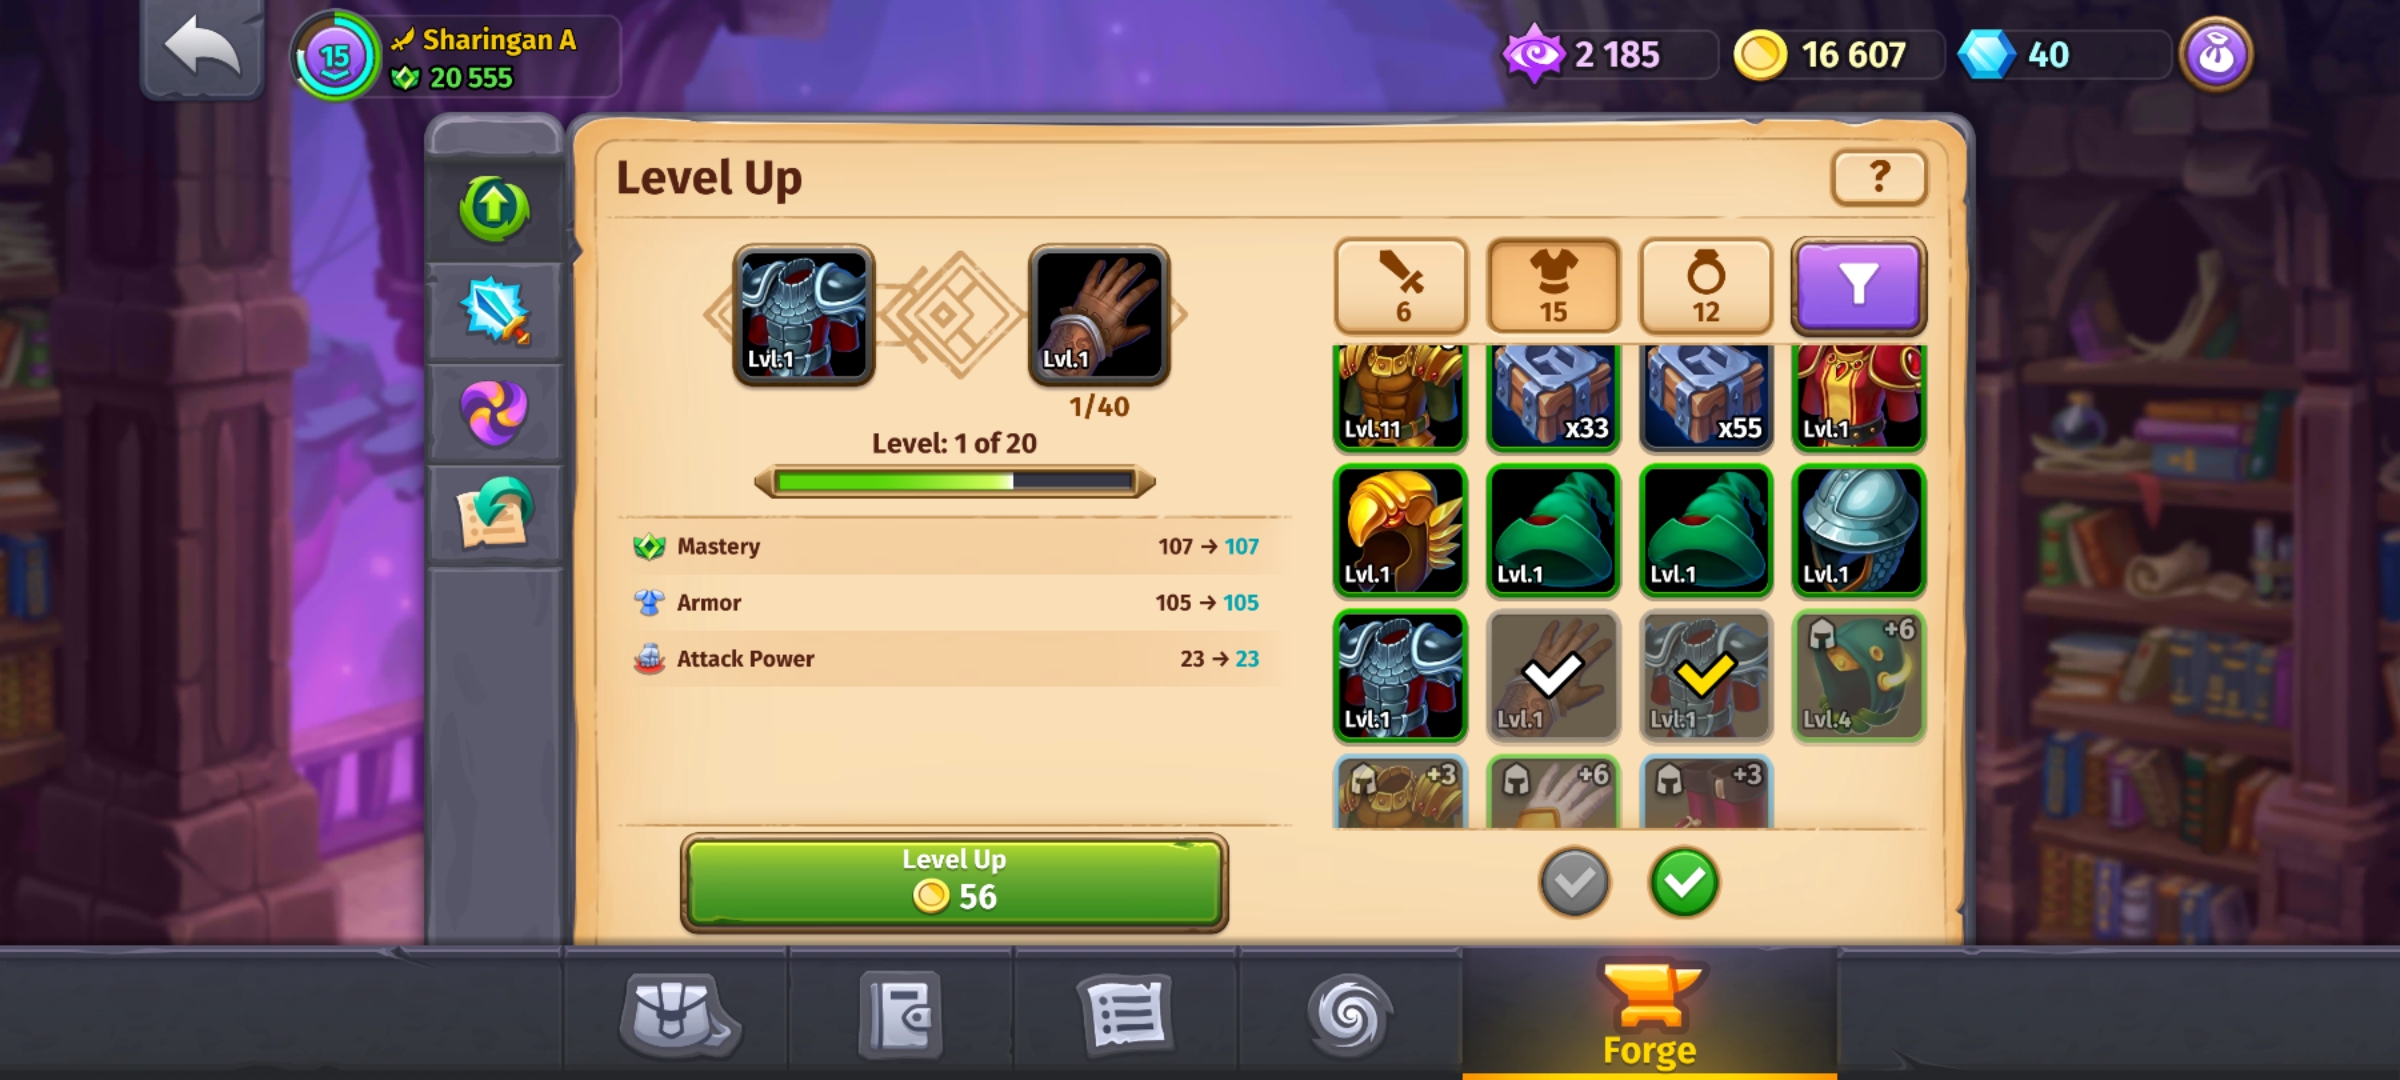
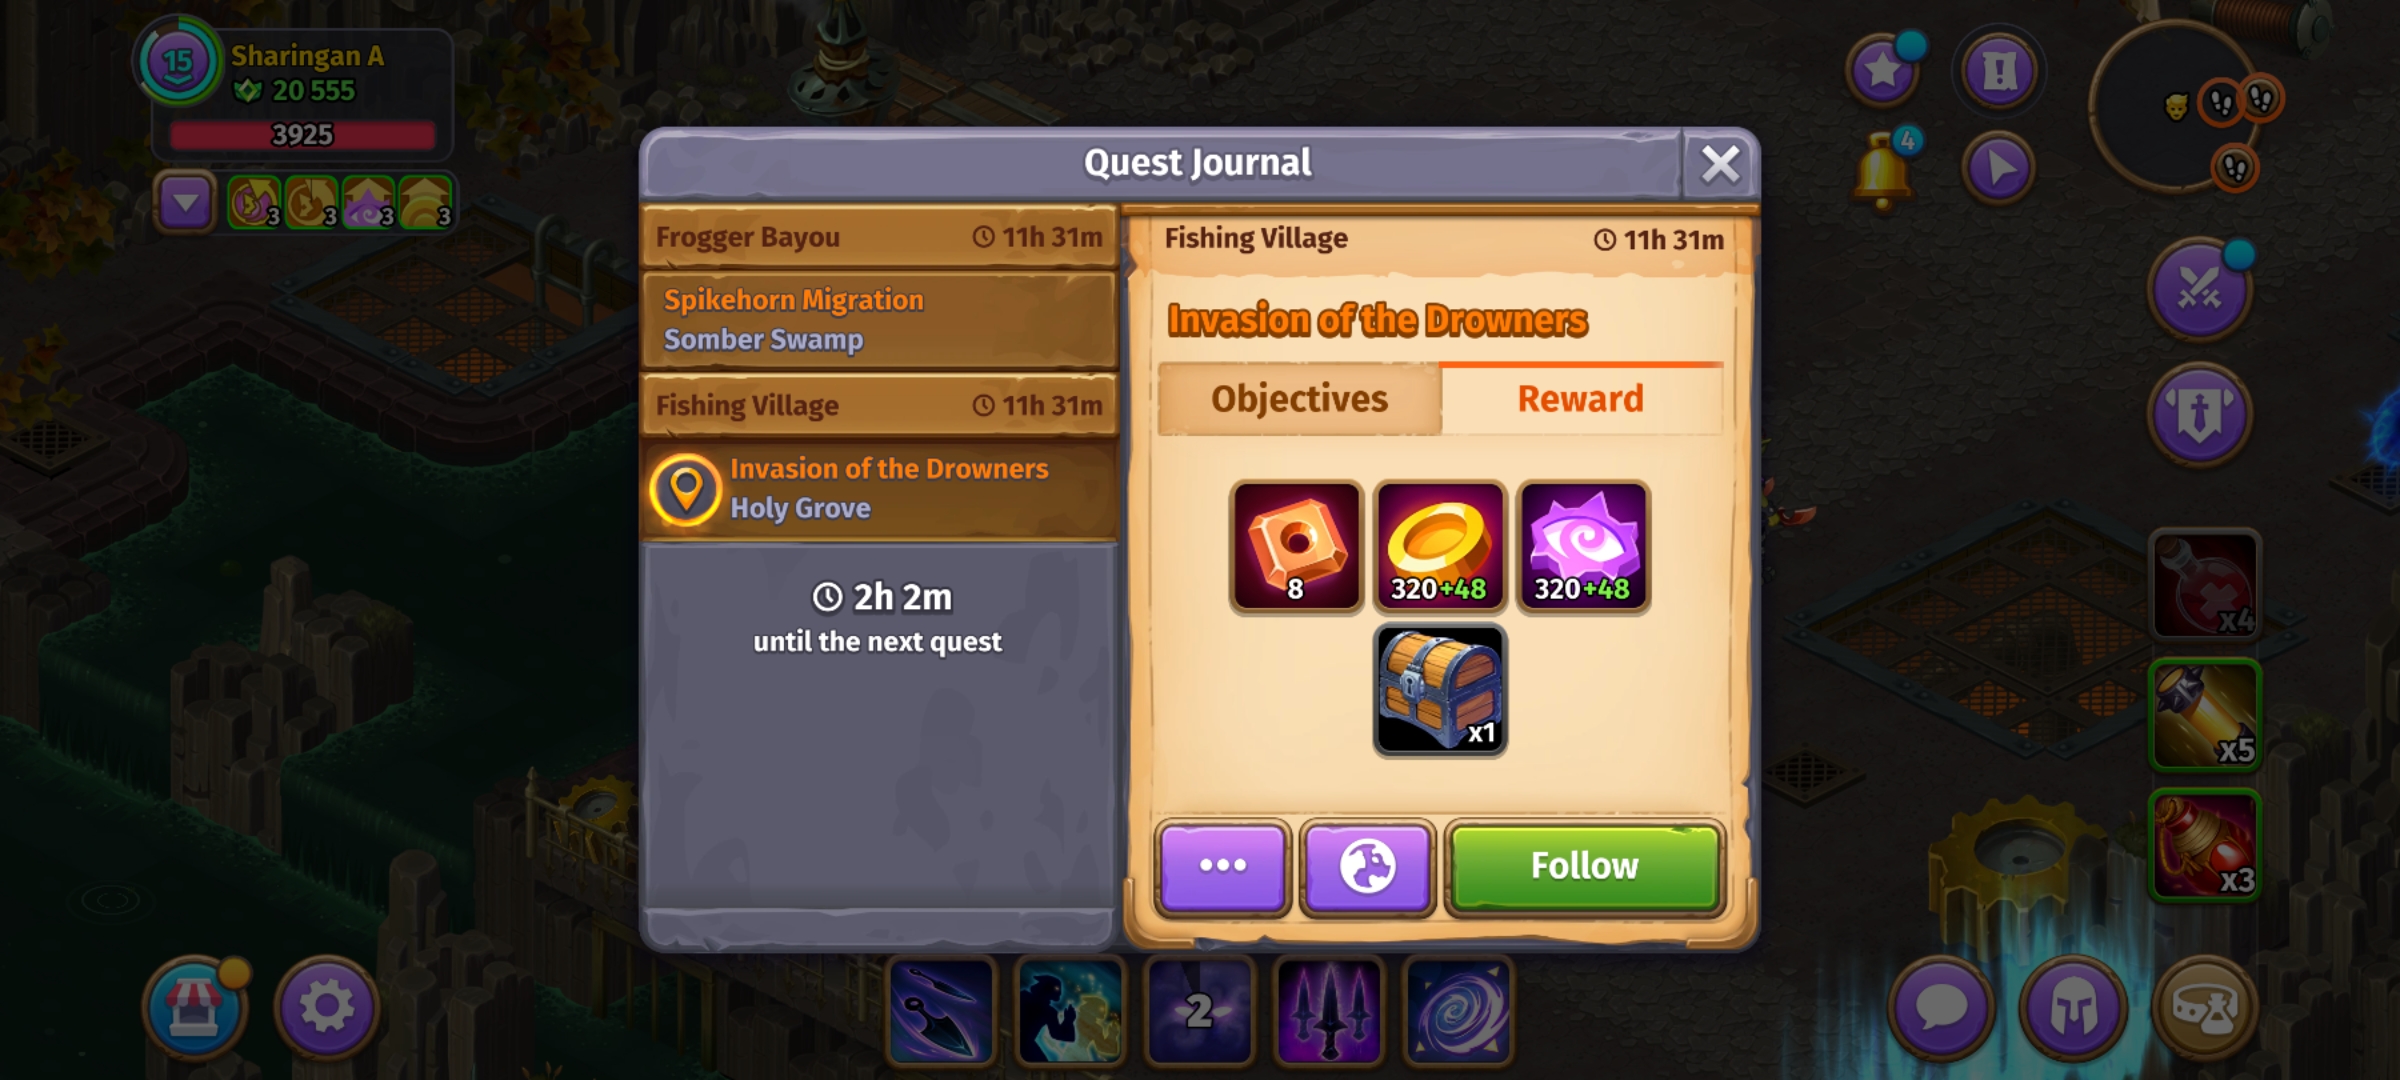
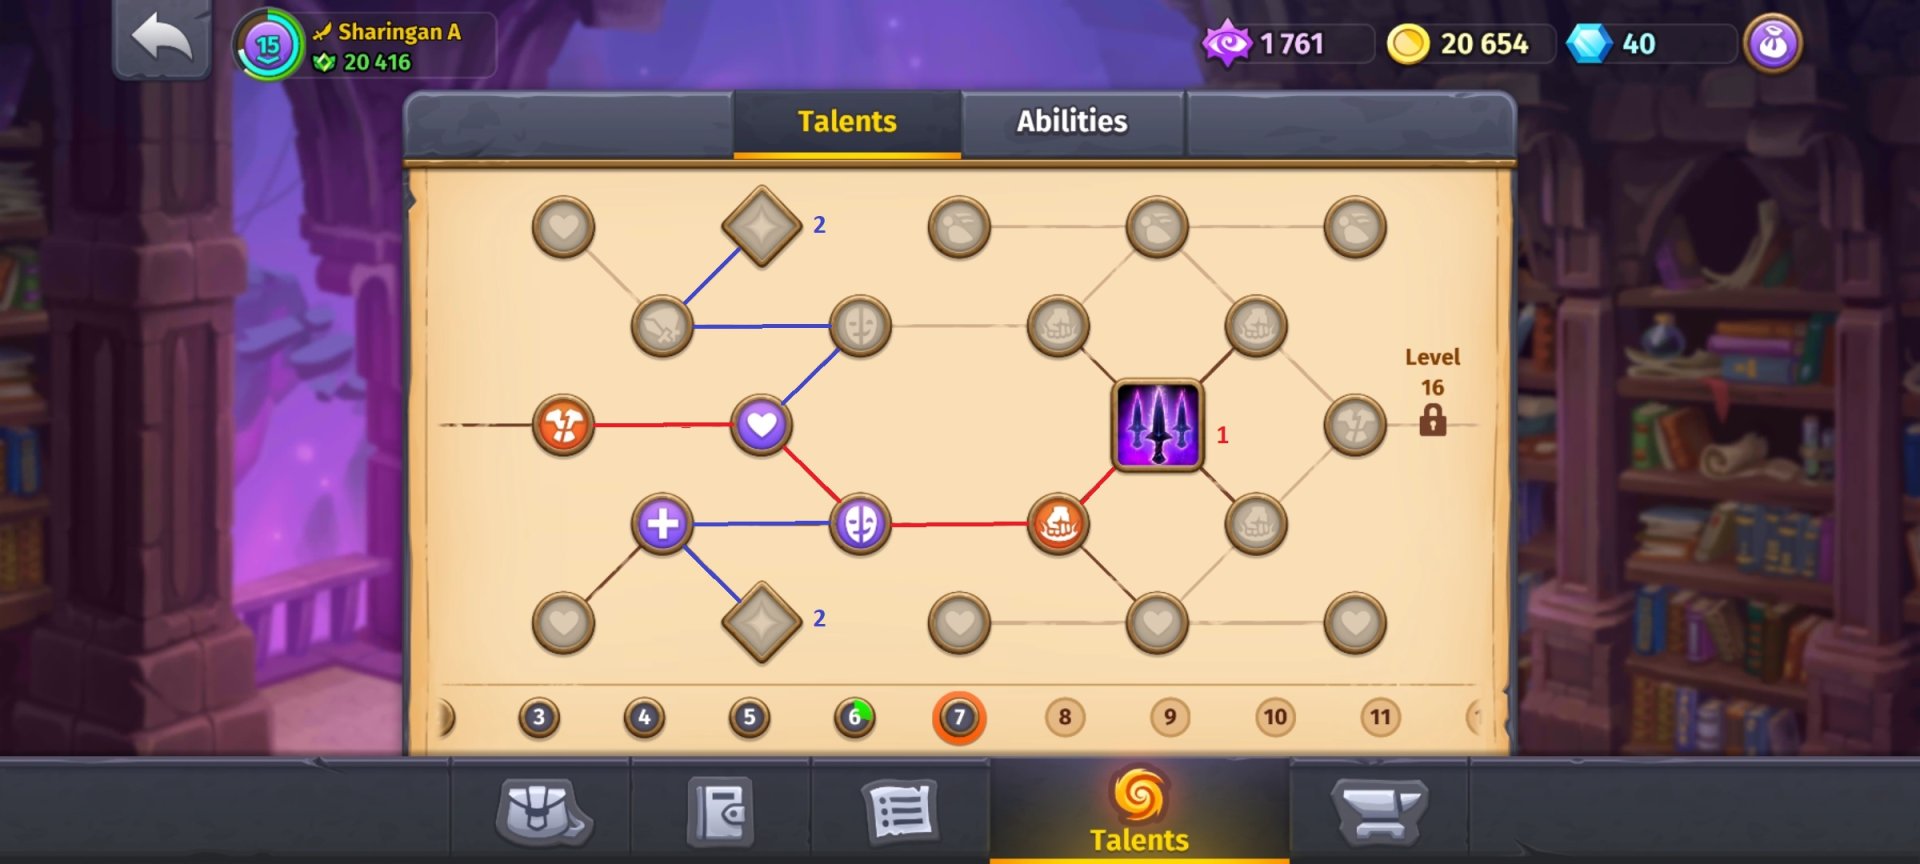
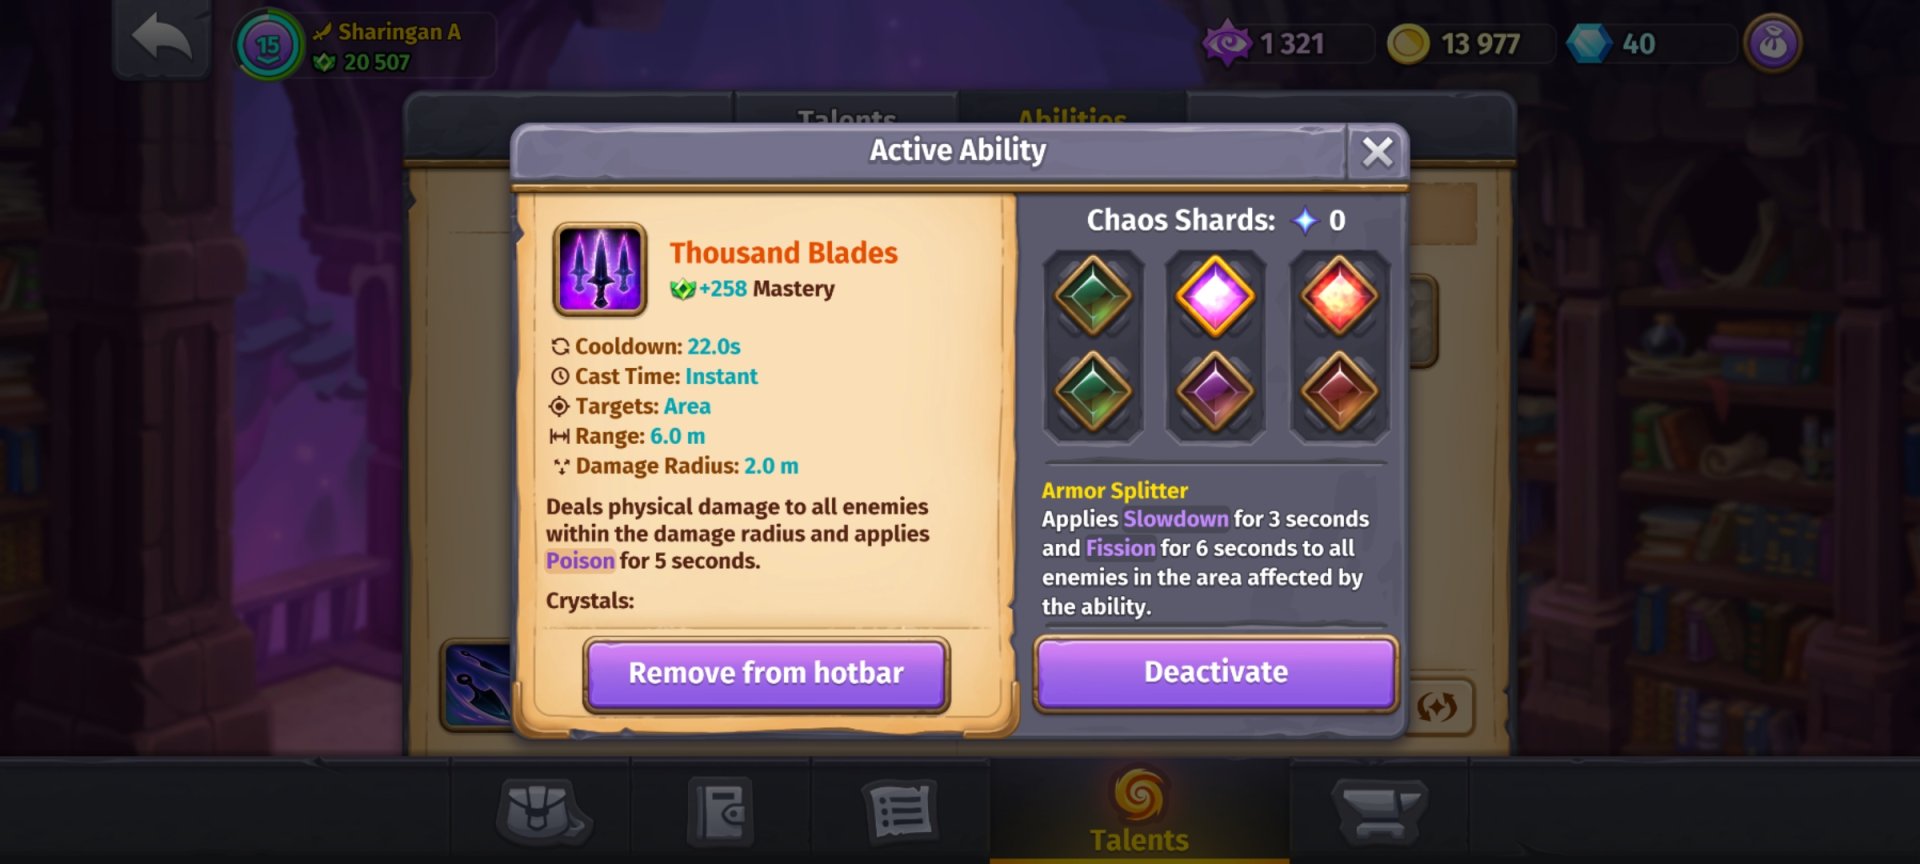
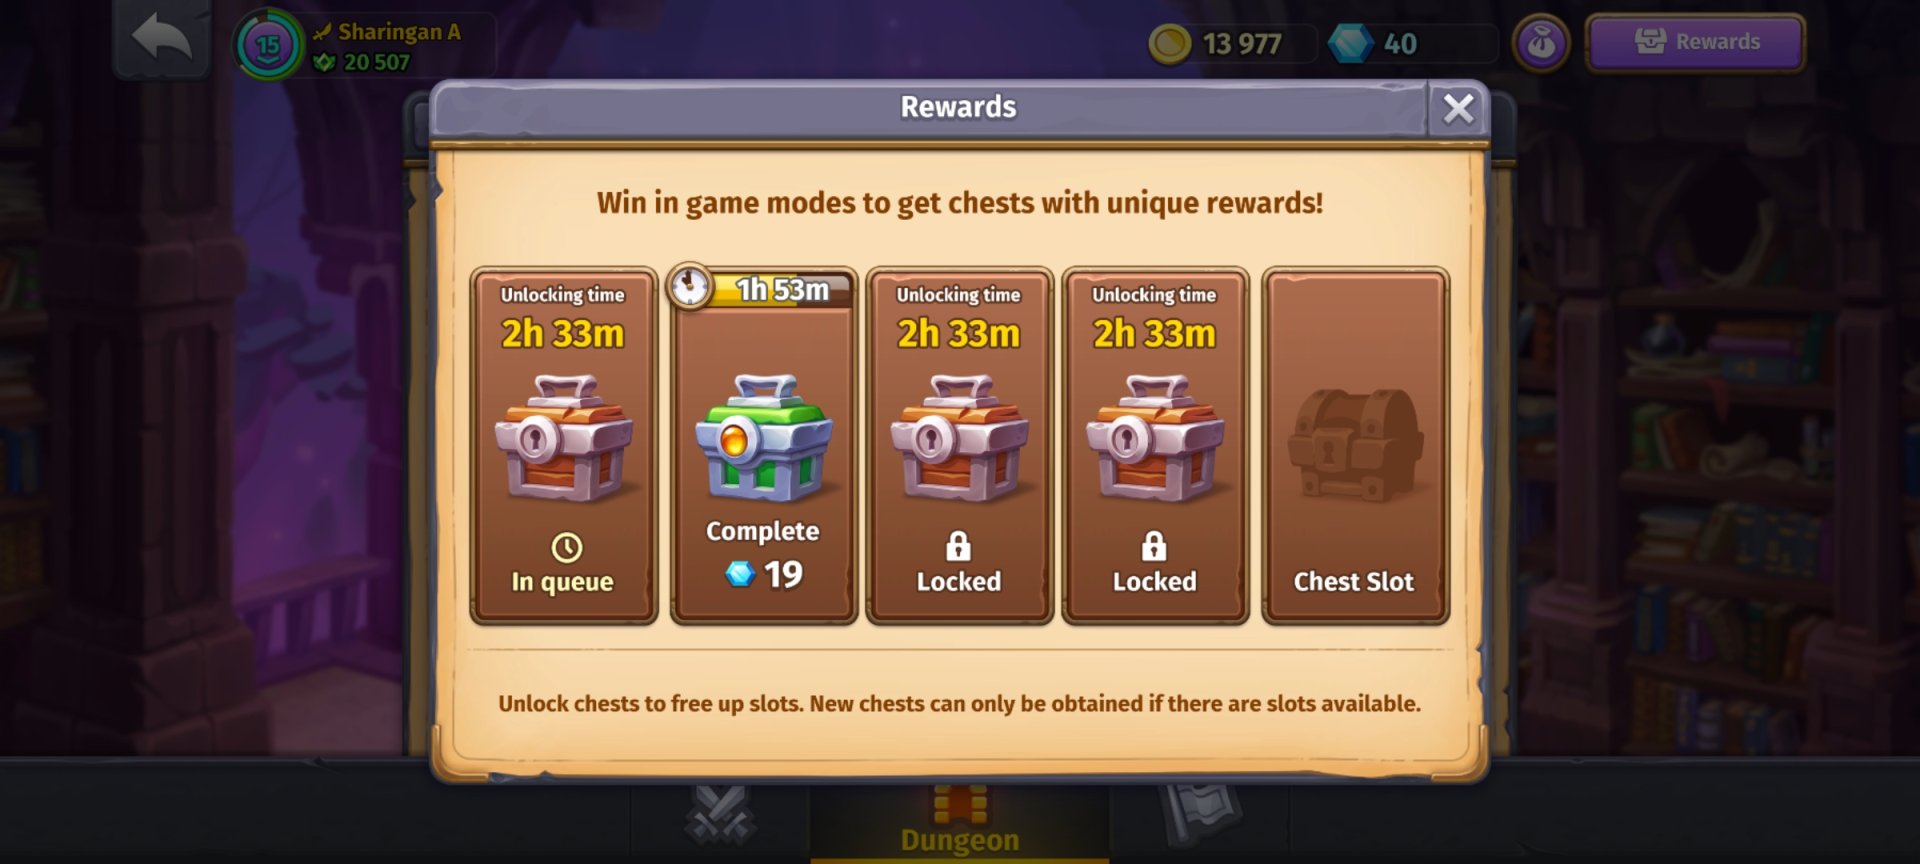
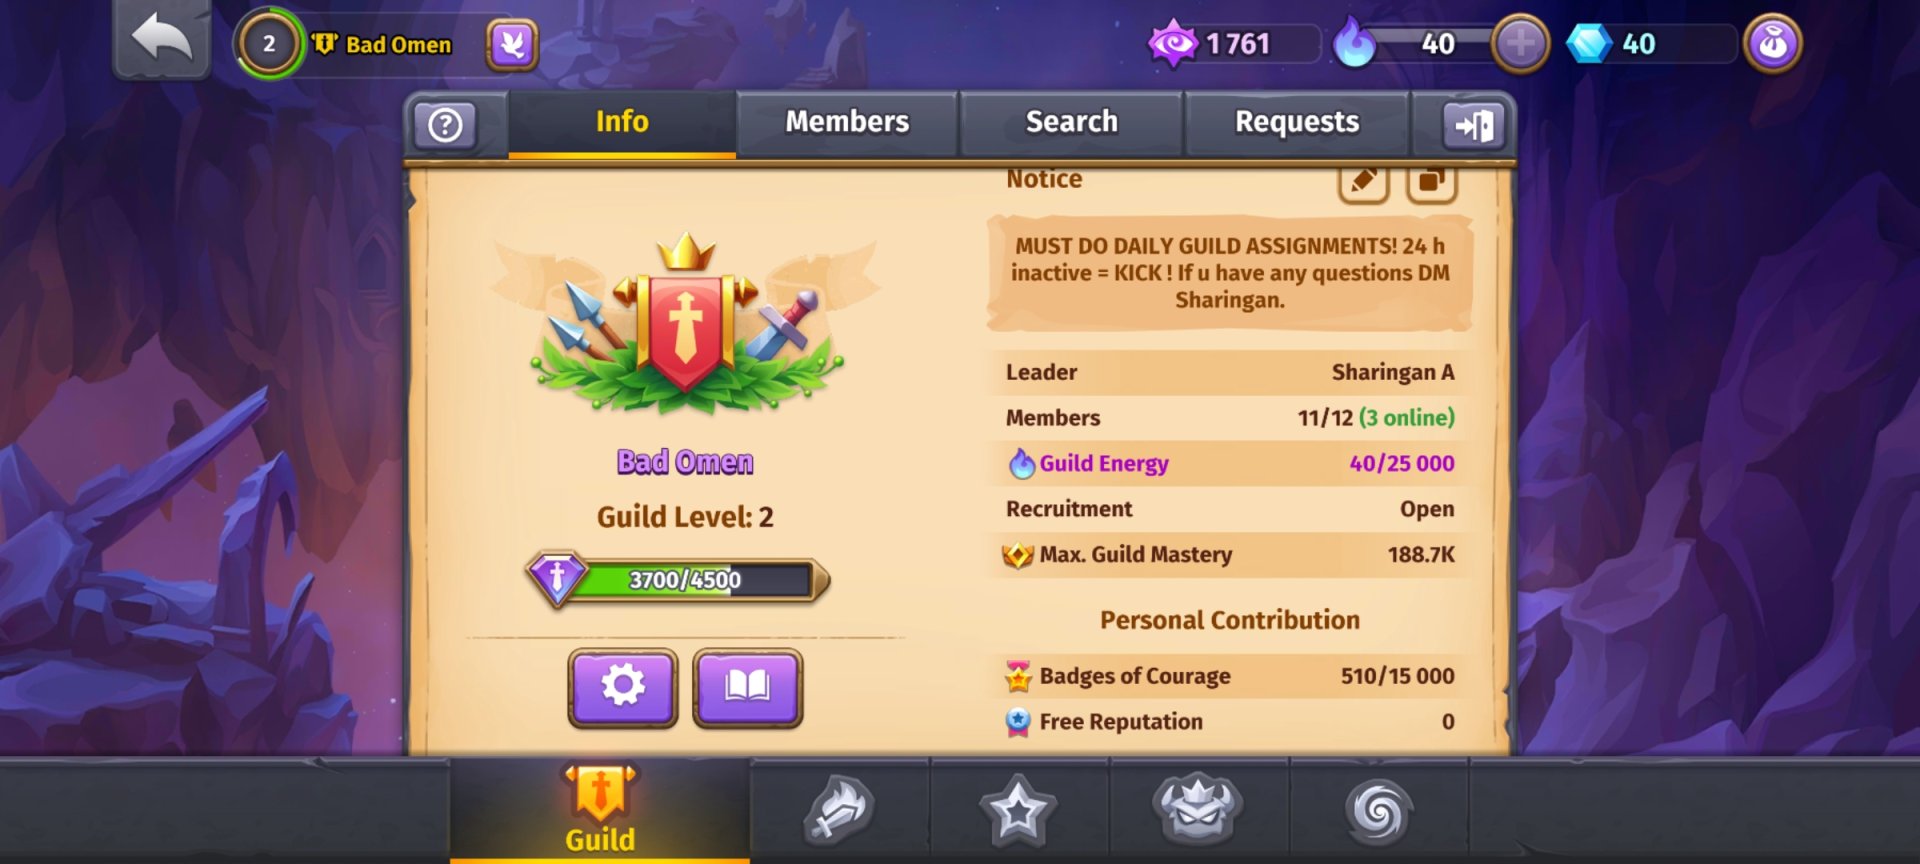
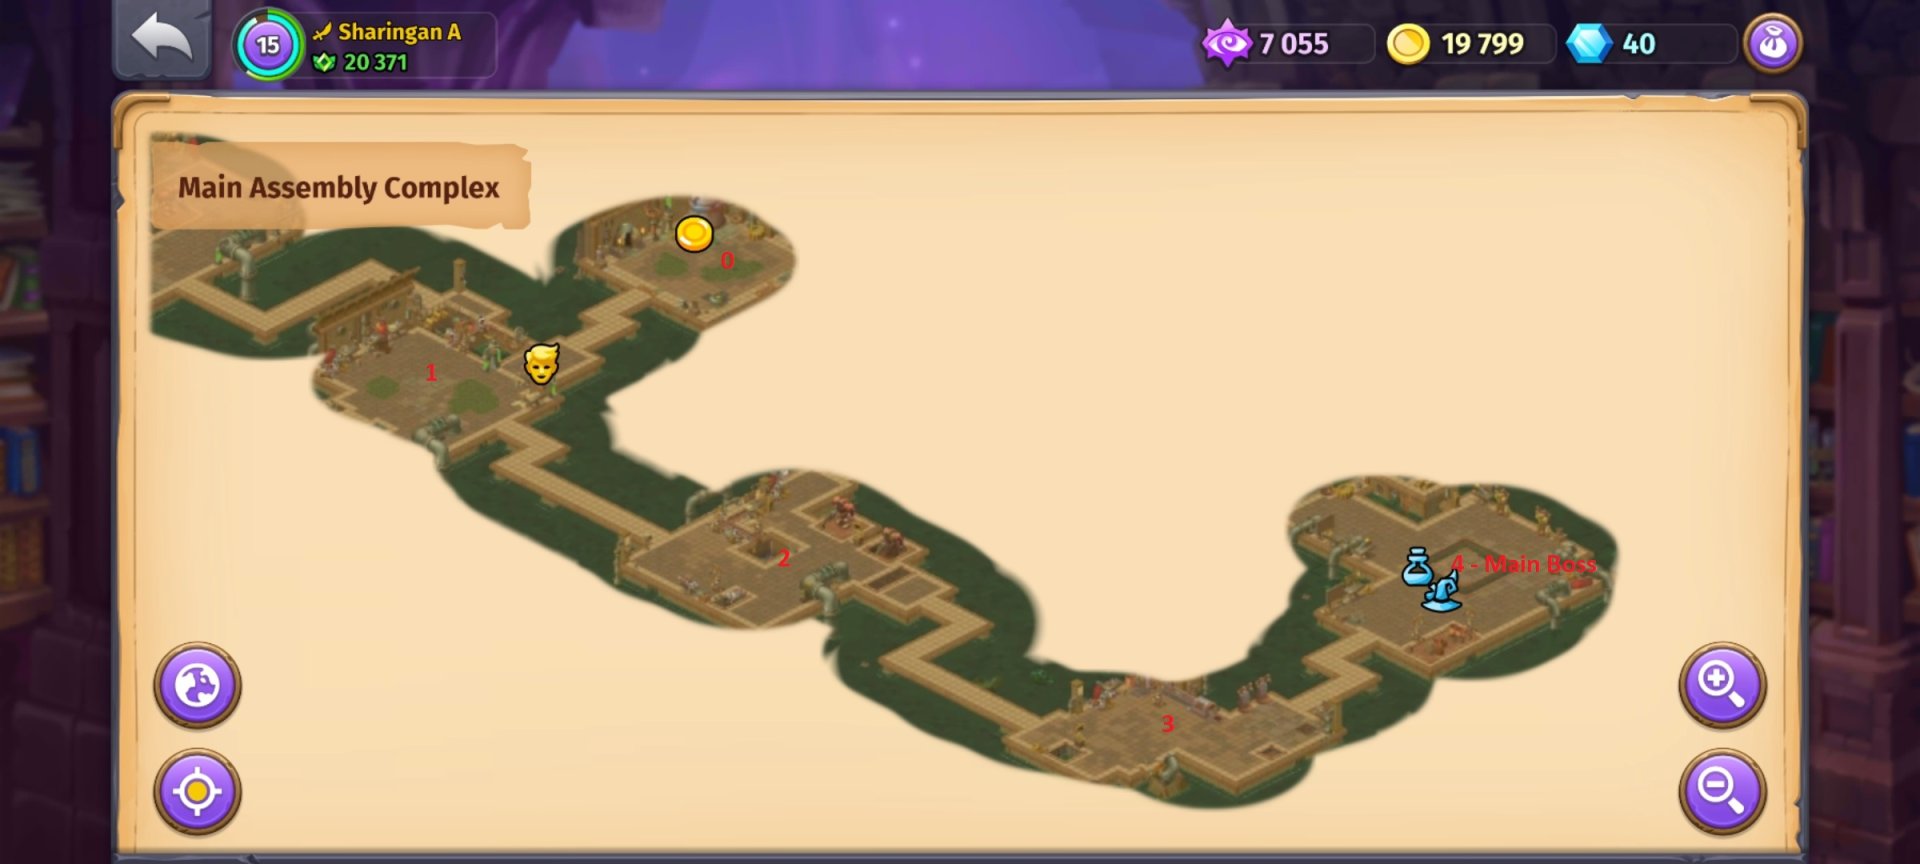
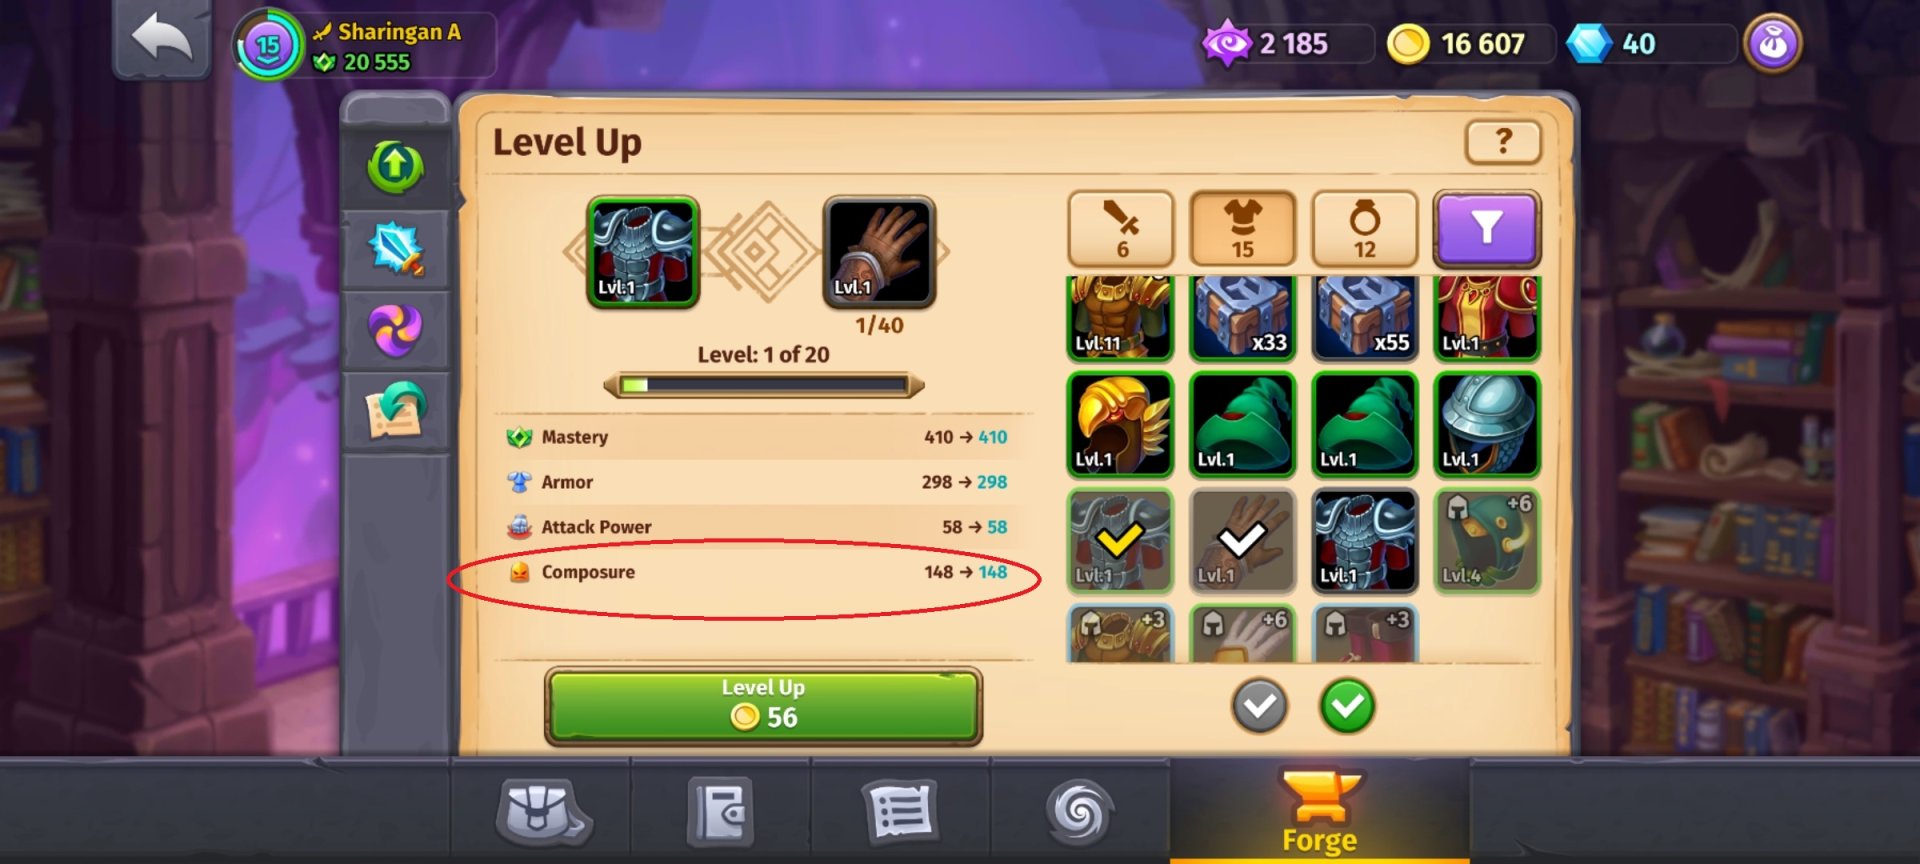
Hello , I've been playing Skylore online for a while now and I have about 300 in-game hours spread around all my charcters so here are the tips and tricks I learned throughout my journey that will prevent you from doing the same mistakes I did in the beggining and hopefully help you progress faster ! How to level up in the early game (Properly) - At first it looks like an easy task that doesn't need much explaining , but you you are wrong! The game doesn't forgive mistakes in the early game and If you don't follow these tips you will waste a lot of time , resources! It will considerably slow your progression leaving you to wonder what to do next and constantly have the feeling of being stuck on the same level for ages. 1. Do not upgrade your common gear ! The common gear you get from the begging of the game will be used only for a short amount of time after which you will swap it for uncommon gear which you can get from arena or dungeon chests. These Uncommon gear pieces give a bonus stat that can be either: - Resilience for PvP (arena and open world) - Composure for PvE (extra damage on weaker mobs) - Might for PvE ( extra damage on Bosses) BONUS TIP: Its easy to complete arena in the first leagues (4-9 , 10-13) and its the fastest way to get uncommon gear pieces thats why i suggest you to start doing it as soon as you get access. 2. Talent Tree progression and chaos shards. On the talent page the most important thing to get first is the skill , secondly the chaos shards and after that everything else ! Chaos Shards are used to upgrade abilities , which make your charcter a lot stronger (Both for PvP and PvE). 3. Do dungeons to get more KNOWLEDGE ! Knowledge is an essential resource in the game , because it is used to gain permanent mastery by learning talents such as new abilities , passives , chaos shards and its also used for enchancing , reforging and combining gear pieces. To boost your progression to the SKIES you should farm mostly dungeon chests as begginer that way you get lots of knowledge by unlocking them every 3 hours. BONUS TIP: You will need at least one alchemist to complete dungeons fast and efficiently! 4. Using Soul Shards efficienctly. Soul shards are used to cleanse the trasures that you get from the adamante caves. DO NOT use them to cleanse grey treasures its a waste of resources ! Cleanse Epic treasures (dropped from world bosses) , because they are the most VALUABLE - opening them provides you with Defense orbs and Adamante crystals that are used for enchaning and reforging items(also you can sell them for extra gold , but I don't recommend it). Anther option is Uncommon treasures (dropped from cave mini-bosses) they give you a little bit better loot than the grey trasures. Focus on the chests that give knowledge instead of gold. 5. How To efficiently use Vigor ? Vigor is consumed after killing a mob. If you can defeat a mob on your own (even if its harder) DO IT , because you will get more resources that way - if you do it with another player you will get only 50 % of the rewards from the kill. High Level players usually farm mobs that are outside the adamante cave receiving knowledge and gold per every kill and ocassionaly a "Gorgor Contract" as drop - its more efficient method of farming. Also try to spend your vigor before doing your daily quests. There are a lot of people at these zones and it will be hard to solo kill a mob. Vigor is recharged by doing arena , dungeons or battlefields. (For 20000 Vigor you can get about 2000-3000 knowledge and gold or more ) BONUS TIP: If you don't have enough space and keep getting a full inventory use the FREE diamonds the game gives you to buy more inventory slots! 6. Join a Guild. Guilds are a great way to boost your progress ! Advanced and active guilds give you acces to passives such as increased gold and knowledge intake , more loot drops , stats boosts and much more. Also if the guild has raid talent unlocked and active members to do it you can get more resources and valuable items from doing a raid! Don't Forget to contribue to your guild by doing the daily guild assignments which reward you with tokens to use in the guild shop and help the guild to grow! WARNING: Most advanced and active guilds that have raids unlocked usually look for players that are at least level 12! 7. Extra Daily Quests You will receive an extra daily quest at levels 13 and 16- If you are close to or have the resources to reach it DO IT as soon as you can because it gives you acces an extra daily quest that you can run twice every day (1 per 12 h) which increaseas your daily income and youprogress a lot quicker! BONUS TIP(CREDIT : Rogravi ) : At level 23 YOU DON'T get an extra daily quest , BUT your first quest UPGRADES! 8. STOP overusing potions ! Potions can be useful , but they are not a must in order to progress or survive. Also they can become sinkhole for your gold if you use them too often due to their price ! The healing potions have proven to be the most useful - saving you in tough situations which reduces your repairing costs , but only use them if you cannot survive without one ! The Strenght/Health boost potions can be used rarely for harder tasks such as completing "Gorgor Contracts" or when fighting "World Bosses/Raids" which makes them unnecessary to progress. 9. Look for a party or create one. If you struggle to progress in arena league or dungeon runs keep failing due to people retreating try looking for a party or create one! A lot of people are looking for parties in world chat who have difficulties completing these tasks , but you can manage do them together. You will also meet awesome people and possibly make new friends along the way to level together and who knows maybe even you might get invited to join a guild! BONUS TIP : Tavern is usually not used by many people , but i think it deserves to be used more often! 10. Dungeon Floors - Most of the time you need to pass 3 floors and meet the main boss of the dungeon on the 4th floor - If you have reached the 4th floor , but you don't see the main boss you should go back a floor or two and find another path instead of starting a fight , because it will be a waste of time and as we all know the dungeon time is LIMITED to 11min. BONUS TIP: Sometimes the mini-boss rooms can be skipped and you can go to the next floor if you don't trigger boss aggro when walking.
-
Bienvenue a tout le monde ❤️💥
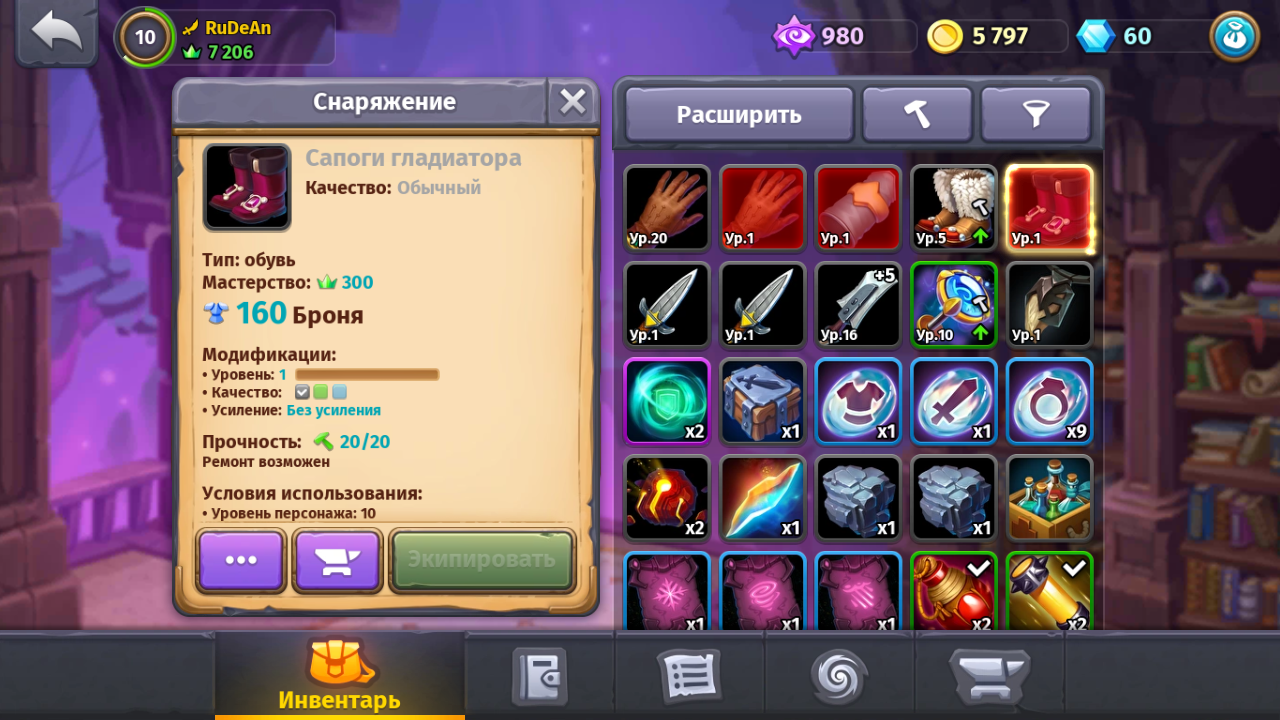
- 11 replies
-
- français
- skylore
-
(and 90 more)
Tagged with:
- français
- skylore
- skylore arena
- arena
- guild
- guild allies friends
- faction
- warspear
- pvp
- pve
- test
- scrolls
- skills
- suggestion
- startup
- games
- game crash
- guardian
- guide
- shadow
- shitpost
- sugestão
- serve caindo fechando game
- armor
- force close
- map
- mpvp
- minionbug
- mago
- mobs
- pls
- new
- none stop stuns
- bug
- boss
- bugs
- bugs item missao
- baus não recebido
- b
- api16
- api19
- atencao
- algaret
- android
- atributos
- adamantine grotto
- alchemist
- arena/ranking/award
- error
- erros
- emojis
- entrada
- experience
- eclipse corp.
- exchangeindiamond
- equipamento bugado
- race
- review
- respect
- tot
- u
- i
- ios
- inspection
- initialization
- illutionist bugs
- itens azuis bugado.
- orlov_007
- quest
- questbug
- quest bug
- drop
- device
- drawing
- dungeon
- disconnection
- dados pessoais
- fatigue
- futuro p2w ?
- hack
- help
- hotkeys
- hp/mobs
- higher level items
- jogo em geral
- lag
- liyingplayer
- wiki
- wizard
- wikipedia
- chest
- combine