Search the Community
Showing results for tags 'guide'.
Found 13 results
-

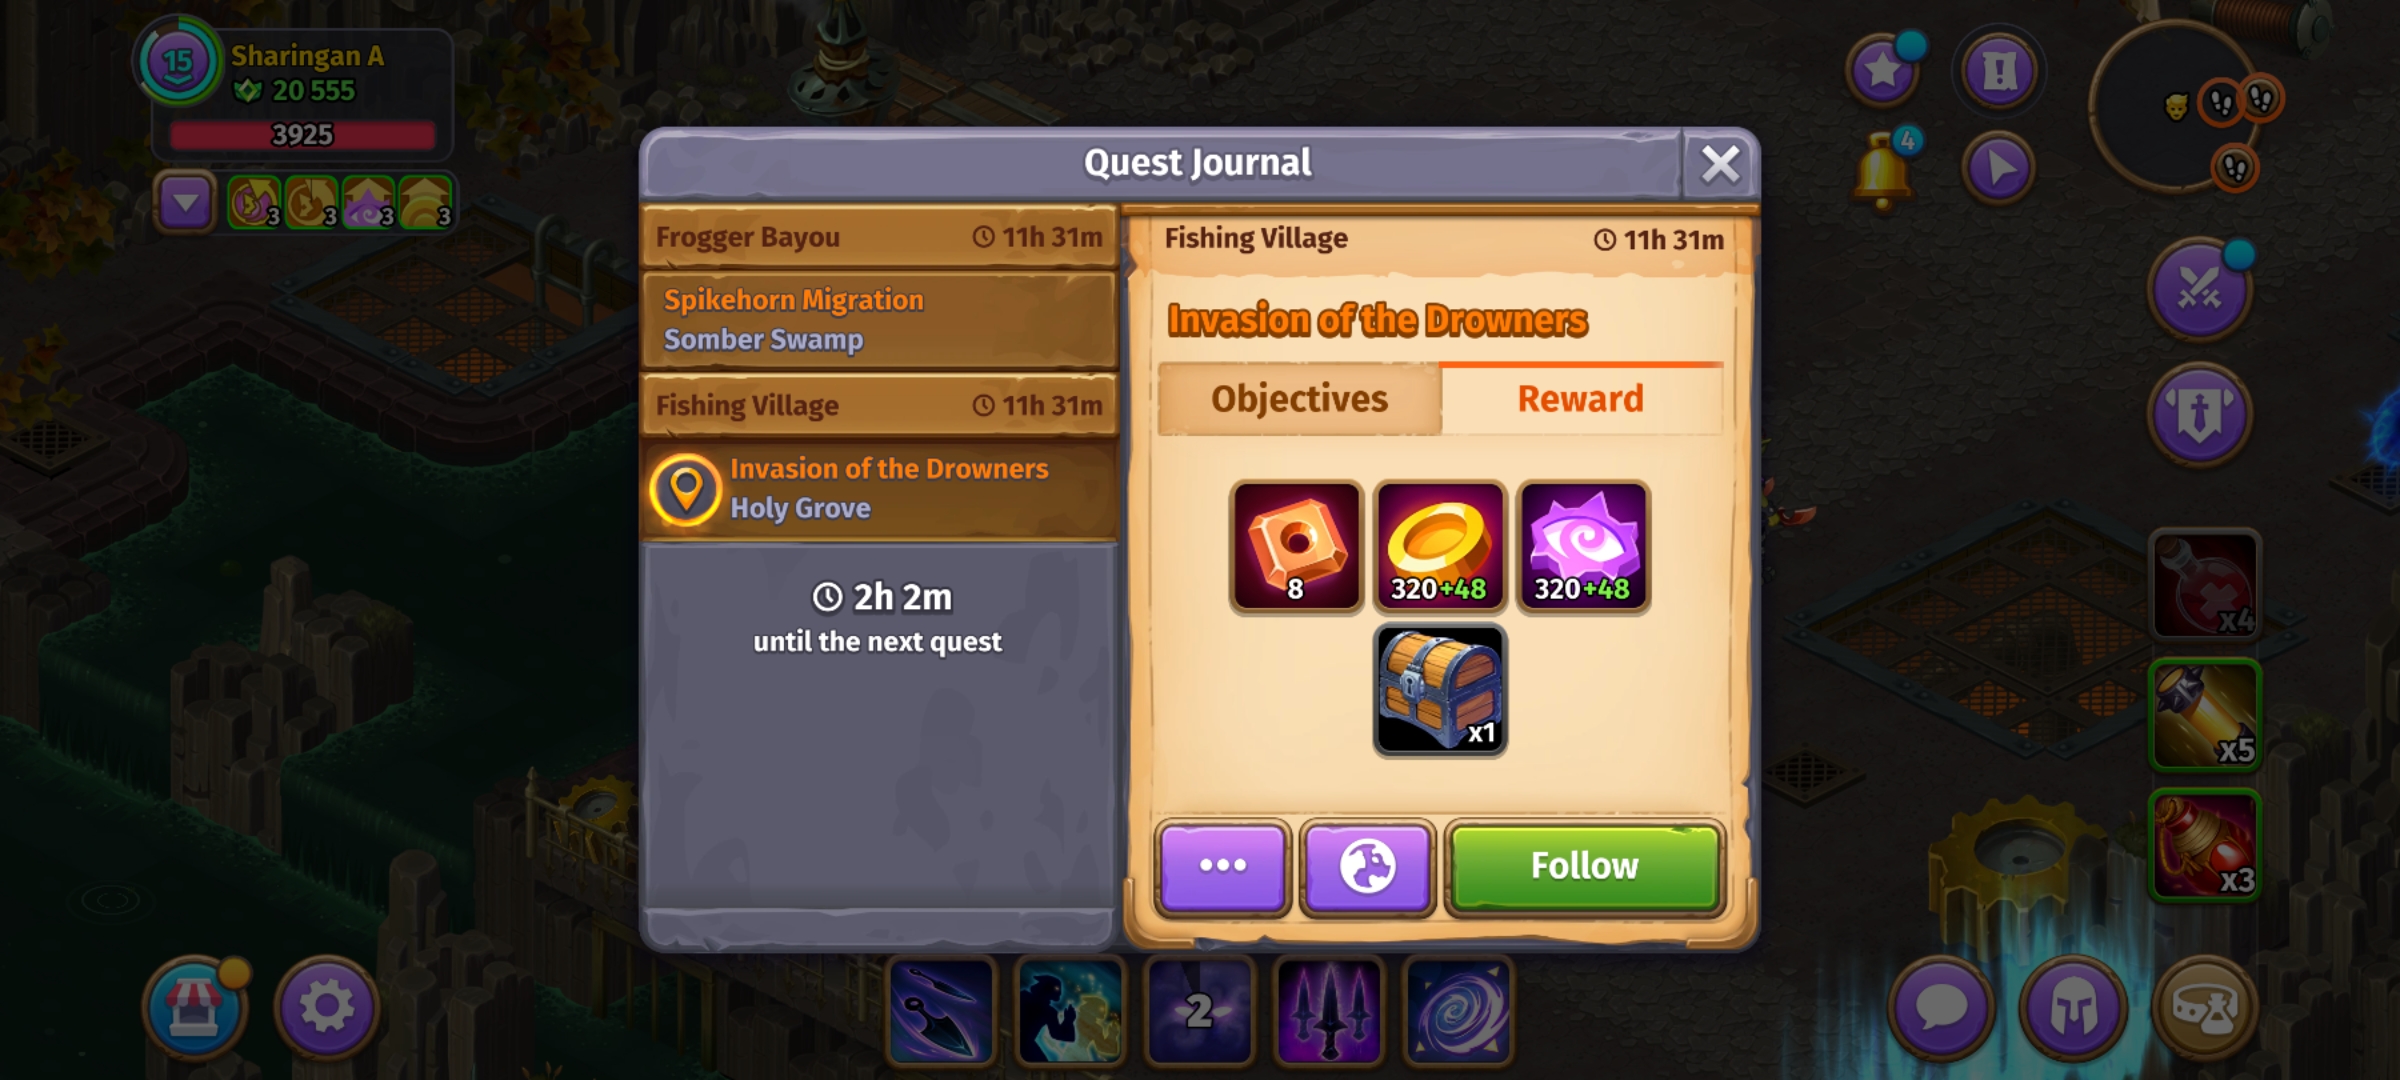
гайд Гайд на Стража v3 [2024] (by orlov_007) | [LØR]orlov_007
orlov_007 posted a topic in Руководства
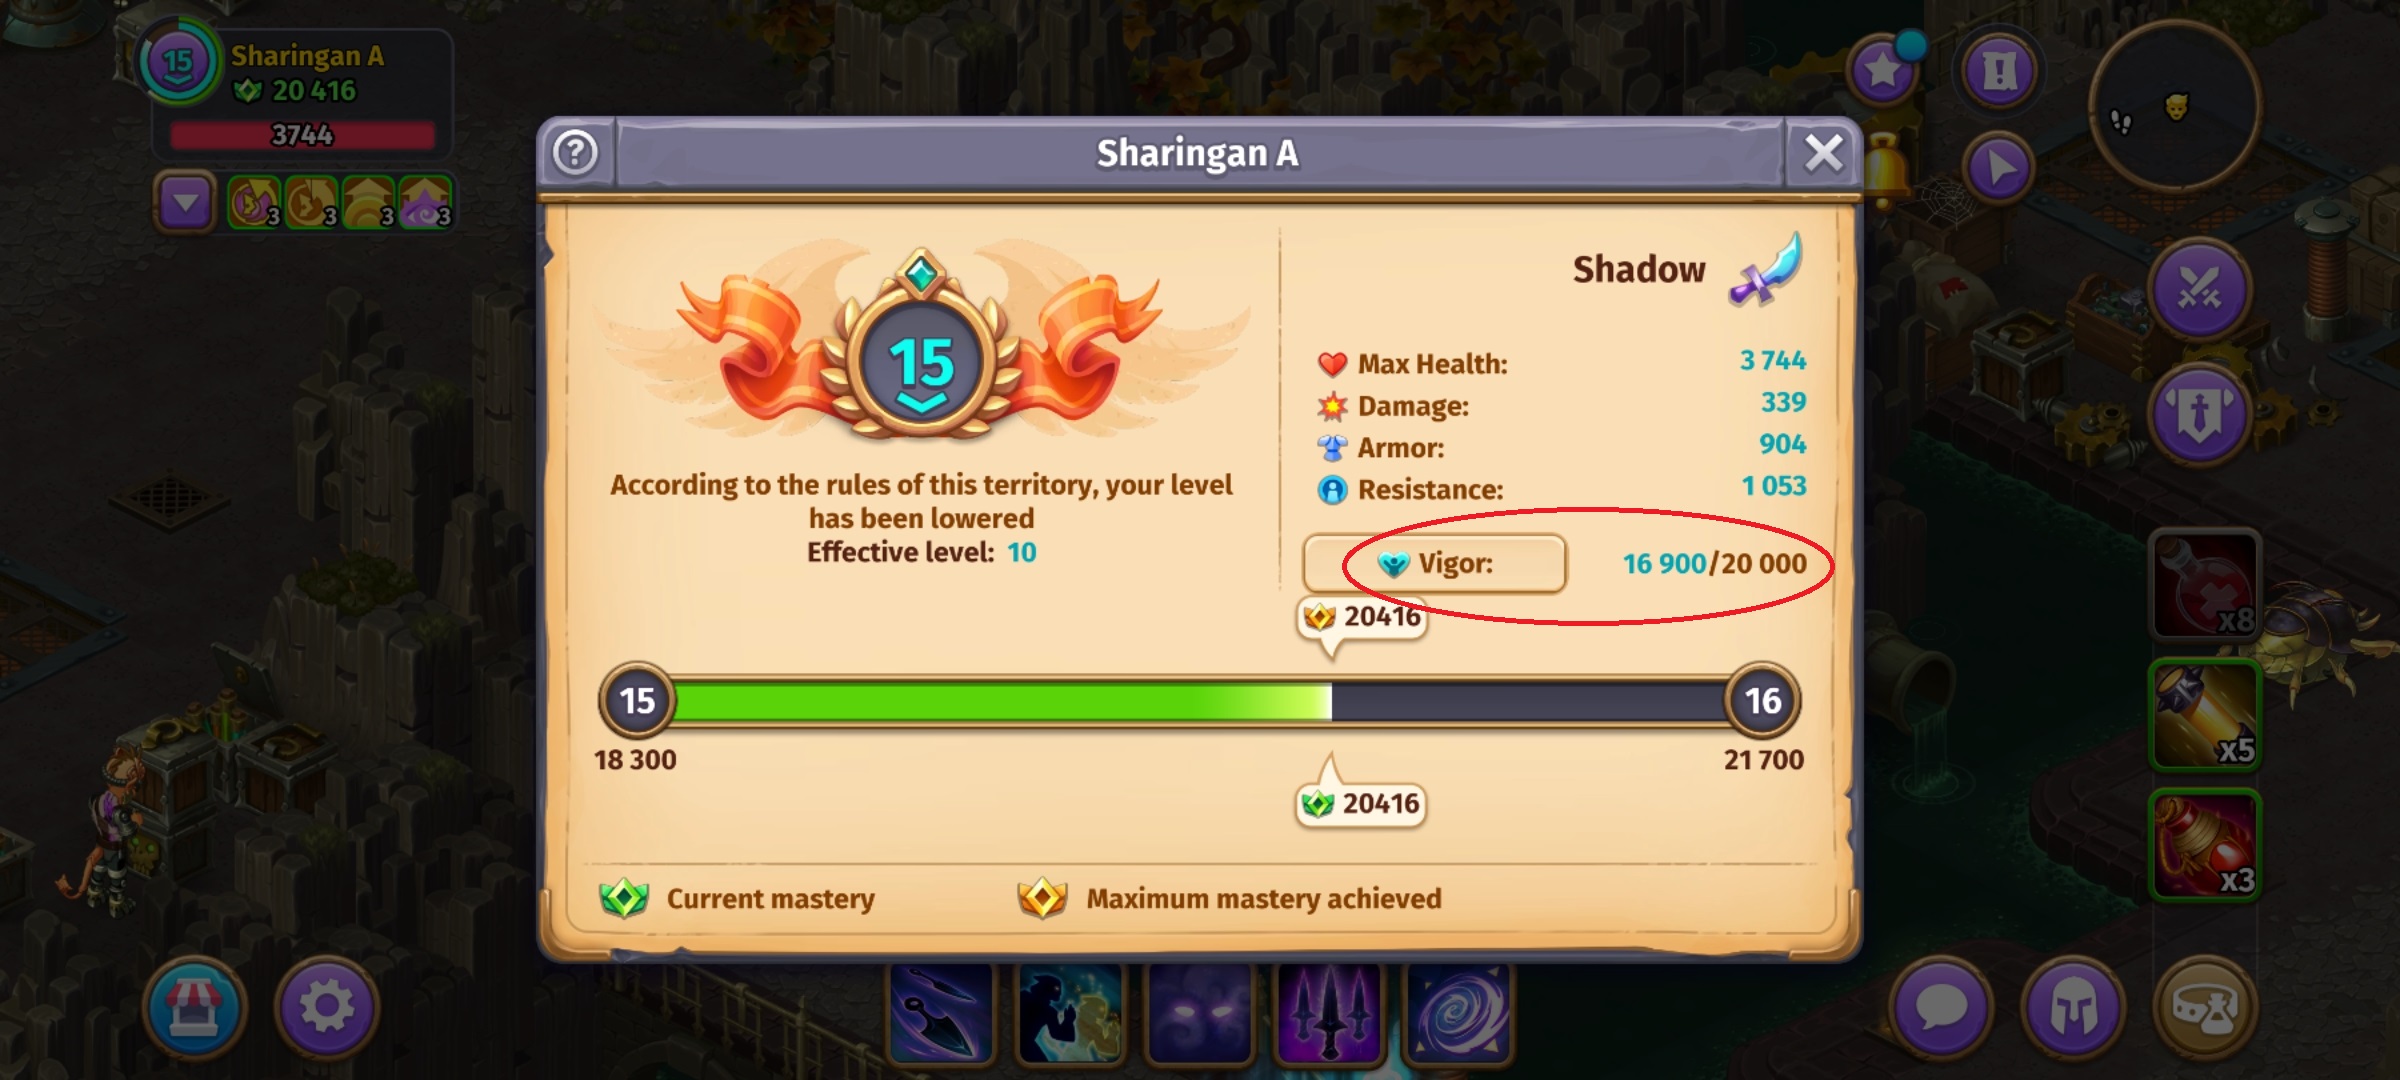
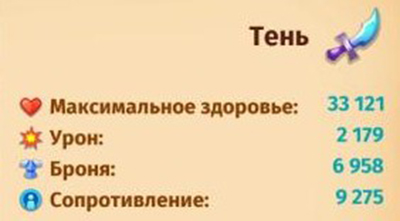
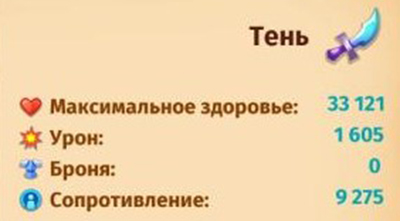
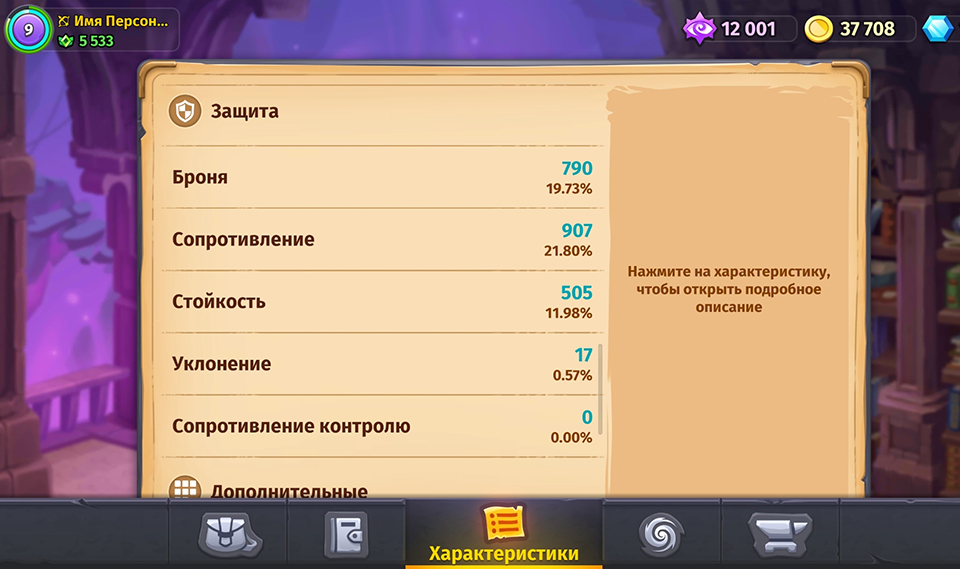
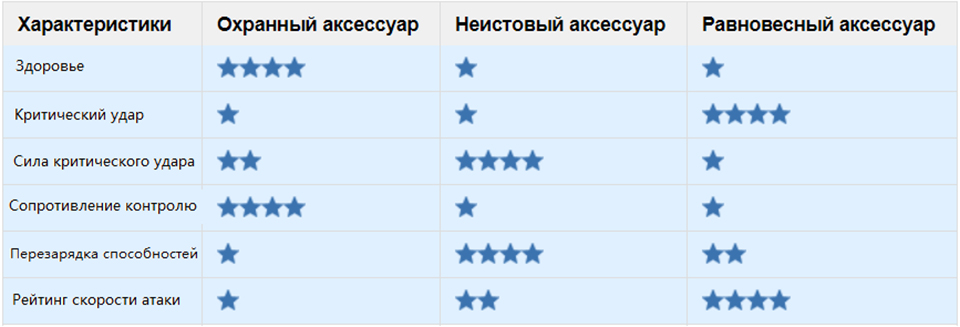
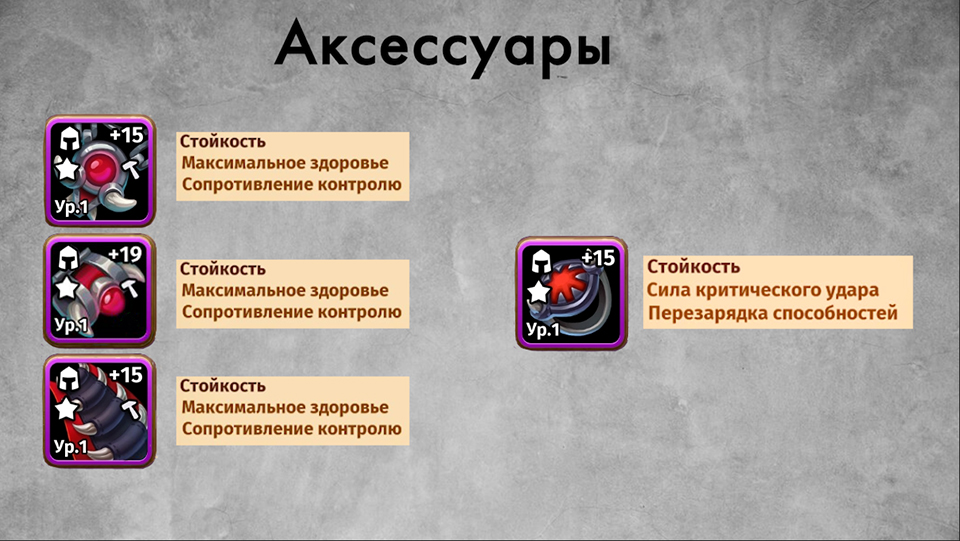
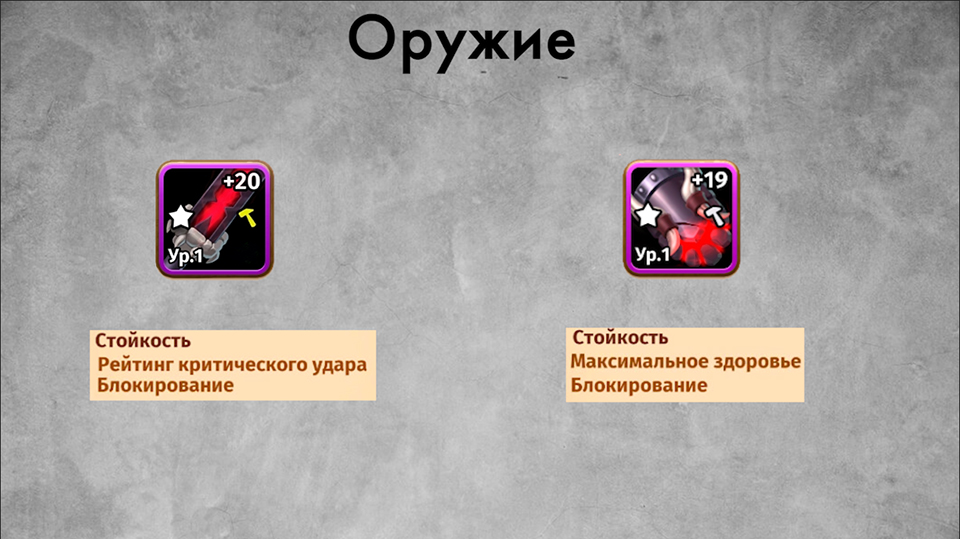
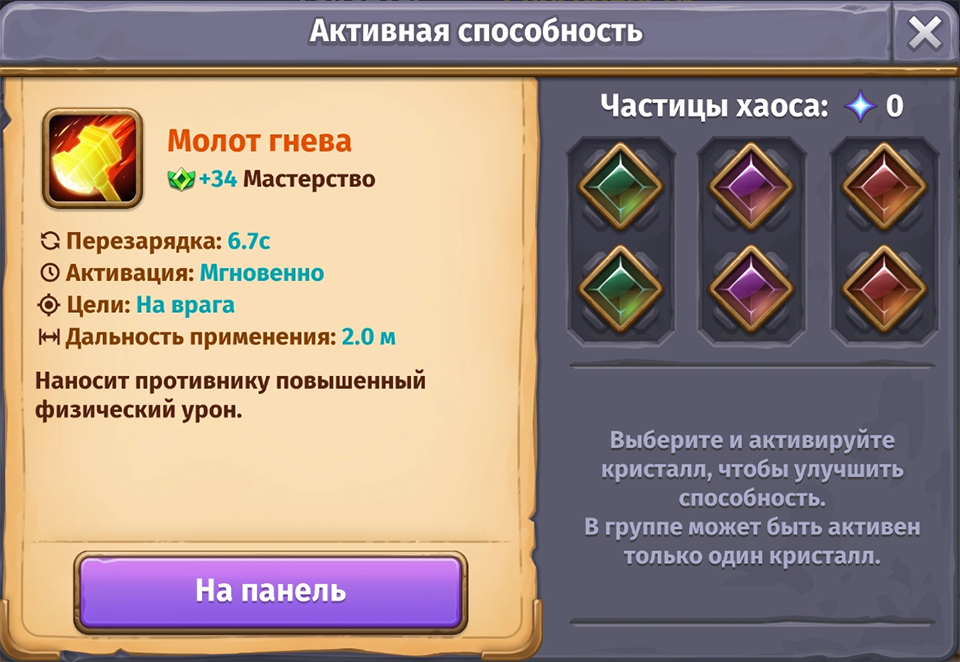
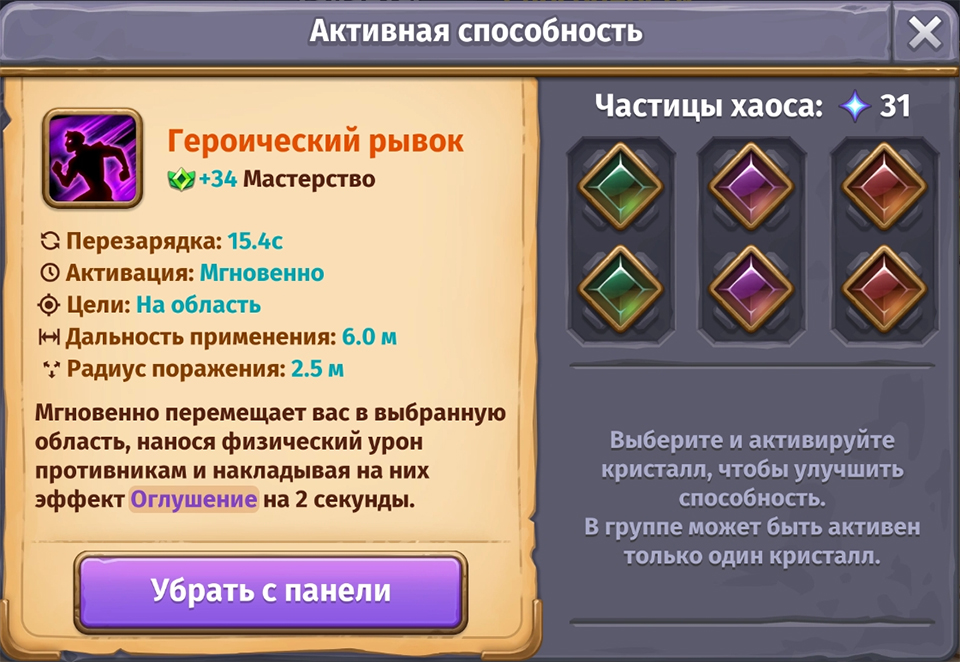
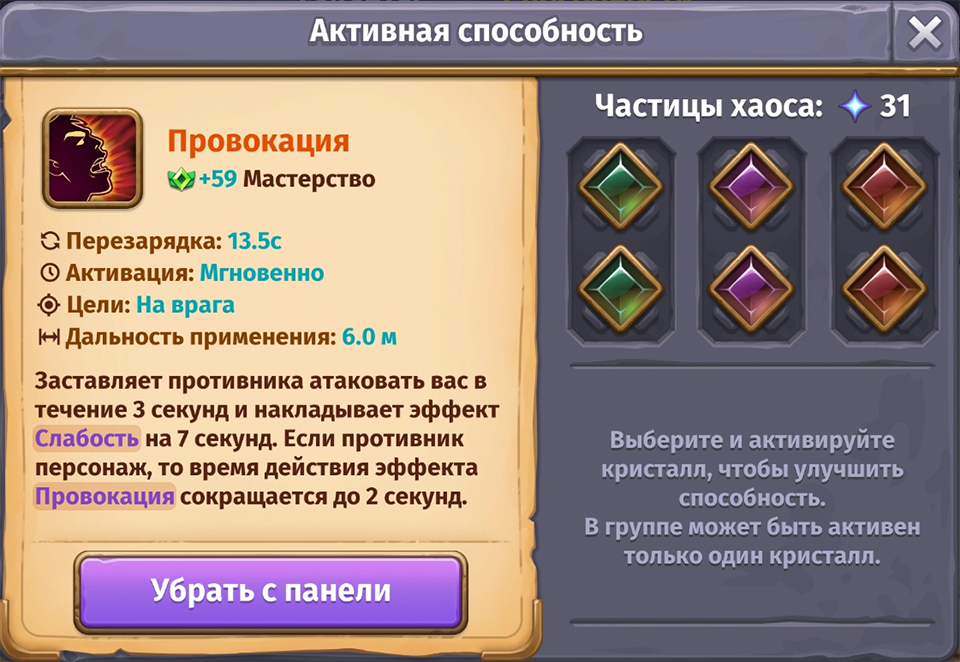
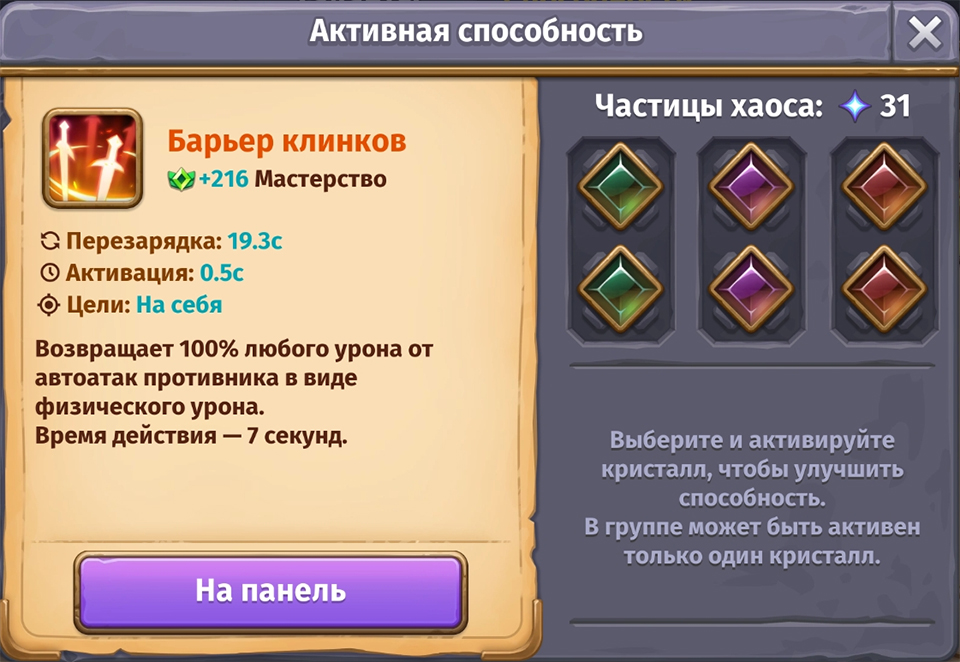
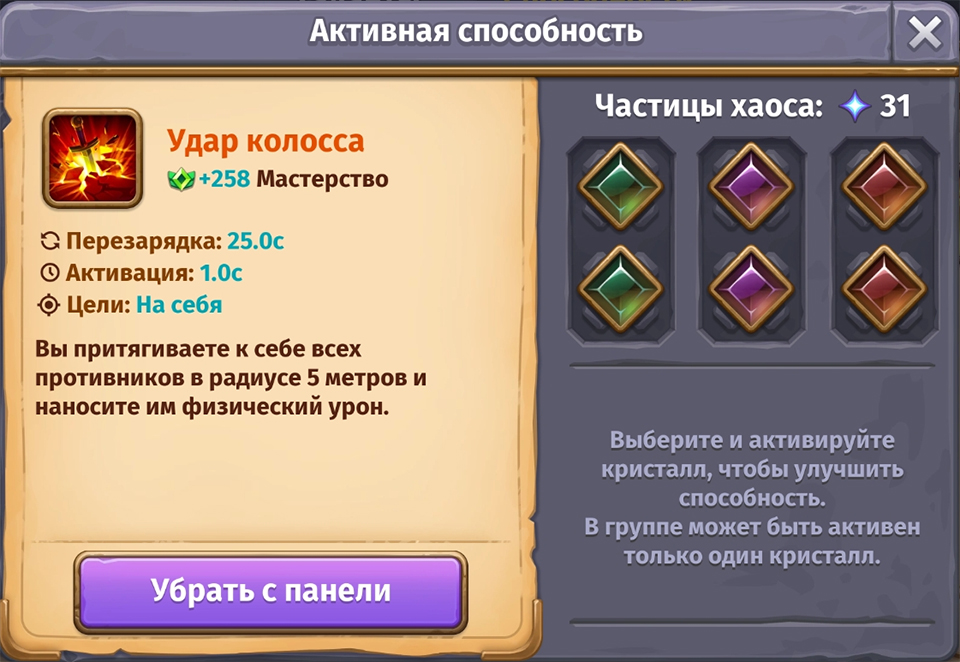
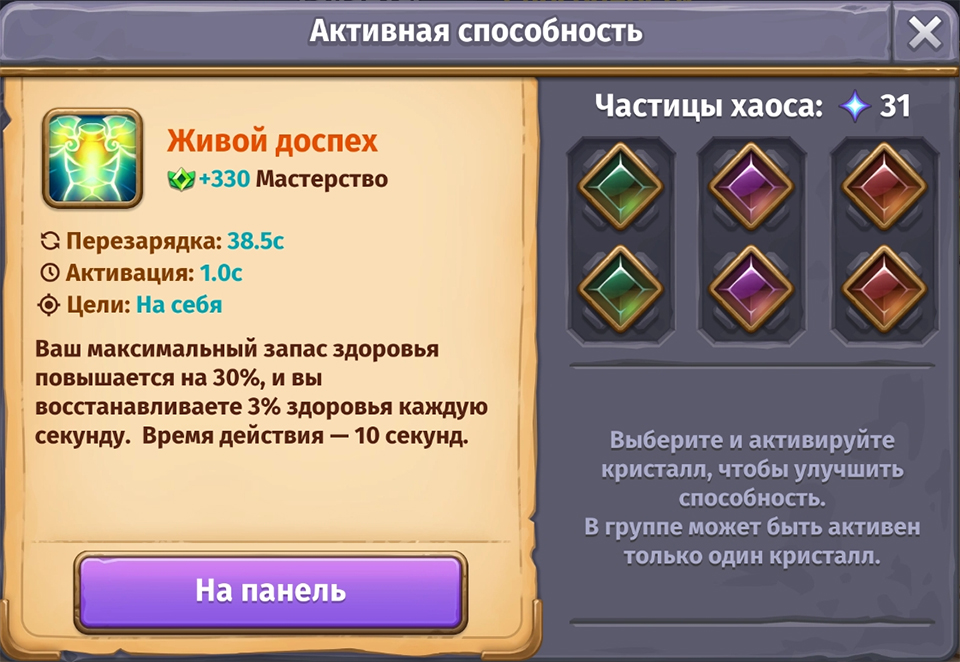
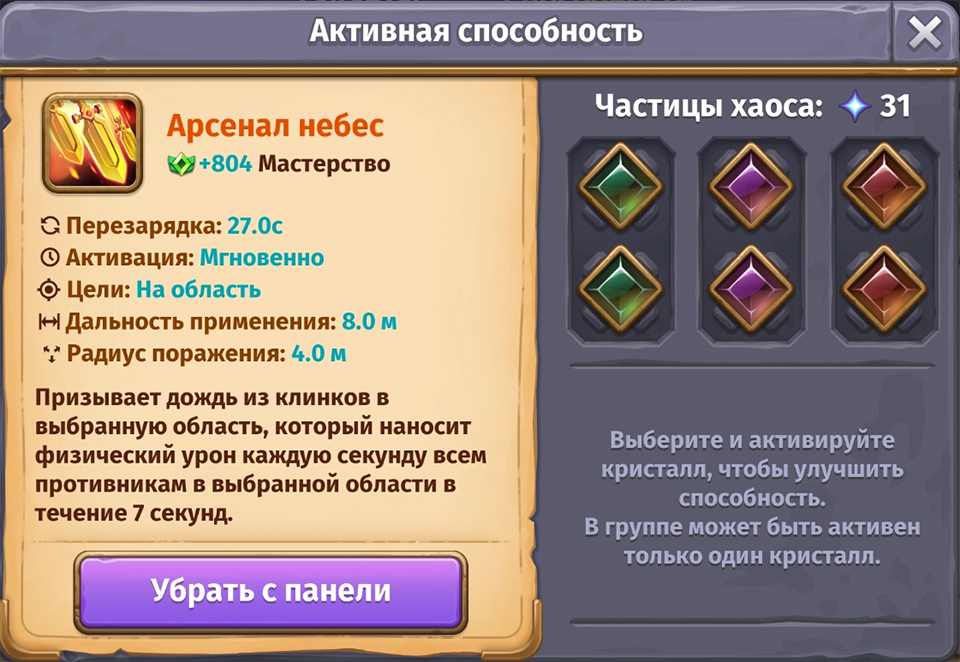
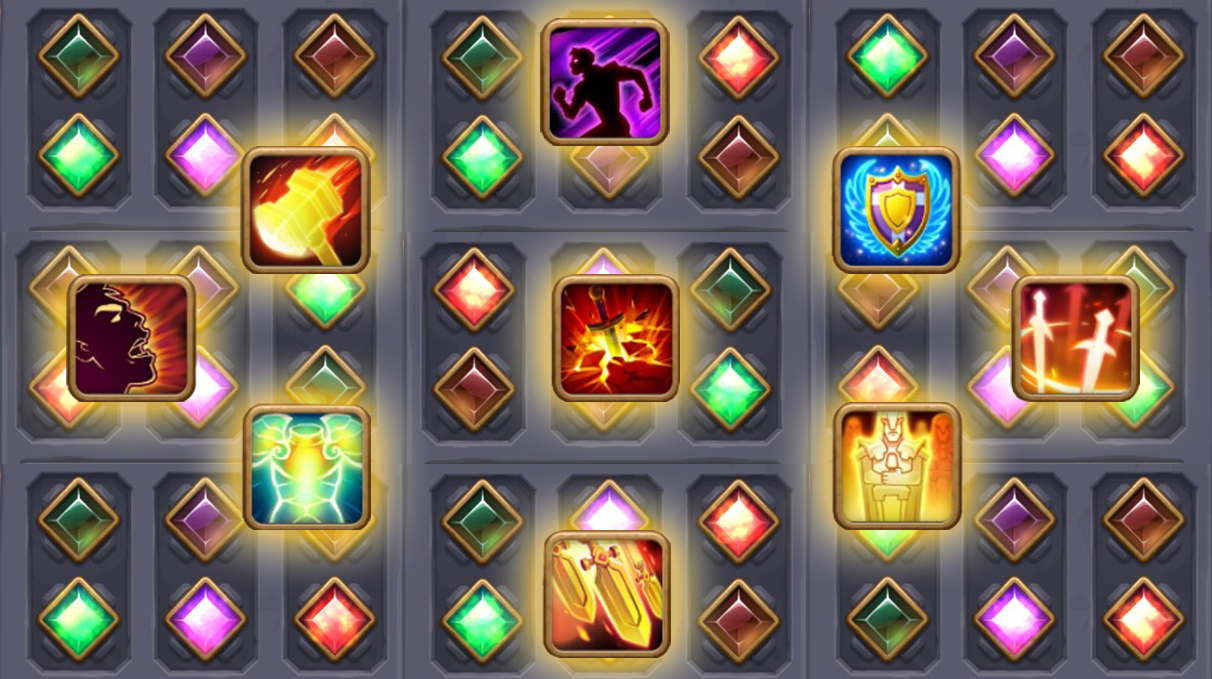
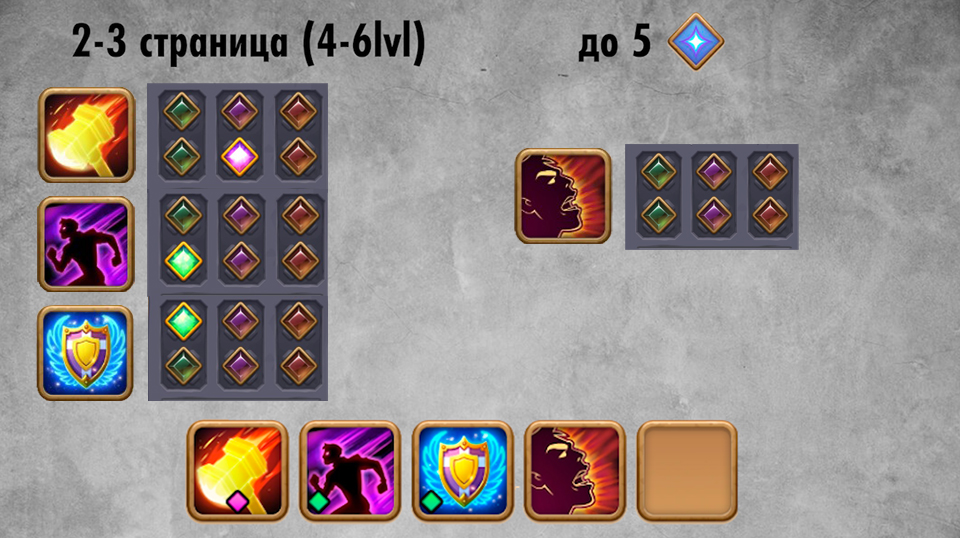
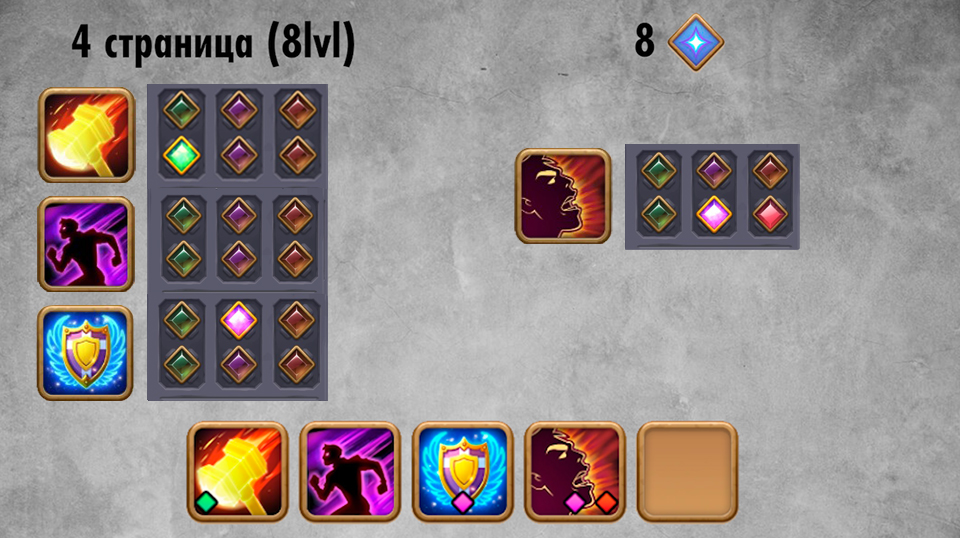
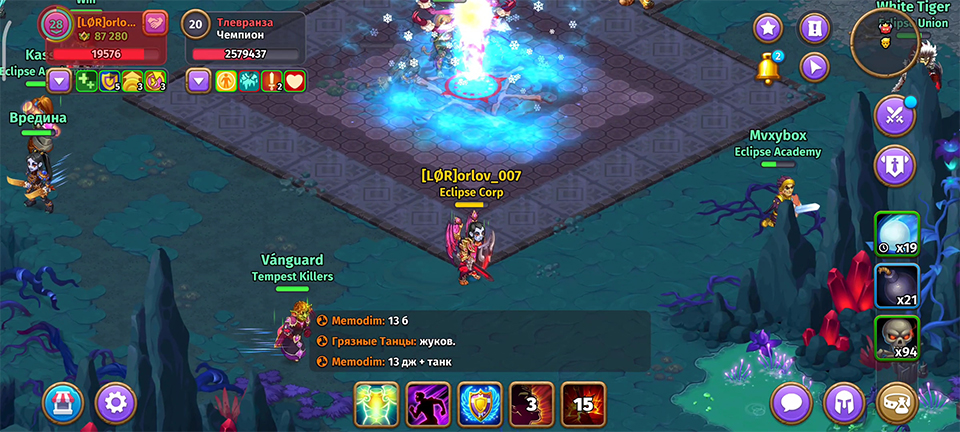
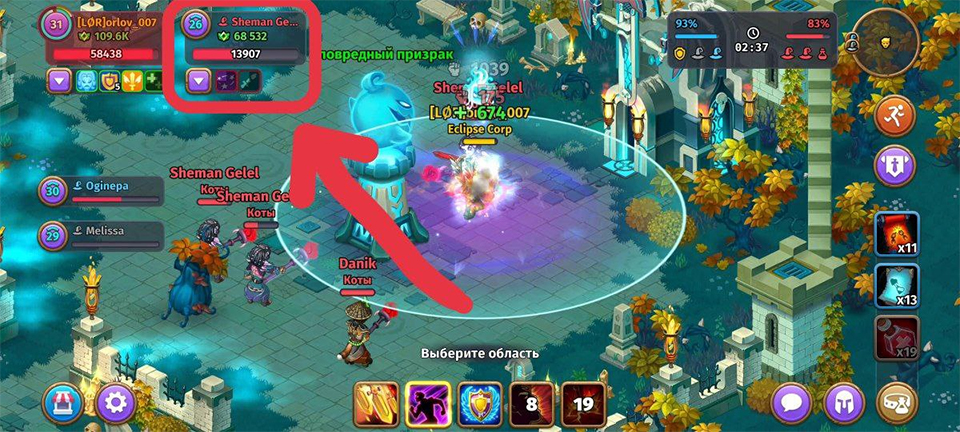
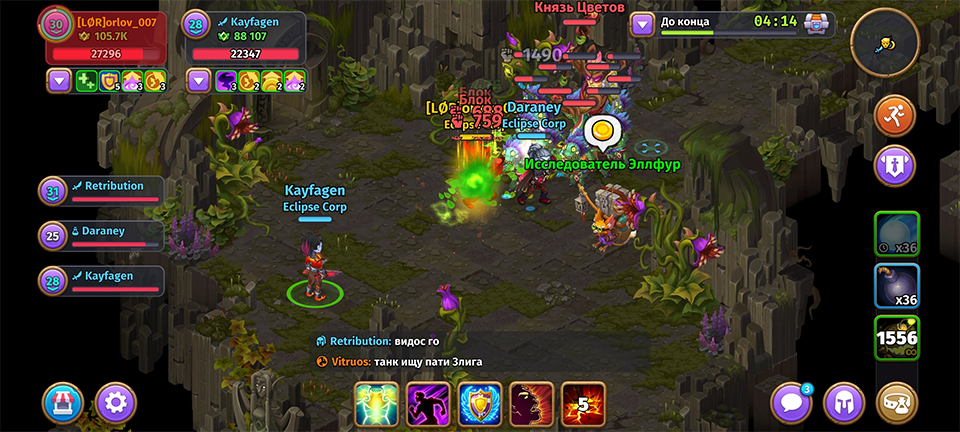
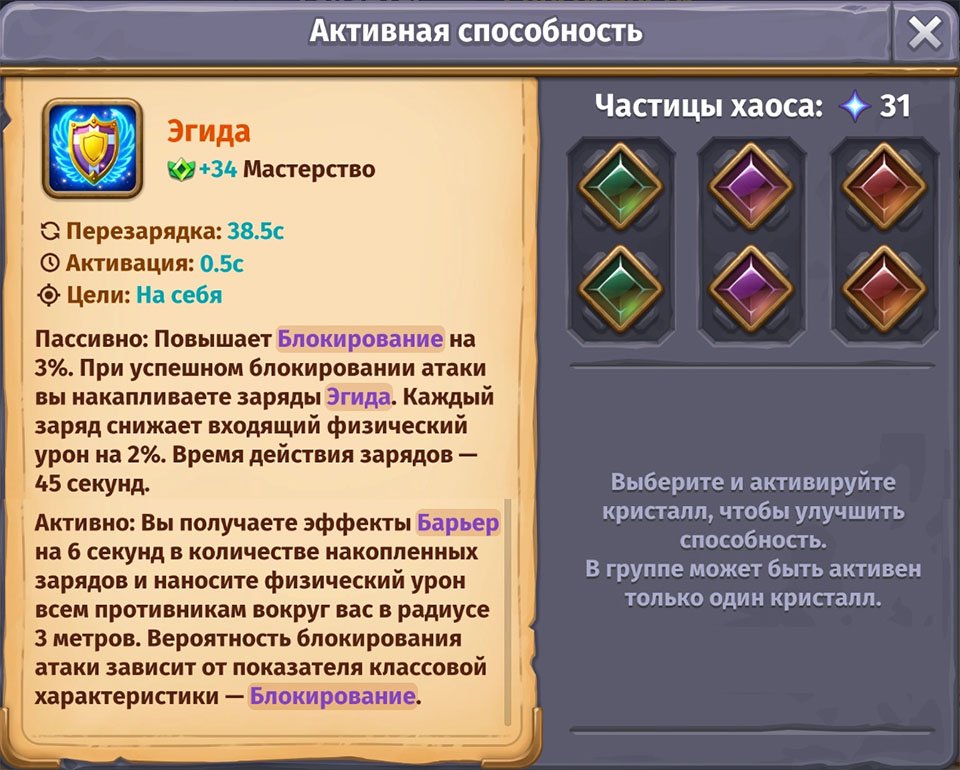
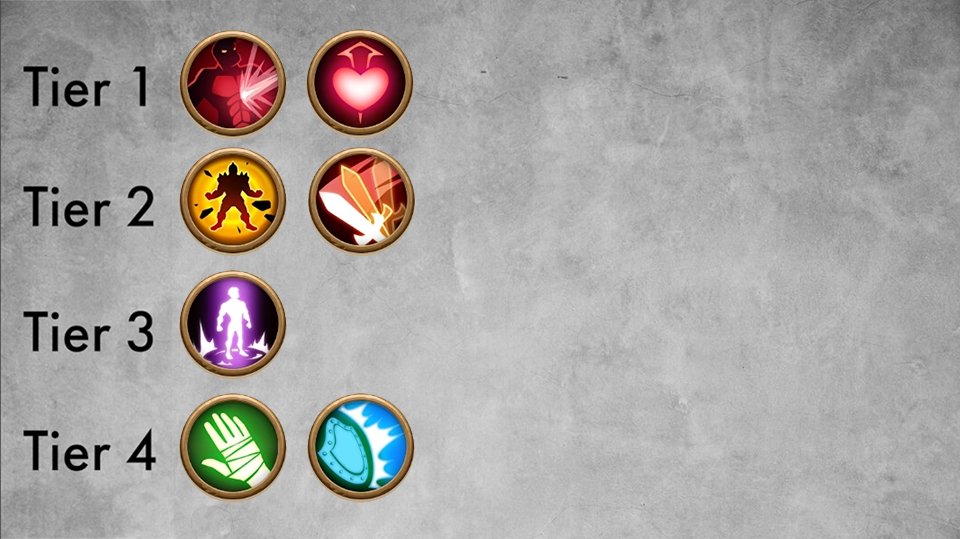
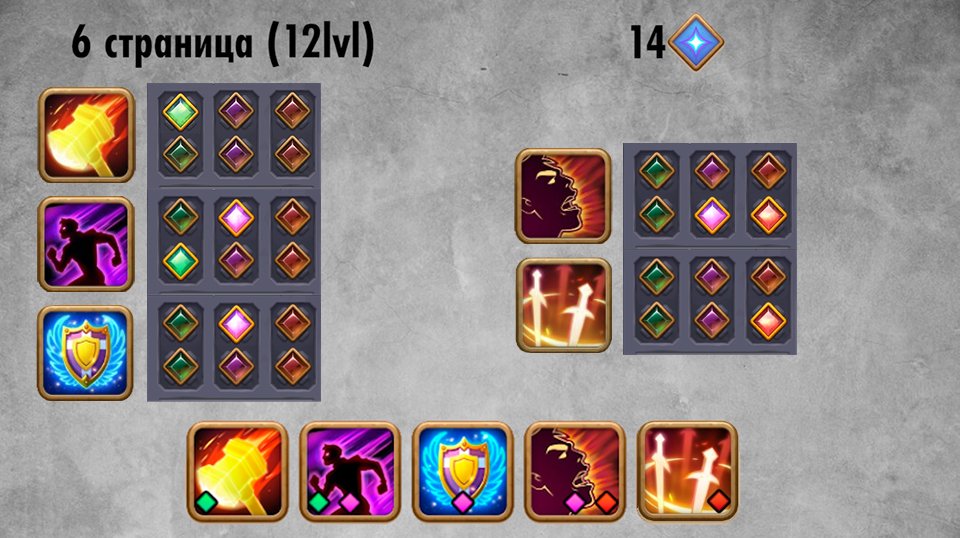
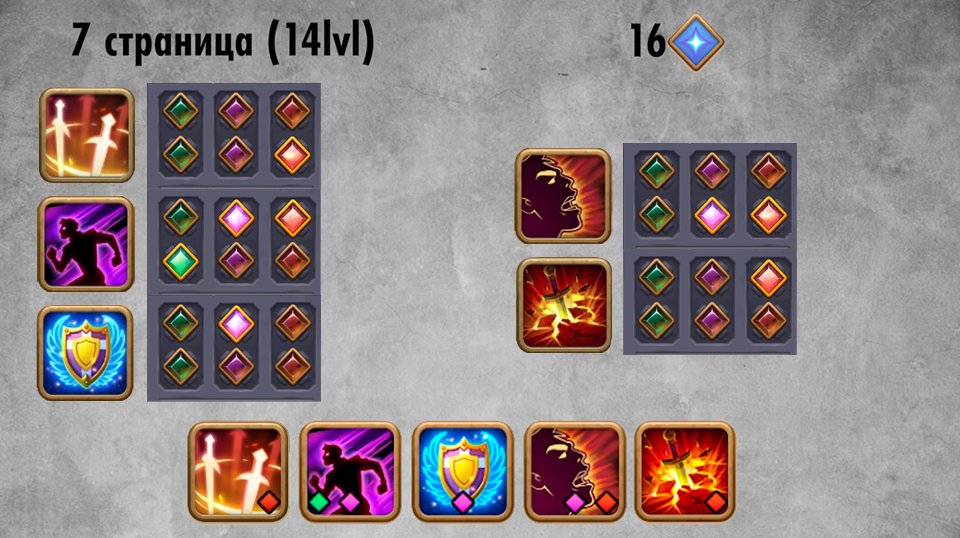
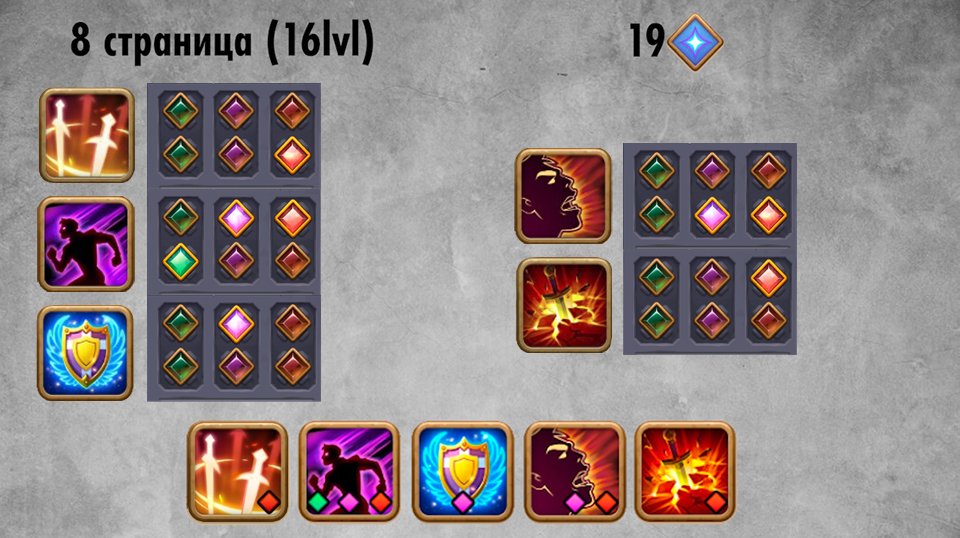
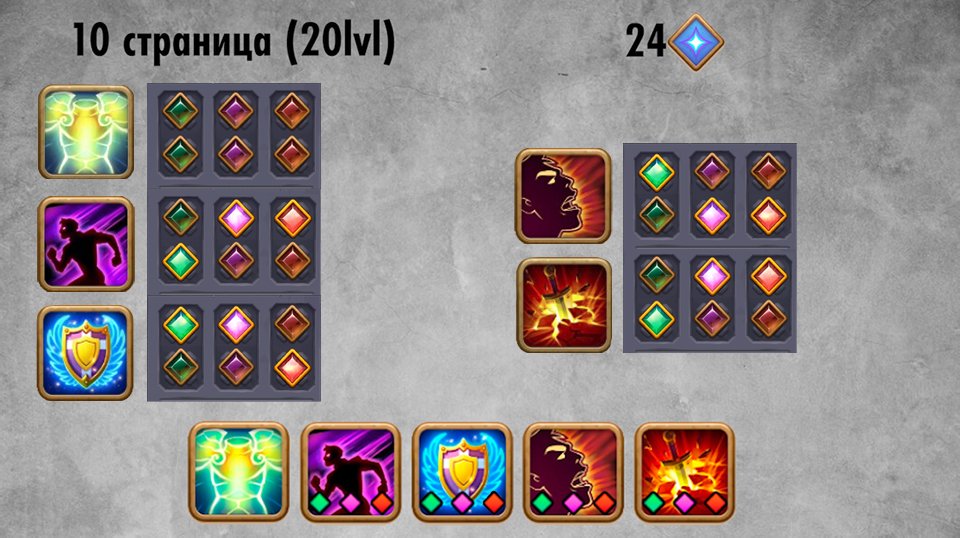
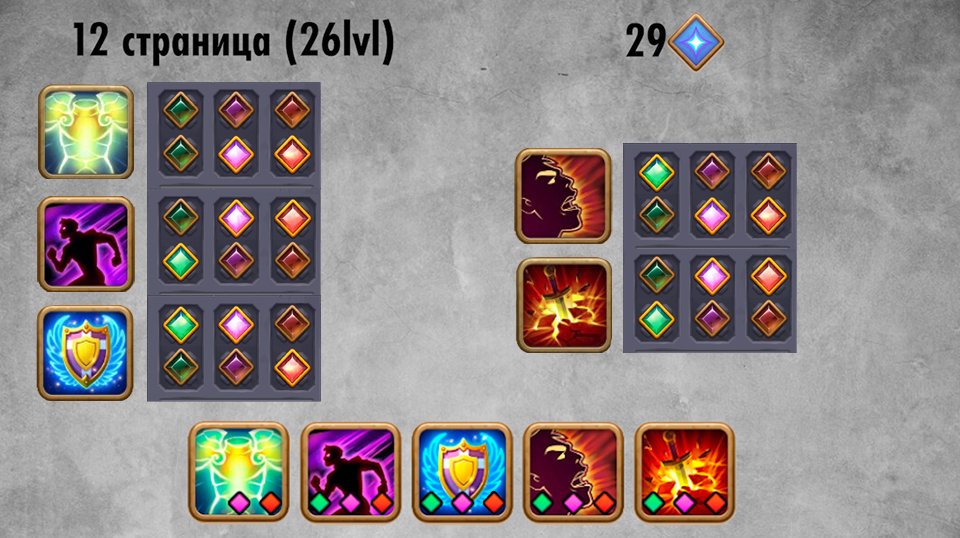
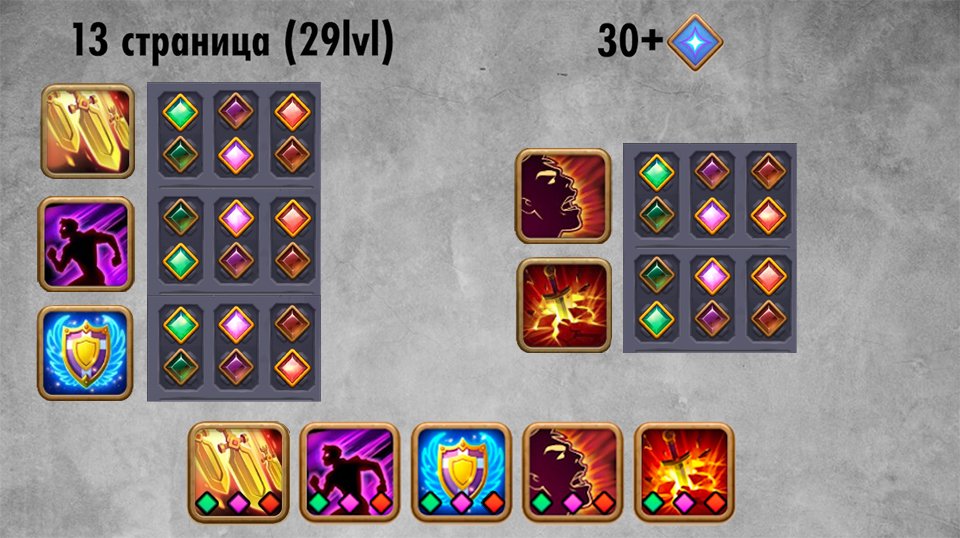
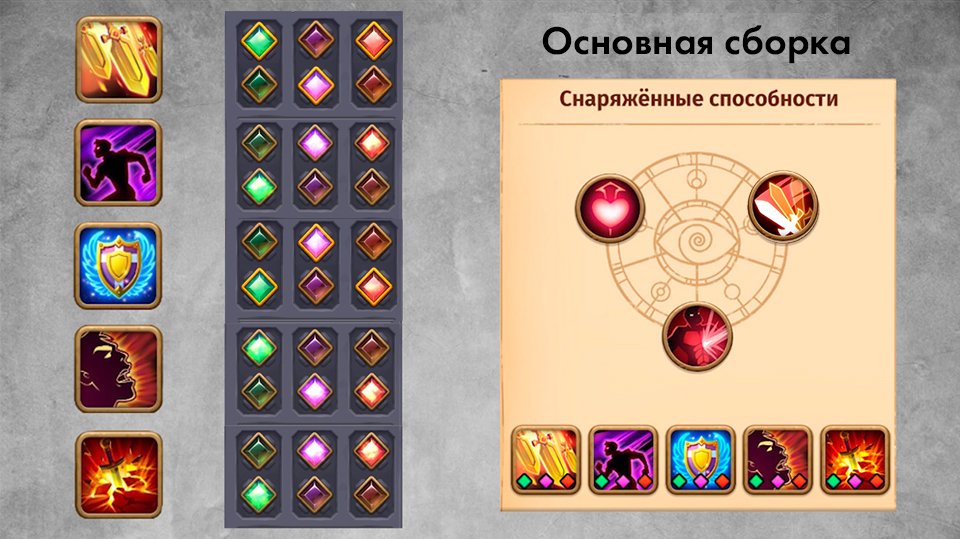
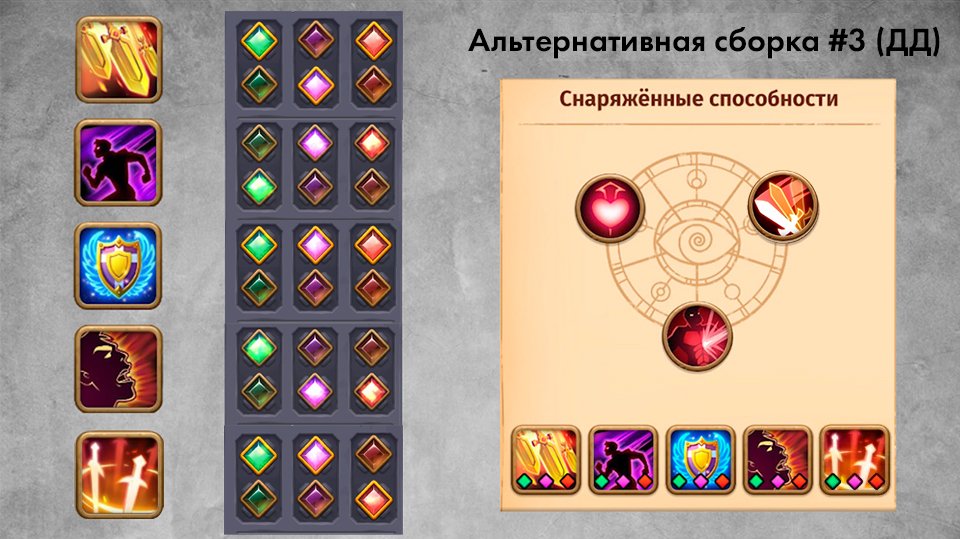
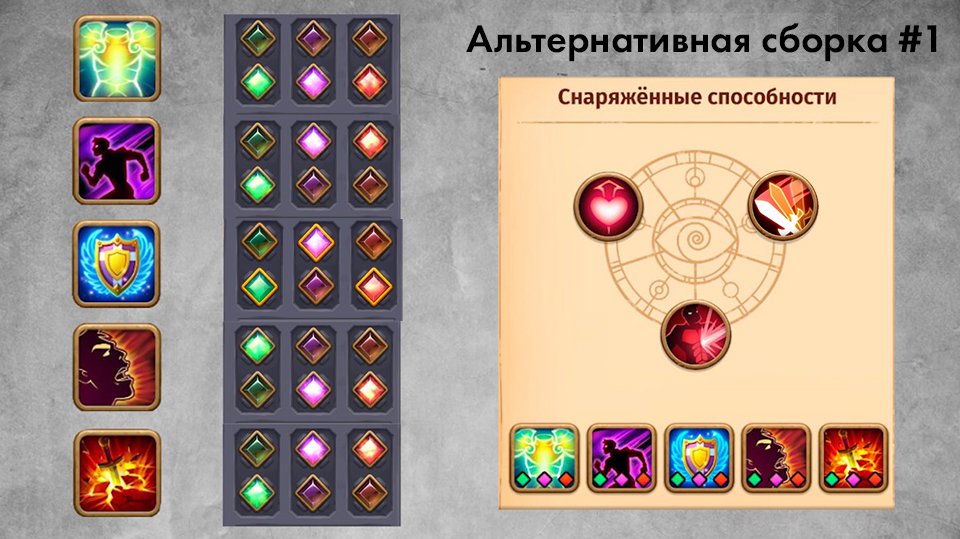
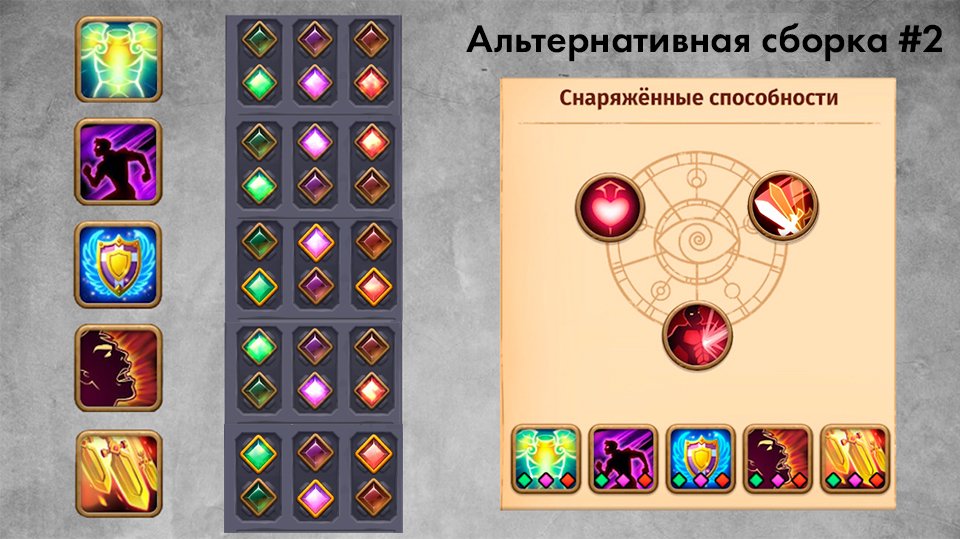
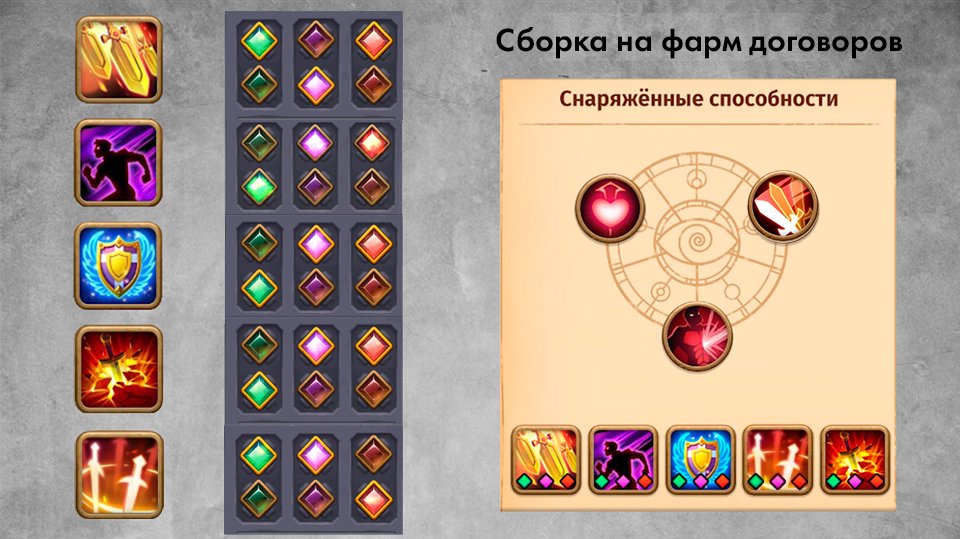
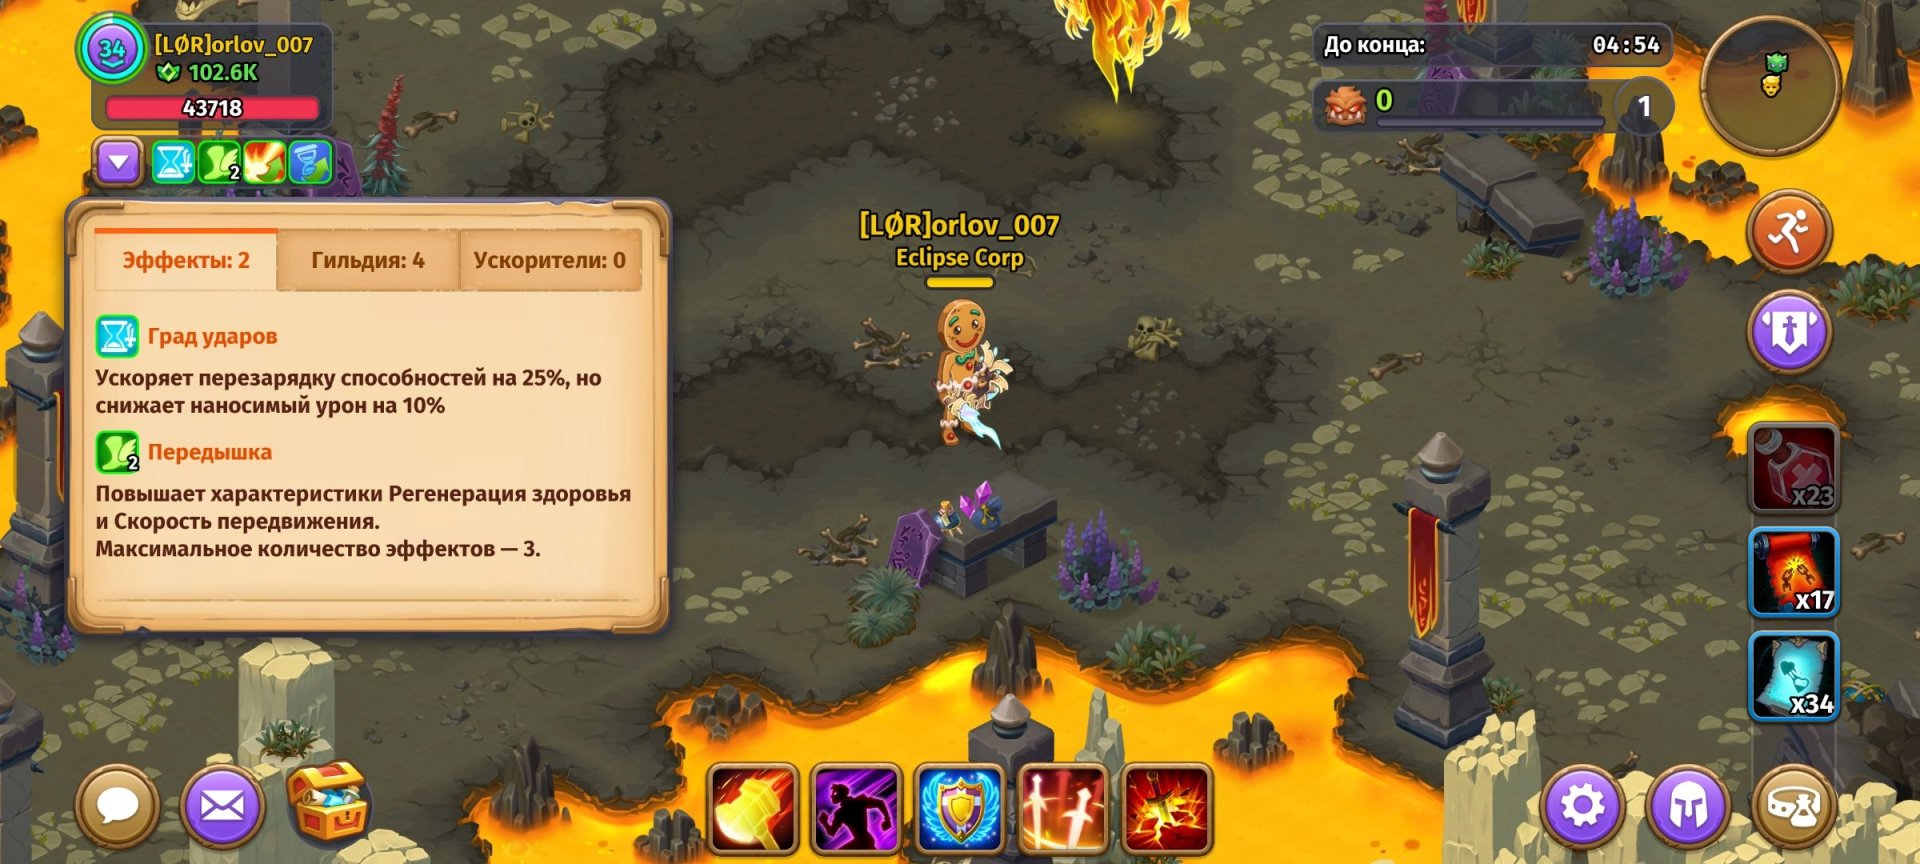
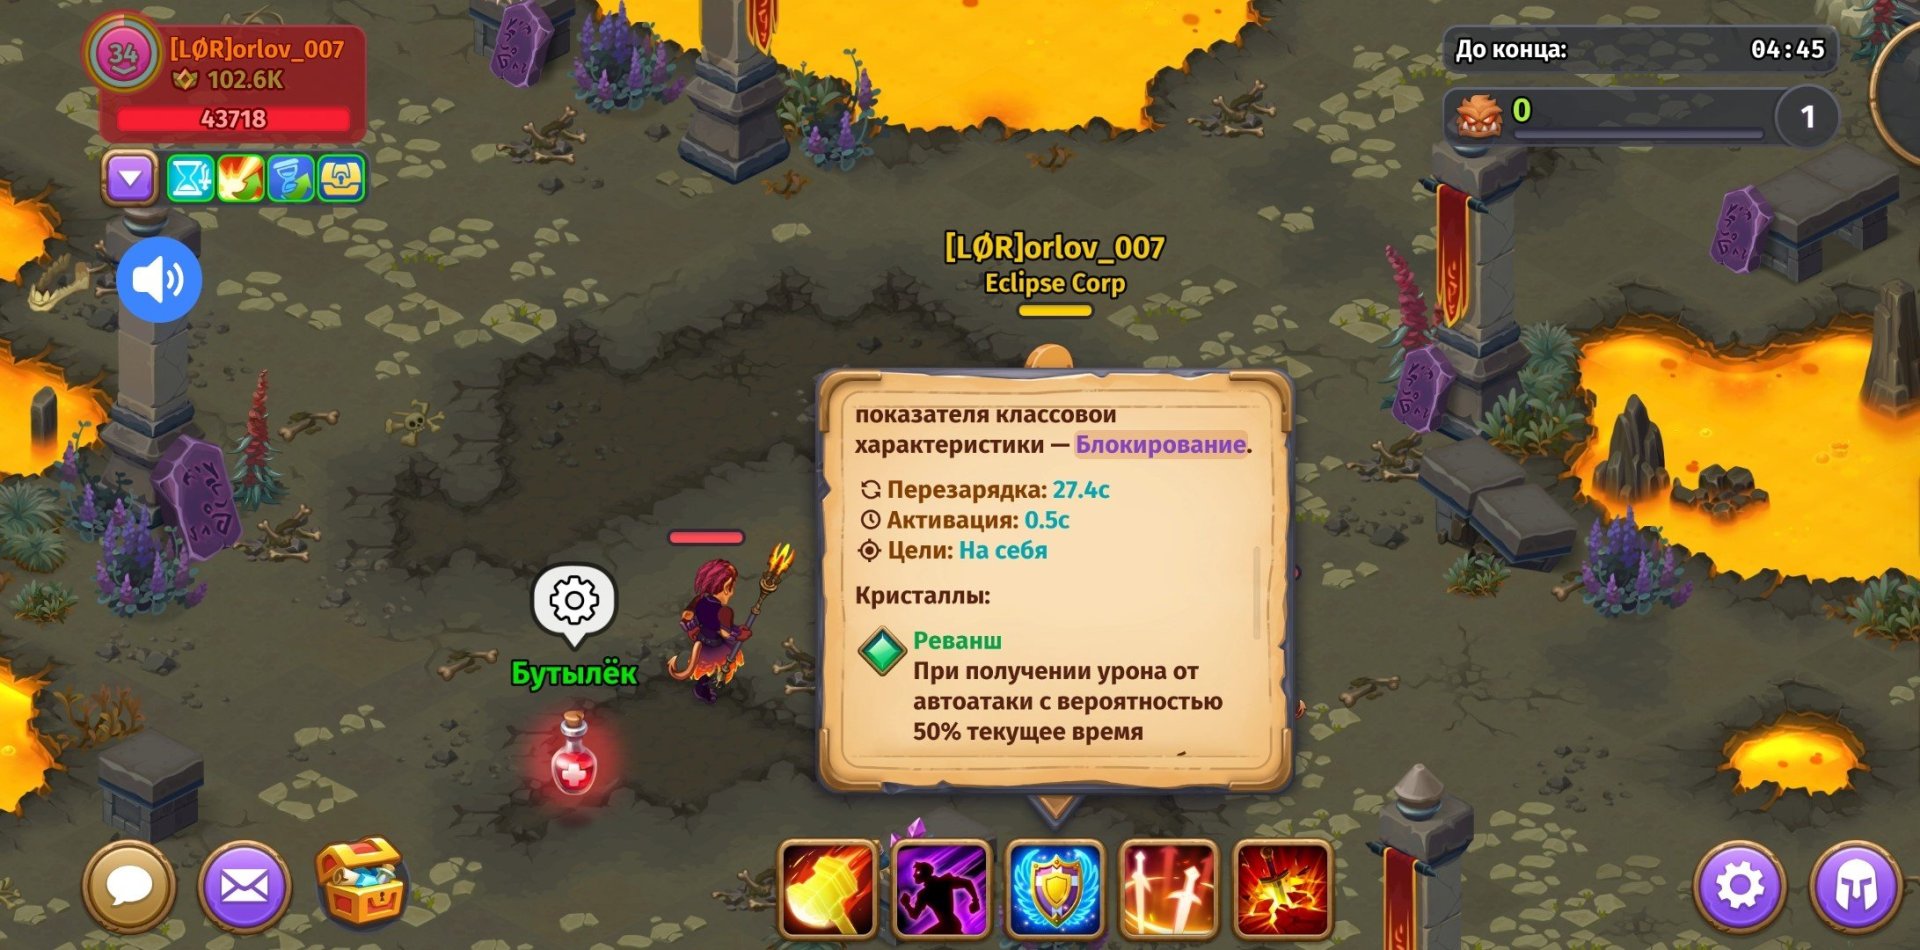
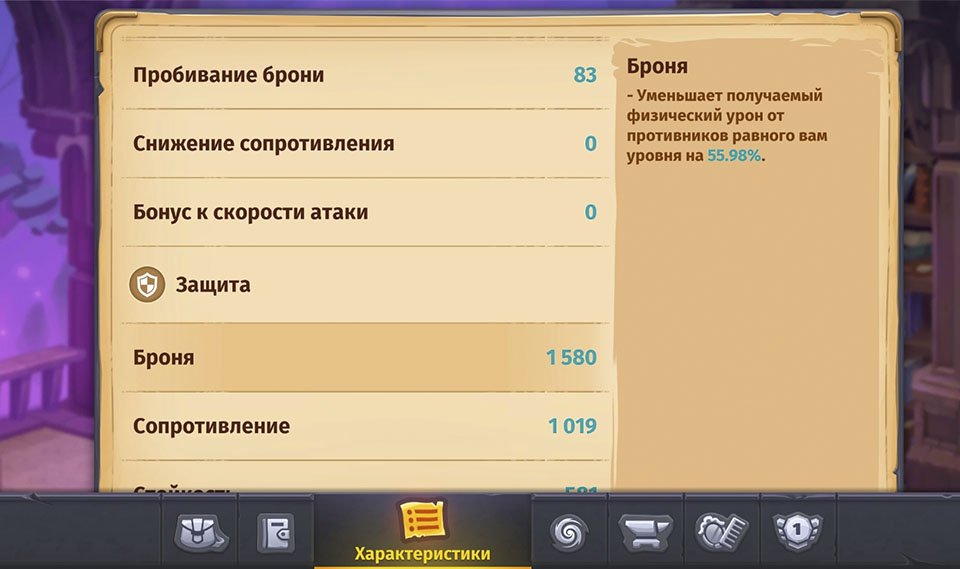
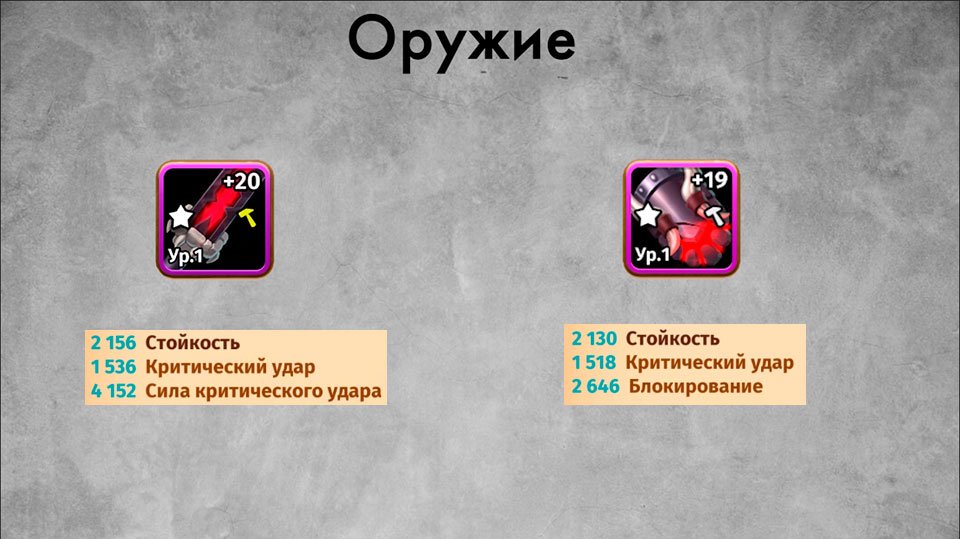
Доброго времени суток! Эта статья будет полезна и тем, кто ещё не знаком с таким игровым классом как Страж, так и тем, кто уже играл за него некоторое время. Условно, мы разделим её на 2 части. В первой я познакомлю вас с классом в целом, отвечу силён ли он, на что способен и на что стоит обратить внимание. А во второй части, мы уже рассмотрим как непосредственно нужно играть и прокачивать нашего стража. (Если какая-то информация со временем потеряет свою актуальность, то я укажу об этом перед началом первой части или по возможности исправлю в самом гайде) Гайд обновлён в Июне 2024 Часть I Стоит ли выбирать стража? Роль в игре Сразу начнём с распространённых вопросов: "А стоит ли выбирать стража? Каков он?". Ответ будет неоднозначным. Стоит ли конкретно тебе брать этот класс, зависит только от твоих предпочтений. В игре все классы хороши и у каждого есть свои сильные и слабые стороны. Баланс далеко не идеальный, но постоянно меняется. Каждый из 5-ти классов уже был и "имбой" и "на дне". Хорош ли страж именно сейчас?(Июнь 2024) Да. Он неплох как в PvP, так и в PvE, но очень зависит от расходников и союзников. Залетая бой зачастую вы не можете реализовать свои навыки без "антиконтролей", ровно как и внести пользу без дд классов, которые поддержат твой врыв. Поговорим о роли Стража в игре. В PvE - стандартный танк, принимающий много урона и готовый сдерживать на себе ораву монстров или атаки боссов, но в PvP немного не так. Класс я бы описал как «надоедливая консерва с контролем, которую сложнее убить». Именно контроль наша ключевая задача. Да, убить тебя сложнее, нежели другие классы, но на долгую жизнь саму по себе рассчитывать не стоит. Ты живёшь до того момента, пока можешь применять свои навыки, или пока в тебя безбожно отдают отхиливающие навыки твои согрупники. Пассивное выживание не такое большое, особенно на начальных уровнях. Стандартное макс. здоровье у классов практически одинаковое. Разница в хп у них, пусть и будет увеличиваться, но не за счёт классовых талантов, а только за счёт пассивных навыков (как "Ветеран") и дополнительных хр-к с экипировки. И то... даже на максимальных уровнях, эта разница составит менее х1.4. На броню c сопротивлением, в PvP ты можешь рассчитывать только на хай лвл. (О причинах далее). (P.S. Страж в целом довольно слаб именно в начале игры. А вот когда он уже выкачает таланты, соберёт экипировку на нужные дополнительные хр-ки и возьмёт необходимые навыки, то станет крайне бесячим персонажем и иногда даже незаменимым) Особенности развития разных характеристик Почему же на защитные хр-ки мы будем рассчитывать только ближе к поздней стадии игры? Всё дело в особенности прокачки персонажа, при которой урон растёт непропорционально броне или сопротивлению. Основное значение урона ты получаешь просто надев хорошее оружие, в то время, как стражу нужно сперва выкачать таланты на хп, подумать как о защите от магии (прокачивать бижутерию), так и о физической защите (прокачивать броню), что гораздо дольше и сложнее. Да, дд классам тоже нужно прокачивать остальную экипировку ради Силы атаки и Силы способностей, которые тоже не так уж мало влияют на урон, но они составляют меньшую его часть. То есть, просто надев пушки максимально доступного качества и заточив их, дд получают сразу много урона и его значение ничем не урезается. Если тебе прибавило 1000 урона, то с повышением уровня это значение останется 1000. А вам приходится вечно "догонять". С фулл эквипом Только с клинками С процентными хр-ками, к которым относятся Броня и Сопротивление, всё иначе. Как мы знаем, просто за повышение уровня у нас статы не даются. А только изучая таланты на новых страницах. Но при этом, с каждым новым уровнем, игра требует больше численного значения характеристики за каждый процент. То есть, условно, если раньше 790 Брони мне давало 19.73% физ. защиты, то с повышением уровня те же 790 Брони дадут мне 17.20%. И казалось бы, можно наверстать упущенные проценты в ветке талантов. Но далеко не на каждом уровне она есть, а проценты всё равно уменьшатся. Настоящую силу таких статов мы почувствуем на максимальных лвлах, когда наша прокачка замедлится, поскольку до этого, мы всё время достигаем новых уровней и еле успеваем догнать новые значения. А имея у дд классов такой дебафф как Расщепление, который снижает Броню и Сопротивление на 20% чистыми (ну, это когда из 32% останется всего 12%), на эти хр-ки мы будем рассчитывать в последнюю очередь. Хотя на высоких уровнях, значение этих статов, из-за разных прибавок, достаточно солидное и явно не разочарует страже-бояр. Система динамических уровней С порезкой характеристик за лвл мы разобрались, но стоит упомянуть об ещё двух механиках игры: система динамических уровней и рейтинговые характеристики. Начнём с системы динамических уровней, что она из себя представляет? К примеру, ты имеешь 30-й уровень. Заходишь на какую-то локацию 9-го. И твой текущий лвл занижается до 9-го, а соответственно, и все хр-ки. Система работает таким образом, что все процентные статы сохраняют свой процент (было 32% брони на 34 лвл и на 9 лвл тоже конвертируется в 32%), а вот числовые хр-ки (как урон, здоровье, регенерация и.т.д) пересчитываются согласно своим множителям исходя из разницы в уровнях. То есть оно снижает статы не до какого-то определённого значения, а исходя из твоих текущих параметров. Если ты только что апнул 1 или несколько уровней, получил срез хр-к и ещё не изучил таланты для их восстановления, то ты будешь ослаблен с учётом того, что они должны быть изучены. Условно, у игры есть определённые значения на сколько твой персонаж должен иметь больше или меньше того или иного стата, смотря только на разницу в уровне. Что такое рейтинговые характеристики? Всё очень просто, это почти все процентные хр-ки, у которых есть формулировка на подобии "Что-то делает на N% от противников равного вам уровня". То есть в зависимости от разницы в лвл хр-ка будет иметь разное значение. В какую сторону это работает? Если ты 34-го уровня, идёшь против 11-го, то твои защита, сопротивление, крит шанс, сила крита и.т.д будут повышены против него, а его, в свою очередь, будут менее эффективны против тебя (меньше брони, критов и.т.д) Отдельно хочу отметить, что рейтинговые характеристики сравнивают твой текущий уровень, а не максимальный, так что на локациях с динамическим уравниванием, например, 9лвл, игроки 34 и 9 уровней не получают изменений для друг друга. Итог. Когда же я смогу хорошо себя чувствовать? Ранее я описал много сложностей в прокачке данного класса и не только, и у тебя могло сложиться впечатление, что я рассказываю как Стражам плохо, но хочу развеять сомнения: все эти страшные объяснения нужны были лишь для того, чтобы ты понял, что не сразу почувствуешь силу своего персонажа и почему это происходит. Как я и говорил ранее - на начальных уровнях ты будешь бесполезным (как в PvE так и в PvP), но чем дальше в лейт, тем ты сильнее. В целом, можно выделить несколько "пиков силы", когда персонаж чуть больше раскрывается и, можно сказать, игра становится немного другой. Вот вам список: 1 частица хаоса Когда у тебя 5 и 7 частиц хаоса При получении «удара колосса» При достижении 14-16 частиц хаоса Когда изучишь Живой доспех Когда появится 21 частица хаоса. При изучении пассивки «ответный удар» Так же на каждом этапе, когда появляются дополнительные характеристики на шмотках, если выпадут нужные. Это 10-й и 20-й синий шмот и 20-й фиолетовый. Когда изучается «Арсенал небес» При появлении пассивки «отрицание боли» С каждым из этих этапов ты будешь чувствовать себя гораздо лучше, главное не забить на первых шагах и дойти хотя-бы до 5-го пункта (18+лвл). Тогда игра заиграет совсем другими красками. А после 20-го уровня, сам по себе мир PvP контента становится куда разнообразнее, и место Стража в нём достаточно велико, когда речь касается больших сражений. Часть II Всё о экипировке на стража И так, первое о чём мы поговорим во второй части - экипировка. Пояснять за каждый тип и класс экипировки я не буду, мы остановимся только на том, что нужно именно стражу и зачем. Смотрим только на вещи самого высокого уровня. До 20-го, я бы рекомендовал надевать вообще любые вещи, которые первее выпали и сильнее текущих (синие), дабы побыстрее прокачаться. Всё равно в скором времени вы смените их полностью. (При толковой прокачке, 20-го уровня вполне можно достичь за 1,5-2 месяца, играя в нормальном клане и проходя рейды). Буквально, до 18-го уровня вы в любом случае будете слабы и никакие шмотки вас не спасут, а данный подход сэкономит вам пару сотен тысяч голды и немного алхимических камней, а соответственно - времени. Собирать будем сет разрушителя. Это PvP экипировка, дающая характеристику Стойкость, которая снижает урон от игроков и шанс критических атак. Для начала, нам стоит разобраться с бронёй. Тут выбор максимально простой - полностью тяжёлая экипировка. В идеале, картина должна быть такая: Дополнительные хр-ки - Максимальное здоровье и Блокирование на всех вещах. Мы собираемся максимально в жир и тут нюансов никаких нет. Чего не скажешь при выборе бижутерии. Разница в классах аксессуаров в первую очередь заключается в балансе между Силой способностей и Сопротивлением, а для нас важны оба параметра, ведь Сопротивление это защита от магии, а от Силы способностей зависят такие эффекты как Регенерация и Барьер, которые нужны нам для выживания в целом. Ниже я приведу таблицу соотношения этих хр-к на каждом из классов бижутерии Из-за не очень полезных дополнительных статов, равновесные аксессуары нам не подходят, а баланс из основных хр-к, мы можем собрать, пользуясь только Охранной и Неистовой бижутерией. По итогу, берём либо 2 Охранки + 2 Неистовки, либо 3 Охранки и 1 Неистовку. Я тестировал оба варианта, оба мне понравились, но в итоге оставил себе 3/1, дабы до конца протестировать Сопротивление контролю. Если же вы решите взять 2/2, то Амулет должен быть Охранным. А в остальном, не важно какой тип экипировки, главное соблюдать соотношение. По дополнительным хр-кам делаем следующее: Всю Неистовку ролим на Перезарядку способностей и Силу крита, а всю Охранку на Максимальное здоровье и Сопротивление контролю. Выбор, в целом, очевидный, но эффективный. Далее осталось только оружие. Самая короткая часть. Каких-то других классов у оружия у нас нет, поэтому выбирать нам и не приходится. Разберёмся только с дополнительными характеристиками. Меч я бы рекомендовал ролить на Силу крита и Рейтинг крита, а Щит на Блокирование и Рейтинг крита. О том, как работают некоторые характеристики в игре Проясним несколько важных нюансов касательно работы некоторых статов: как они работают и на что влияют. Первое о чём я хотел бы рассказать - классовая хр-ка Блокирование. Многие новички думают, что при срабатывании этого стата ты полностью поглощаешь урон, однако это не так. Урон снижается лишь на 50%, при этом, действует только на направленные атаки. Сюда входят как удары с руки, так и навыки срабатываемые на цель. (Например Шаг сквозь тень у роги). На любые эффекты периодического урона или массовые атаки это не действует. В отличии от Блокирования, Уклонение полностью предотвращает урон от направленных видов атак. Однако у стража много синергий на классовой хр-ке, так что несмотря на меньший срез урона, она нам выгоднее. (P.S. Сейчас существует баг, при котором горение от мобов всё же блокируется) Теперь перейдём к стату Сопротивление контролю. Он не даёт шанс полностью избежать эффектов контроля, как в других ммо, однако уменьшает их длительность. То есть, если значение этой хр-ки у нас 20%, то все подобные дебаффы будут действовать на 20% меньше. (Действует только на Оглушение, Страх, Немоту, Обездвиживание, Провокацию и Сон) Следующее что мы рассмотрим - бафф «Защита». Ровно как и Расщепление, оно изменяет параметры Брони и Сопротивления чистыми процентами. (но только на 15%) То есть, если у вас 50% Брони, то после прибавки станет 65%. По такому же принципу действуют наши Заряды эгиды. За каждый заряд (он же «стак»), мы получаем по 2% физ и маг защиты. Максимально 5 зарядов. Соответственно, за все 5 нам прибавится 10% чистыми. И если совместить это с примером, рассмотренным ранее, то получим: 50%+15%+10% = 75% Брони. А вот хр-ка Пробивание брони (альтернативная - Снижение сопротивления) действует иначе. Она игнорирует Броню (или Сопротивление) именно на процент от текущего значения. То есть, условно, при игнорировании 5% от 75-ти, получится не 70%, а 71,25% защиты. Поговорим про Оглушение. Достаточно неочевидной особенностью этого эффекта является то, что он не суммируется и не перенакладывается при повторном применении. То есть, если ваш союзник оглушил цель рывком на 3 секунды и по истечению 2-х из них вы решите отдать свой рывок ( тоже со станом на 3с), то оглушение не продлиться и после оставшейся 1-й секунды противник просто выйдет из контроля. Поэтому важно следить за таймером отрицательных эффектов в таргете. (Просто важно знать, что такие эффекты как Немота или Страх с недавних пор тоже не суммируются, но зато перенакладываются) Про Кровотечение так же стоит поговорить, ибо оно составляет достаточно большую часть нашего урона. Урон от кровотечения не растёт вместе с уроном от оружия. По сути он состоит из базового урона кровотока + % от Силы атаки, а значит, что прокачка брони (и тем более лёгкой) или Щита даст бОльшую прибавку. Кстати, именно из-за наличия Щита у стража он способен разогнать урон от Кровотечения даже больше, чем ханты. При этом, глиф от Эгиды за 3чх "Прилив сил", повышающий урон за каждый заряд вместо защиты с недавних пор повышает вообще весь твой урон, включая Кровотечение. Так же, Расщепление тоже влияет на урон от Кровотечения (поскольку наносится физический урон), но не совсем таким же способом. Повышение урона может повысить урон от кровотока в любой момент, когда оно появится и пока висит на тебе, а понижение защиты учитывается в момент наложения ДоТ`а. То есть если вы сначала наложили Кровотечение и только потом дали Расщепление, то урон останется прежним, зато если сначала наложить Расщепление, а потом уже Кровотечение, то урона станет больше. Стратегия прокачки талантов Теперь стоит поговорить о том, в каком порядке мы будем качать ветку талантов. Я не буду расписывать каждую страницу, ведь на самом-то деле тут просто нужно придерживаться определённому алгоритму, справедливому ко всем страницам. Первым делом всегда качаем Навыки, Частицы хаоса и Здоровье, далее уже берём Броню, Силу атаки и Сопротивление, и уже в самом конце Блокирование, Сопротивление контролю и Регенерацию. Понятное дело, что эти таланты не идут именно в таком порядке, поэтому просто выбирайте кротчайшие пути к более приоритетным. Что касается навыков - не все из них полезные и некоторые можно пропустить, а вернуться уже когда талантов не останется. К такому разряду относятся, например, пассивки «Адаптация»(16лвл) и «Под зашитой» (12лвл). Их можно абсолютно смело пропускать, пока у вас есть другие таланты, + навык «Бессмертные защитники»(23лвл) бесполезен для тех, кто играет без гильдии. Активные навыки и пассивки стража Время рассмотреть все навыки стража. Описание каждого вы можете прочитать на скриншотах, а я в свою очередь дам свою рецензию по каждому из них. Молот гнева Урон далеко не самый большой, но навык быстро перезаряжается, а в синергии с блокированием им можно неплохо так спамить. Только вот чтобы это реализовать враг должен совсем не двигаться, не заставлять отбегать вас самих и не накладывать на вас контроль. То есть подходит в концепции только для ПвЕ и то, в будущем у вас будет альтернатива получше. В начале игры, при дефиците частиц хаоса - юзаем, а дальше юзлесс, максимум в середине игры в договорах, ну а после 29-го вовсе забыть можно. Героический рывок Единственный способ инициации и генератор большого кол-ва контроля. Особенно силён, когда вы имеете достаточное кол-во частиц хаоса, чтобы реализовать синергию с провокацией. Обязательный навык Эгида Это наша героическая способность. Она имеет большую перезарядку, но дарует нам неплохой сейв. С частицами хаоса и в синергии с провокацией, именно этот навык нам будет обеспечивать основной способ выживания до 18-го уровня. Так же, с последними изменениями частиц хаоса навык пусть и далеко не полностью, но всё же частично избавляется от своих минусов (перезарядка и скорость активации) Провокация Данный скилл это и контроль противника и сейв, причём я считаю таунт, как вид контроля - лучшим. Этот навык - один из ключевых для синергий, ведь имеет 100% блок всех направленных атак в первые 3 секунды после использования, при вкаченных частицах хаоса. Тоже обязательный навык Барьер клинков С последним обновлением навык заиграл другими красками, благодаря изменениям частиц хаоса. Добавление 1 тика в глифе за 3чх "Буря мечей" + накладывание кровотока вокруг себя, а не при автоатаке врага, сделали навык достаточно интересным для ДД сборки и в какой-то степени даже самым ДПСным навыком, но не в рамках 1 прокаста, а на дистанции. (Арсенал наносит на 40% больше урона, но имеет откат на 64% больше). + навык стал быстрее вносить этот урон Так же, мало кто знает, что изменения коснулись и альтернативный глиф за 3ч "Шквал стали". Раньше мы отражали 50% урона от способностей врагов по следующему сценарию: Урон врага (допустим 100ед) летит в тебя, уменьшается от твоей брони и прочих эффектов (допустим 50% родной брони + 15% от "Защиты" + 22% от Стойкости + могли быть ещё прочие эффекты), летит во врага только 50% от этого и уменьшается от его брони (допустим даже только 25% родной брони и 22% Стойкости). Из наших 100 урона мы в лицо получили 33.15, а враг получил 9.69... То есть даже если мы каким-то образом за 7 секунд действия получали урон на 99% нашего здоровья, то враг получил бы меньше 30%. И это при условии, что любой урон от навыков в виде "лужи" (арсенал, лужа от стяжки, лужа от ледяной сферы и т.п) и призванных существ (духи ханта, дракон, резчик, клоны, петы и т.п) не возвращается вообще (кстати, до сих пор). Сейчас же навык игнорирует твою защиту при расчётах и даже если ты должен был получить 100 урона, снизил его до 33.15, то во врага полетит не половина от этого, а половина от 100. Причём, любое уменьшение входящего урона не уменьшает возвращаемый, даже если сработало Блокирование и уменьшило урон на 50%, ты под защитой "Бессмертных защитников", понижающих урон на 75% и новой расходки "Панцырь А`Нуин" тоже на 75%, урон в любом случае полетит во врага "до" уменьшения. Однако защита врага всё равно уменьшает возвращаемый тобою урон, а так же, возвращаемый урон от обычной и критической атаки будет одинаков, несмотря на то, что урона ты получишь больше. Рассмотрим так же следующие сценарии дебаффов: 1) Если на враге Слабость - ты возвращаешь меньше урона, поскольку получаешь меньше 2) Если на тебе Слабость - ты возвращаешь столько же урона, как и возвращал бы без неё 3) Если на враге Уязвимость - ты возвращаешь ему больше урона 4) Если на тебе Уязвимость - ты возвращаешь столько же урона, хотя по тебе наносится больше 5) Если враг повышает свой общий урон (например ураган стрел с чх) - ты возвращаешь больше урона, поскольку получаешь больше 6) Если ты повышаешь свой общий урон (например глиф эгиды) - ты возвращаешь больше урона, хотя получаешь столько же Остаётся только понять как при большой защите за 7с принять настолько большое кол-во урона) Я уже протестировал и практика показала, что ты далеко не можешь просто залететь и положить всех таким образом, но свою долю урона внесёшь, особенно если это массовые бои и в суматохе люди не следят за тем, кто что прожимает и отдают АОЕ. Навык играбелен, но не маст хев, в ПвЕ на договорах крайне полезен, прочитаете об этом ниже. Удар колосса Тот самый навык, который позволит тебе быть ключевым фактором в масштабных пвп сражениях. Стягивать толпу врагов, пока твои союзники их заливают уроном – очень вкусно, но не так легко реализуемо. Так же, этот навык станет глотком свежей воды и в PvE, когда откроется на 14 лвл, фарм будет куда приятнее, а в договорах результаты сильно улучшатся. Живой доспех Очень сильно повышает выживаемость и создаёт синергию на повышение максимального здоровья, хорош даже без модификаторов. С момента его получения твои возможности в танковании во многом возрастут и на этом этапе точно нужно брать, но ближе к концу игры он будет менее актуален, за счёт того, что в ПвЕ вы сможете жить более спокойно и без него, а в ПвП контроля у всех станет много. При активации в 1с, не такой большой длительностью (если ты хочешь перед врывом прожать, то треть времени потеряешь) и большим кд в 40с, навык просто будет впадлу ставить на панель из-за того, что хоть и всё равно иногда использоваться. Для договорных ПвП 1 на 1, можно сказать, что тоже обязательный, хотя это просто активность придуманная самими игроками и ориентироваться на неё не стоит Бессмертные защитники Последние изменения затронули и этот навык и наконец-то, спустя почти 2 года с момента его добавления он пришёл в тот начальный вид, в котором задумывался, когда я его предлагал. Кто не понял какие изменения были сделаны за это время, то вот вам список: 1) Перенаправляемый урон в тебя перестал быть чистым и стал физическим (уменьшается от твоей брони) 2) Активный эффект навыка стал работать на всех соклановцев, а не только на группу 3) Активный эффект так же стал накладывать бафф "Защита" на союзников при применении (но не на себя) 4) Время активации теперь 0.5с вместо 1.5с. Так же разработчики за это время ввели такой режим как "Охота", где этот навык помогает ускорить прохождение. В совокупности эти изменения неплохо повысили актуальность защитников, но про ПвП пока сказать сложно, польза от навыка не настолько явная глазу и нужно провести больше тестов. Как ситуативный навык - пойдёт. Арсенал небес Тут ситуация с самого начала была отличная. И сам навык неплох, и модификаторы достойные. Пусть не все из них прям "крутые", но хотя-бы вариативные. Это навык, у которого самый высокий урон и для ДД билдов он мастхэв. Однако чтобы его реализовать враг должен достаточно долго находиться в его радиусе. В целом, нас это устраивает в рамках прокаста с контролем, но если у врага будет свиток антиконтроля, то применение "откладывается" и какое-то время навык бесполезен, но от этого никто не застрахован. Для PvE навык тоже отличный. Что на рейдах/охоте, что в договорах (основные режимы) реализуется и не сковывает тебя. Подводя итоги: очень хорош, но и альтернативы имеются к тому времени в зависимости от нужд. Я использую разные сборки по ситуации, меняя ЖД, Стяжку и Арсенал между собой. Пассивки Про пассивные навыки особо нечего писать, достаточно просто прочитать описание. При составе сборки я прокомментирую некоторых из них, а пока просто держите тир-лист пассивок по моему мнению: Резюмируя весь данный блок с навыками, хочу сказать, что разработчики сделали большую работу по актуализации навыков и сейчас Страж всё же имеет какое-то разнообразие в билдах. Понятное дело, что некоторые глифы в навыках или половина пассивок, оставляют желать лучшего, но в сравнении с тем, что было раньше, это уже неплохо. Но и очевидно, что главный минус - большие затраты частиц хаоса. Некоторые навыки без дорогих глифов слишком плохи (Барьер клинков, Провокация, Защитники), а некоторые просто гораздо слабее. И вот новичкам в этом плане, конечно, не повезло. Сборки на стража. "Путь" прокачки талантов Наконец-то настало время для самого сочного – разобраться как правильно вкачивать частицы хаоса. Я составил некий «путь», по которому мы пойдём с самых низких уровней, рассматривая какие модификаторы нужно качать на этапе каждой из страниц таланов. Путь составлен так, чтобы мы как можно меньше не тратились на сброс частиц хаоса, экономя ресурсы для прокачки и при этом, получали самые сильные комбинации. 2 Страница (4 лвл)[2чх] Начинается наш путь на 2-й странице, где мы получаем свои первые частицы хаоса. Сразу берём «Неутомимый защитник» в эгиде, дабы гарантированно получать стаки и наша ульта начала нас сейвить. До достижения 5-ти частиц хаоса мы берём «Исцеляющий удар» на молотке и «Не зная усталости» на героическом рывке. А вот как только мы получим 5 чх, я рекомендую сбросить сборку. Ради чего, спросите вы? Я вам отвечу: для какой-то эффективной основы нам нужно было подкопить, а дабы не мучатся весь этот период, пока таланты качаются, мы брали гораздо более слабую, но дешёвую альтернативу. 3 Страница (6 лвл)[5чх] И вот, мы накопили 5 частиц. С этого момента, длительный период, мы можем не сбрасывать сборку. Берём стандартный набор для выживания: «Глухая оборона» в Провокации + «Второе дыхание» в Эгиде. Стоит отметить, что «Глухая оборона», в ближайшие 3 секунды, блокирует вообще все направленные атаки, а не только от тех целей, на которых подействовал основной эффект навыка. С данной комбинацией мы будем гарантированно, за короткий срок, получать стаки эгиды и набивать регенерацию, что сразу и усиливает эффект нашего ультимейта и даёт восстановление здоровья в бою. 4 Страница (8 лвл)[8чх] Следующий шаг. Нам стало доступно ещё 3 частицы, и мы возьмём себе «Вызов» в Провокации и «Авангард» в Молотке. Теперь наш агр стал ненаправленным и действует на всех врагов в радиусе 5 метров, что гораздо упрощает его использование и позволяет накладывать контроль сразу на нескольких противников. «Авангардом» мы продолжаем нашу синергию на блокировании, через «Глухую оборону». Теперь, молоток крайне сильно и гарантированно откатывается за очень малую цену. 5 Страница (10 лвл)[11чх] Идём дальше, ещё 3 частицы. Тратим их на модификатор «Буря мечей». Теперь у нас есть какой-то более-менее не позорный урон, главное используйте Прыжок -> Молот-> Барьер клинков -> Провокация (и в конце всего контроля просто преследуйте врага, по возможности ещё раз молот, если знаете, что убьёте, то эгиду после провокации можно) 6 Страница (12 лвл)[14чх] На 6-й странице мы берём модификаторы «Не зная усталости» и «Нокдаун» на Героическом рывке. Уменьшаем кд и повышаем контроль от прыжка. В целом, прыжок станет куда приятнее 7 Страница (14 лвл)[16чх] А уже на 7-й странице, чтобы наш новый навык был ещё более приятный и фармить с ним стало одно удовольствие, на следующей странице мы берём «Землетрясение» за 3 частицы. Урона у стражей не так много, а это небольшое сглаживание данной проблемы, поскольку лвл маленький, то в том числе для фарма или договоров это лучшее решение. 8 Страница (16 лвл)[19чх] Далее берём «Неукротимость» всё на том же Героическом рывке и вот основная комбинация у нас собрана. Отныне, нам стоит больше заботиться о кол-ве стаков эгиды и, желательно, постоянно их поддерживать. 9 Страница (18 лвл)[21чх] Тут мы получаем новый навык - «Живой доспех». Время менять обратку и пересаживаться от более ДД версии на полноценную танковую. Это во всех смыслах лучшее решение, поскольку ЖД хорош и без модификаторов, поэтому данное действие добавит нам и хороший навык и 3чх + на странице получим ещё 2. Тратим их на «Каменную кожу» и «Энергетический всплеск» в Ударе колосса, «Неукротимый защитник» в Эгиде и «Задира» в Провокации. Первый модификатор даёт нам бафф Защита, который, как мы помним, даёт очень вкусные бонусы. И теперь, даже благодаря Удару колосса, мы становимся более живучими. Второй модификатор - просто как приятный бонус, в основном, ощущаешь в PvE, а уж именно в договорах - тем более, ибо оно уменьшает кд не в процентах, а на 4 секунды, поэтому взяв бафф на перезарядку вы уменьшите кд до 18-19с, а потом ещё на целые 4с. Стяжка каждые 15с - вкусно. Третий модификатор мы уже знаем, просто пассивно накапливает стаки, очень приятно, особенно учитывая требования к нашей комбинации (4 стака) Четвёртый модификатор - Быстрее кд агра, просто приятный бонус. 10 Страница (20 лвл)[24чх] Следующая страница. Самое интересное – пассивка «Ответный удар». В сравнении с предыдущими даже очень хороша, добавляет тебе урон. С неё выходит приблизительно х1.3 твоей автоатаки. Не так много, но и откат 2 секунды. Пример действительно справедливой пассивки. Вернёмся к частицам. Берём модификатор «Бдительность» в Эгиде, чтобы она быстрее откатывалась, это как в PvP неплохо, так и в PvE. Принцип отката - именно секунды, поэтому бафф на перезарядку очень сладкий, вы можете пробовать отказываться от каких-то модификаторов или навыков для выживания в договорах, чтобы улучшить свои показатели за счёт ДД. 11 Страница (23 лвл)[26чх] Далее у нас 11-я страница. Навык «Бессмертные защитники» пригодятся в рейдах в основном, поэтому не так важно для нас сейчас, когда мы рассматриваем основную сборку, но вообще стоит изучить, если вы один из основных танков в гильдии. Так же, нам дали 2 частицы, мы берём глиф «Стойкость» в Живом доспехе, который на Сопротивление контролю. Скорее просто как приятный бонус. В совокупности с нашими доп. статами на бижутерии, бонус будет не так уж и плох, хотя сама хр-ка не такая сильная. 12 Страница (26 лвл)[29чх] И вот уже на 12-й ветке, берём «Сплочённость», в Живом доспехе, увеличивая время его действия в зависимости от союзников вокруг, и идём дальше 13 Страница (29 лвл)[31чх] И вот уже на 29-м, мы достаточно меняем билд, снова в сторону дд уводя, ибо к тому моменту контроля появляется много, ЖД уже не так неудобно юзать, а Арсенал (новый навык) очень классный. На этом этапе можем позволить себе вставить в него все 3 модификатора, а именно: «На острие клинка», «Рассекающие плоть клинки» и «Орудия палача». Первый даёт нам спешку, для нас как для милишника очень приятно, хотя и альтернативный можно взять, поскольку там замедление передвижения противников стакается с эффектом "Замедление" и они вообще становятся очень медленные. Второй и Третий глифы дают нам много урона по 1-2 целям. Кровотечение так вообще будет составлять чуть ли не 40% урона с этого навыка. По ротации: Прыжок -> Арснал-> Удар колосса-> Провокация-> Эгида ->Прыжок (смотря кто против вас и что у него есть в запасе, эгиду можно не жать и попридержать стаки) 14 Страница (32 лвл)[34чх] На последней странице мы забираем последнюю пассивку, ставим, и наслаждаемся игрой на полную. Вместе с новыми частицами хаоса мы можем поставить модификаторы в неиспользуемые навыки, дабы не сбрасывая частицы поменять сборку. Вот как выглядят мои основные варианты сборок: Это всё были варианты для обычного стража с тяж шмотом, но что по поводу полноценной ДД сборки? С последним обновлением, в котором изменили Барьер клинков мы стали к ней ближе и даже можно неплохо выдать урона уже сейчас, но есть некие нюансы, а именно: Мы герои ближнего боя, нам нужно дать прыжок для инициации и при этом находиться возле врага в последующие секунд 7-9, что иногда бывает проблематично, особенно имея спешки, телепорты, драконы и.т.д у противников, + очень небезопасно с точки зрения позиционирования. А ведь для нанесения большого кол-ва урона мы пожертвуем и тяжёлой бронёй и защитой с зарядов эгиды (чх) и даже массовым агром ради Расщепления, (ибо без него я считаю ДД сборки неполноценными), что и так сократит нам жизнь.В итоге получается какая-то неудобная стеклянная пушка, которая сама боится контроля как огня и даже то, что мы могли раньше легко контрить (рога) для нас становится очень большой проблемой. Поэтому ниже я представлю сборку для ДД в том виде, который сейчас наиболее жизнеспособен, не отказываясь от масс агра и блокирования с него в пользу кровотока. (да и вообще таргетный агр это неиграбельно), только в редких случаях 1 на 1 против какого-то ханта, когда ты инициируешь. (P.S. Я думаю к моменту 34лвл вы сами сможете понимать что и зачем ставить) Договоры Договоры - важная часть игрового процесса в котором можно в начале игры получать необходимые ресурсы. Суть простая: Чем больше мобов за отведённое время убьёшь, тем выше награда. Как страж себя чувствует в договорах? Достаточно плохо, относительно ДД классов, если честно, даже несмотря на все изменения. Вероятно стражи в фулл фиол лайте могут посоревноваться, но обычные работяги точно нет. Тут не будет чётких билдов на каждый уровень, как это было для основной сборки, но советы к их составлению и конечную сборку я дам. У новичков есть проблемы ещё на этапе выживания, чтобы просто пройти договор, поэтому на первых уровнях билд от основного практически не будет отличаться очень долгое время. Только на уровне 20-м мы можем задуматься о расхождении с основной сборкой и изменениях в сторону ДД. (например убрать глиф за 3чх в Эгиде и за 2чх в стяжке, поставить вместо ЖД обратку и впихнуть глифы "Буря мечей и "Рассекающий вихрь"), так же после 20-го уровня вы можете убивать Зверя (босс такой) и собирать лёгкий сет Провидцев (на Хладнокровие). Для чего он нужен и нужно ли его качать? Сразу отвечу - нет, качать его не нужно, максимум потом когда-то сможете его изучить и заточить на +11 (это относительно дёшево), когда ресурсы будут позволять. Польза от сета очевидна: даже если вы в фиол тяжёлой броне, то синяя лёгкая всё равно даст больше Силы атаки, а соответственно и урона. Да, мы жертвуем огромным потенциалом выживания, но он нам и не нужен в таком кол-ве. Как правило, в конце игры с выживанием проблем нет и всё решается в разгоне урона. Прибавка чисто за лёгкий сет не такая большая, однако у нас ещё есть "Хладнокровие", и вот вместе с ним в лёгком сете наш урон будет выше шде-то процентов на 30 (в сравнении с фиол тяжем). Заметная разница, скажу я вам, а вложения минимальны. Просто ходите на Зверя/Судью и оставляете те вещи, которые нужны для коллекции. А какие хр-ки нужны?, спросите вы у меня. А я вам отвечу - не запаривайтесь особо с ними, но если всё же хотите выбрать лучшее, то на броне Перезарядку способностей, на бижутерии 2/2, в неистовке Силу крита и на равновеске Рейтинг крита. Оружие мы оставляем родное, прокаченное. Однако это далеко не всё, настоящие изменения будут уровню к 29-му, где у нас появляется навык "Арсенал небес" и пассивка "Серия ударов" + повышается общая выживаемость +приобретаем больше чх. На этом этапе мы можем избавиться от "Провокации", поставив все 3 нормальных ДД навыка: "Удар колосса", "Арсенал небес" и "Барьер клинков". и играть по следующей сборке: Если не хватает выживаемости, то можете изменить глиф за 3чх в эгиде, одно это изменение даст довольно много, особенно если брать бафф на Перезарядку в начале договора, что я вам определённо советую. Я напомню, что он снижает кд в %, сначала навык срежет себе довольно приличное время, а потом чх уменьшит на 10 секунд, что в совокупности даст нам каждые 17с прожатие ульты, а если ещё и Реванш прокнет (а он обязательно прокнет под мобами)... фуф... В заключении хочу сказать, что даже пожертвовав выживанием, собрав фулл синюю лайт PvE броню и приноровиться, мы всё равно будем забирать меньше, чем это делают ДД классы (ханты, маги, роги), которые не фармили никакой сет и которые имеют в билде целые навыки на выживание, а то и два (транслокация + раздвоение например). Справедливо ли это? Вероятно нет, нужно ли исправлять апом класса? Думаю тоже нет, ибо тогда это будет монстр с уроном в лайт шмотках. Тут только вводить какой-то бафф отдельно в режиме, для Саппов, который не просто жертвует бронёй и повышает урон, а в зависимости от брони повышает урон. Потому что в противном случае им равносильно пользуются ДД. И то, если ради него мы не сможем подбирать другой бафф, а ДД смогут, то это всё равно нас не уравняет... (Да, отвлёкся на мысли, простите) Важные советы На последок хочу дать несколько важных советов, на что стоит обращать внимание и как себя вести, играя за стража. Начнём с того, что всегда стоит следить за отрицательными эффектами противника, в частности за эффектами контроля. Особенно важно, когда в команде есть ещё персонажи с Оглушением. Так же, не стоит судорожно нажимать все кнопки как можно быстрее. Влетели с Героического рывка - подождите несколько секунд, смотря на эффекты противника или отсчитывая в уме нужное время, и только потом давайте Провокацию. Иначе никакого профита с неё вы не получите. Ни контроля дополнительного, ни стаков (ибо после рывка человек в стане и атаковать вас не сможет). Следующее что я настоятельно рекомендую - изучите все навыки и глифы других классов. Это очень важно. Не понимая как работают навыки вы не сможете "играть в карты", отдавая свои скиллы в ответ на действия противника. Условный пример - вы воюете против мага, он отдаёт в вас волну. И если вы не знаете, что она накладывает Расщепление, то, соответственно, не попытаетесь предотвратить получение последующего урона, который будет наноситься на 20% больше, за счёт уменьшения Брони и Сопротивления. Ну или же пример с Тенями - их основной урон это атака из инвиза. Без него он очень мало сносит. И таких примеров можно назвать много. Важно не только понимать какой из навыков что делает, но и какую задержку, время применения и откат имеет. Многие хотят так же услышать ответ на вопрос "Как правильно давать прокаст?", но не могу сказать, что тут есть правильный ответ. Есть парочка желательных для тебя последовательностей(Например: имея 4 стака эгиды прыжок + спустя время агр + спустя секунду прыжок снова), но далеко не всегда ты их реализуешь. Всё зависит как от действий противника, масштаба сражения, так и от длительности битвы. Разработчики добавили дд классам много контроля и жадничать прыжком как раньше уже нельзя. В 90% случаев твой бой начинается именно с него. Но не стоит влетать в первую попавшуюся цель или сломя голову лететь в даль. Выдать контроль в противника - это хорошо, но смысла не имеет, если никто не зальёт урон. (Хотя опять же, если вы контролите хила, пока ваши дд убивают другую цель - это оправдано, но должно быть согласовано. Никто не читает ваши мысли, и ваши ожидания могут не совпадать с мыслями союзников). Теперь про данжи. На начальных уровнях (где-то до 18) мы не геройствуем, а проходим по одной, ну максимум две пачки. Вы пока не можете индивидуально держать мобов и хорошо восстанавливать здоровье. А вот уже ближе к последним уровням можно хоть всё подземелье держать, лишь бы урона залить хватило (на болотных данжах мобы стакают защиту и хил). Но всё равно я советую пробегать комнаты, накапливая мобов только до того момента, как встретите мини босса. Останавливаемся и убиваем мобов, далее без мобов его легко обходим (любой маг или рога спокойно может организовать данное мероприятие). Теперь, что касается общих советов по данжу: Вы всё-таки почти всегда хотите идти первыми, а соответственно, не лишним будет понимать, как же нам искать нужную комнату с конечным боссом. В подземелье всегда разные комбинации комнат, но они придерживаются общих правил. Вот что вам нужно знать: Комнат до последнего босса всегда 3. Одна с мини боссом и 2 с мобами На пути вам должен встретиться строго 1 минибосс. Если нашли второго - возвращайтесь, это тупик Если вы зашли в тупик, то нужный проход обязательно находится в предыдущей комнате На протяжении всего данжа вы можете определить куда двигаться, посмотрев на карту. Конечно, она будет скрыта для вас, но её можно двигать в разные стороны и с помощью размера определить в какой стороне больше комнат. Если вы первые зашли в комнату, а все мобы с пачки находятся не в радиусе пассивной агрессии, то вам достаточно любым способом атаковать одного моба из пака, чтобы все его друзья начали вас преследовать ( Если другие члены пати не атаковали их). Иногда можно сократить путь, перепрыгнув через преграды, пропустив мини босса, например. Все комнаты с боссами одинаковы по внешнему виду и в них никогда не встречаются мобов, так что запомнить их будет не лишним Ну и вот вам наглядный пример как я прохожу данжи - https://youtu.be/WYo0eG9su-4 Последнее о чём расскажу - как танчить Тлевру. Тут всё достаточно легко. Начинаем бой, бьём, ждём секунд 13-15, она начинает кастовать такой столб, и мы отходим в указанную точку. (скрины ниже) Её очень легко запомнить, ибо эта точка находится на углу. Как только увидели вокруг Тлевранзы развеивающийся кружок - возвращаемся обратно. Если вы всё же попали под данную атаку - молитесь, чтобы рядом с вами никого не оказалось. Она наносит урон в зависимости от кол-ва существ поблизости вас. Так же, нужно понимать, что наш спасительный уголок работает только если босс находится в центре, поэтому, возвращаясь к Тлевре, главное успеть войти в радиус её атаки, чтобы она не сдвинулась с места. После того, как вы к ней пришли обратно, у вас есть 10 секунд. Проще всего контролировать время, используя Героический рывок в качестве таймера, прыгая к ней после её прокаста. Откат при 4-х стаках у нас 7 секунд, а значит бьём ещё 2 секундочки после кулдауна и бежим обратно. Каждый 3-й навык босса - волны. В таких моментах вам не следует так просто отдавать рывок для сближения. Оставьте его на увороты от волн. Вот и подошла к концу третья версия гайда. Спасибо за внимание, жду вашей реакции. Либо благодарность, либо критику - всё будет интересно. Дискутировать тоже разрешается и приветствуется. Возможны ошибки, я ведь тоже человек, так что если найдёте что-то - указывайте.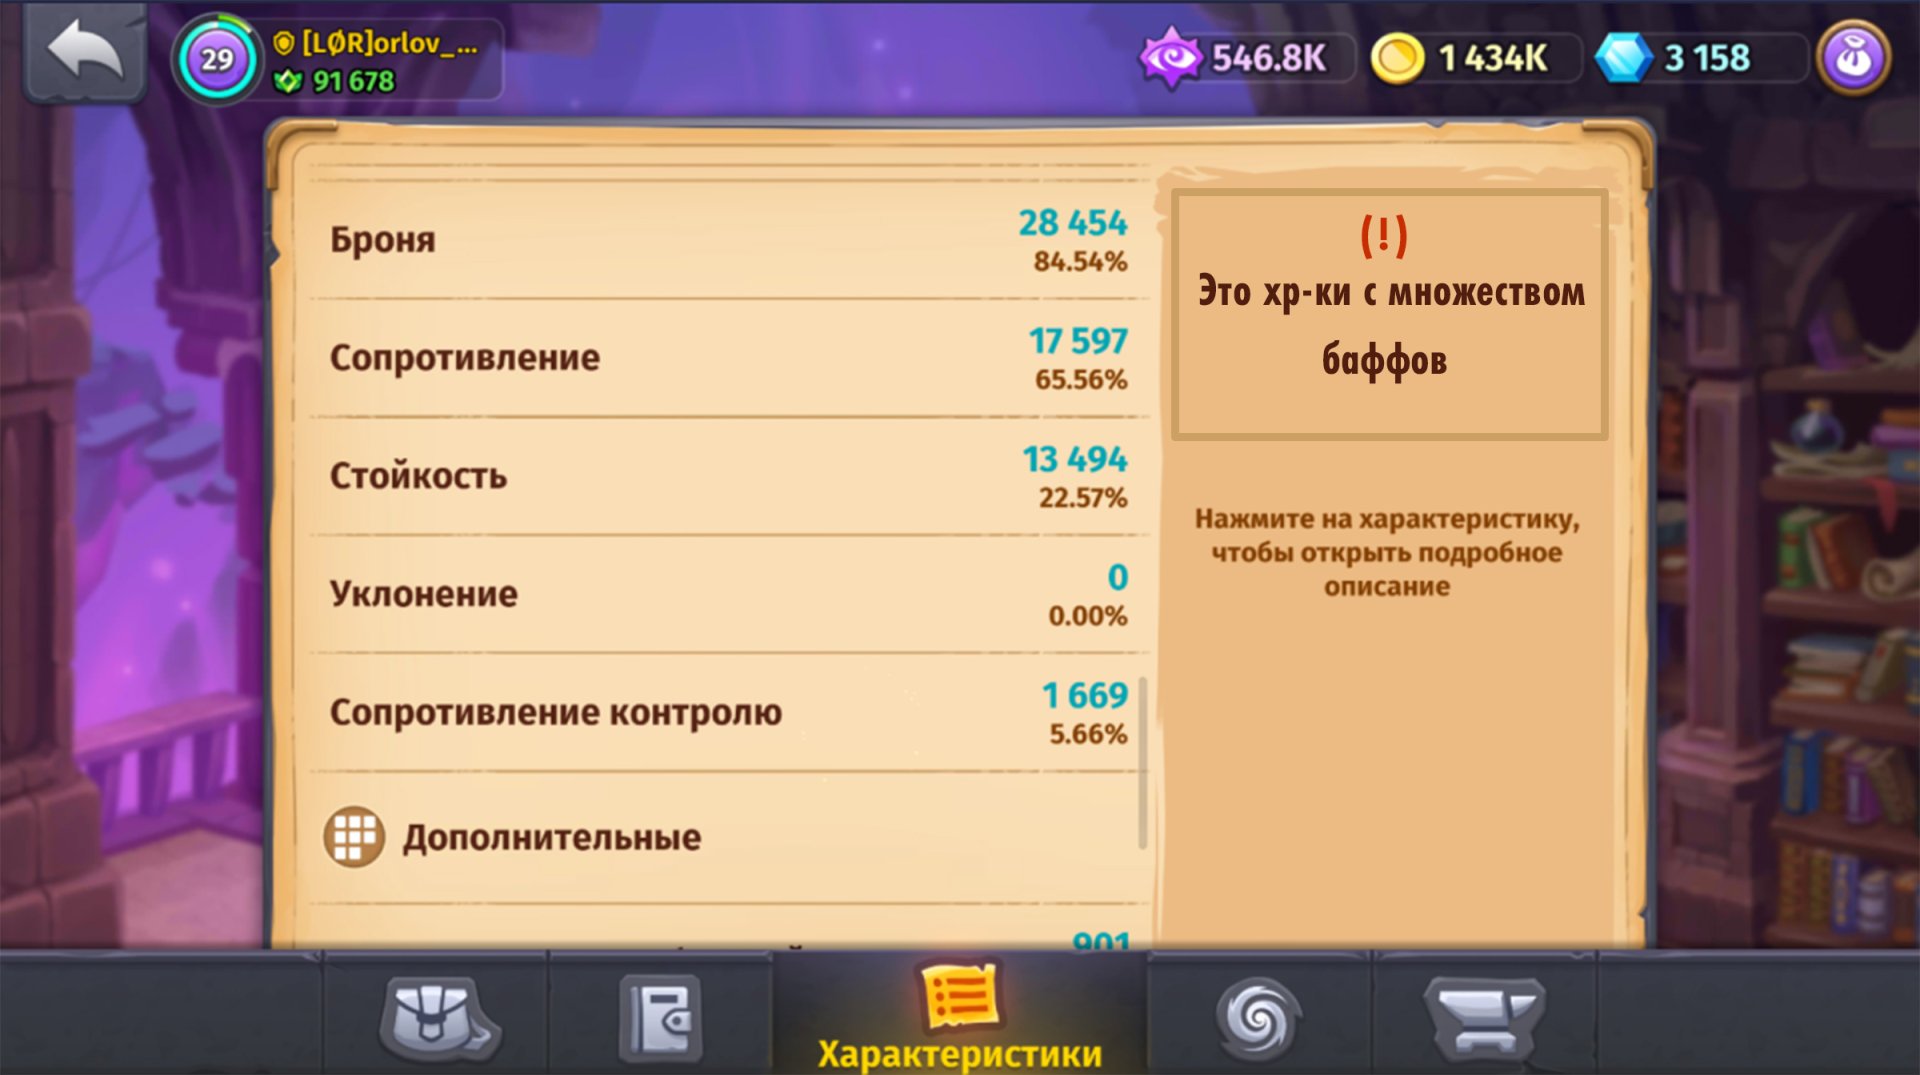


- 42 replies
-
- 20
-

-

-
Aloha everyone, let me first say that this guide is based on my personal experience making 3 different Guardians, but focusing on my favorite style and pretty much what most people choose this class for....TANKING. So let's start with stats and how they affect our builds. Note: If you are level 12 or lower and have not done this you will probably want to reset your character to make your life simple. While you are level 9 DO NOT LEVEL UP YET. Instead hit the ARENA hardcore until you collect all the Prizes. These prizes will include Uncommon Gear that will save you alot of resources and give you a large amount of power when you Equip (do not equip them if it will level u to 10). This will also be greatly needed to collect your core gear set in arena from 10-19. STAT DESCRIPTION -Attack Power: Increases Physical Damage. Also increases Bleed damage over time to opponents. -Ability Power: Increases damage done by Abilities. Boosts our Regeneration value, and damage absorbed by our Barrier. -Armor: Decrease Physical Damage recieved by a percent. -Resistance: Decrease Magical Damage recieved by a percent. -Resilience: Decrease Damage recieved from all sources. Also reduces chance of recieving a Critical Hit from other players in PvP areas. -Control Resistance: Reduces how long you are affected by: Stun, Fear, Silence, Root, Taunt, and Sleep. -Block (Class Characteristic): The chance to reduce Directional and Auto Attack damage by 50% (Does not work against Aoe Skills) ARMOR SET All Armor Sets give both the ARMOR and ATTACK POWER stat. Armor sets are selected by players based on the primary stat given once you upgrade them to Uncommon status. The 3 primary level 10-19 sets are: -Adept Set (Composure Stat): This increases the amount of damage you deal to Weak, Regular, and Strong mobs. -Technician Set (Might stat): Increases damage to Elite, Boss, and Champion monsters (also includes Guild Raids). -Gladiator Set (Resilience stat): Our core stat we want to obtain as this Reduces all damage recieved from all sources (not only known for tanking but the best PvP set as the other 2 stats do nothing towards other players). Your Armor will also be broken down into 3 Classes: Light, Medium, and Heavy. (Described below Accessories section) ACCESSORIES All of these will give you the RESISTANCE and ABILITY POWER stat. Just like Armors, Accessories have 3 different Classes to determine stat values: Frantic, Balance, and Guardian. (Description below) -Light Armor / Frantic Accessory: Really High Attack/Ability Power and Low Armor/Resistance. -Medium Armor / Balance Accessory: High Attack/Ability Power and decent Armor/Resistance value. -Heavy Armor / Guardian Accessory: Low Attack/Ability Power and really high amount of Armor/Resistance. Obviously Heavy Armor and Guardian Accessory from the GLADIATOR SET is the most common. This combo will give us the highest amount of Armor, Resistance, and Resilience for optimum defensive value. Note: Though no Guardian ever chooses Light or Medium Armor. There are 2 other selections for Accessories that some players use outside of pure Guardian set. (Sometimes this comes down to RNG, if you cant get the set you want you can always try these options) 1) BRUISER BUILD (All Balance Accessories)- Leans more toward Solo and PvP style players as you have a medium Damage value while still having high defensive stats. 2) HYBRID FIGHTER (Frenzy and Guardian Mix)- You will notice that the Amulet Accessory gives way better stats than the others. So to boost your burst while keeping you tanky, swap out your Gladiator Guardian Amulet for Gladiator Frenzy Amulet. This allows far higher Ability Power to increase your Regeneration ticks and amount your Barrier absorbs. But keeps the Resilience stats to keep your damage mitigation high. This build works best with 2 Frenzy Accessories (one being the Amulet) and 2 Guard Accessories as it targets the highest possible Barrier and Regeneration values. (this build is commonly seen in end game aka 23+ as RNG takes a big role) TALENT TREE The Talent tree is a way to obtain new Abilities and Stats at the cost of Knowledge Points and time. As you gain enough Mastery your character will Level up and unlock the next page of the Talent Tree. Though it is confusing, here is a simple way to prioritize how you want to path the nodes you unlock: -Tank Priority Path Active/Passive Abilities> Chaos Shards> Hit Points> Block> HP Regen> Control Resist> Armor> Resistance > Etc -Bruiser Priority Path Active/Passive Abilities> Chaos Shards> Hit Points> Attack Power> Block> HP Regen> Control Resist> etc Chaos Shards are extremely important for us to become tanky thus why it's 2nd on the Priority list. Once you obtain the Ability and all Chaos Shards in the tree, immediately move on to the next unlocked page unlocking that Ability and Chaos Shards. I get alot of Guardians asking how to power level through a bottleneck (ie stuck at level 15, 16, or even 17 for a week+) but this is not a bad thing. As Guardians are the worst class in mid game (level 12-23, because the DPS classes start to gain scaling skills) this bottleneck gives us time to catch up. Every class gets this bottleneck, so use this time to unlock more Talent Nodes to make use of our optimal end game power spikes (wont make sense to be high level if you will take weeks anyways to unlock the core Talent on that page you have been waiting so long to receive). So if you dont do this during a bottleneck imagine how many low level nodes you could have unlocked while you wait for a single high level node (which takes days to a week to unlock). TANK ABILITY BREAKDOWN As I'm targeting new players with this, I will focus on the Taunt, Aegis, and Hammer of Wrath ability. First of all, the Chaos Shards you obtained from the Talent tree will be absolutely needed to obtain tanking capacity. Each Ability can have a maximum of 3 Talent Crystals equipped at a time. The Talent Crystals are broken down into either a Tier 1 Crystal (requires 1 Chaos Shard to unlock), Tier 2 Crystal (2 Shards needed), and Tier 3 Crystal (needs 3 Chaos Shards to unlock). Second, Aegis is our HEROIC ABILITY. This Ability cannot be removed from our Hotbar but it is a key ability for our class with which several of our Talents and Passives will relate to this skill. So let's get this explained TAUNT- Target a single opponent, forces them to attack us with Auto Attacks for 3 seconds while applying a stack of Weakness. (Our Bread and butter skill but sucks without upgrades) -Challenge (Tier 2)- Ability applies to all Target within 5 meters. (Now this is a Huge Boost, will be very necessary as you keep reading) -Stonewall (Tier 3)- Block all directional attacks for the next 3 seconds. (Once again an INSANELY huge boost for what's to come, our Heroic Ability Aegis). AEGIS- Passive: Gain 3% Block. When you Block an attack, gain 1 Charge. Each charge reduces all incoming Physical Damage by 2%. Active: Gain Barrier effect for 6 seconds equal to the amount of Aegis Charges you have. (The Barrier from this skill is HUGE and as you can see, Taunts Stonewall has insane synergy with Aegis ) -Secondwind (Tier 2): Whenever you gain an Aegis Charge, there is a 30% chance to gain a Regeneration stack (Max 6) (and yet again Taunts Stonewall is showing its prowess) -Revenge (Tier 1): Whenever you recieve damage from an Auto-Attack, there is a 50% chance to reduce the cooldown of Aegis by 1 second (This is such a great Passive as the chance proc can apply to Attacks that are Blocked and even absorbed by the Barrier from this very skill) HAMMER OF WRATH- Deal Physical Damage to a single Target. (Main damage skill in early stages but is a subpar skill in the future). -Healing Blow (Tier 2): Every 3rd time Hammer of Wrath is used, gain a stack of Regeneration for 6 sec. (Time for more Regen stacks but this is still meh, we can make this better) -Vanguard (Tier 1): Decrease this Abilities cooldown by 1 sec for each Blocked Attack. (And yet again, Taunts Stonewall shows its crazy prowess) The Taunt and Aegis skill will forever be part of our arsenal. So prioritize these skills first while Hammer of Wrath will be a temporary skills be an effective one in the lower levels. To best utilize Taunt and Aegis, try to have you Taunt skill off cooldown before using Aegis. Taunt the mob to quickly stack up your Aegis charges. Wait a few seconds before activating Aegis and gaining the Barrier effect. During this time, your Regeneration will be healing you back up and Taunt will be ready to Block more attacks and reapply your Regeneration and Aegis Charges. Rinse and Repeat. Weave Hammer of Wrath in between skills to further refresh those Regeneration procs. With this said I hope this will help all you Guardians to better understand our mechanics and reduce the amount of wasted resources. Feel free to ask me question in the forums or in game and I will be glad to answer if able to. Will be planning to add the mid games skill at a later time and also have a Passive Talents section.
-
Greetings folks, this is De Victoria, leader of the Hayat Ağacı guild and an alchemist-class player. Fig 1. Yup, i am holding a brand new alchemist weapon called bladed-spear. 😂😂😂 I've been freely playing and having fun in Skylore for two weeks now, and I've been getting a lot of questions from the players, including my guild members, about how I've been able to improve my character rapidly. Instead of answering them all individually, I decided to put them together and prepare a guide. In this way, I will have the opportunity to contribute to the community and to say thanks to the people who made this beatiful game. Here is the guide that you will need. Fig 2. Well well, look who's there. Welcome to the Skylore wanderer! Each character in the game has its own unique play style as well as strengths and weaknesses. So avoid the "strongest class" perception as much as possible. My advice is to try out all the five characters in the first week of the game and find the role that appeals to you. I'm sure a weapon in your hand will fit you well. Fig 3. I will Erin. After making your choice, follow the main and side quests until the fifth level. Afterwards, get your chests by doing dungeons and continue to the arenas. The purpose of doing this is to complete your lack of knowlege required for skills in the background while you are dealing with the arena. On the other hand, while waiting for the arena and dungeon queue, farm gorgor contracts, items, gold and knowledge on level 4th-mobs. This move will also help you make good use of your time. Once you're done with the arena, then continue your quests again. (Do not forget to change farm spots according to your level). Fig 4. The Uncommon One. There are stop points at certain levels in the game. For example 5,9,13 and 15th levels. Generally, players give up at these intervals and then rage-quit. Because they don't know what to do at all. The first step you need to follow is to get uncommon (later will be rare) items with the arena. Then, if you have missing items, you need to complete them from chests in arena-dungeon, battlefield, raid, guild or adamantine cave. Fig 5. The Enchanting Section. You've got all your stuff and you're stuck at one of the stops those I mentioned. This is where the game's upgrade system comes into play. You can pass these points by enchanting your items for a small amount. This is a magic key that allows you to open locked doors. This situation will repeat itself all-time. Fig 6. Hayat Ağacı is rushing in to Dungeon. The last thing i want to tell you is, avoid wasting your main resources as much as possible. Save up to your level 20 items by using them only when necessary P.S. This guide is completely f2p viable.


-
Sección Ⅰ. Breve descripción del mago en Skylore. La tarea principal del hechicero en el juego es infligir un gran daño desde una gran distancia, y el daño se puede infligir tanto a un solo objetivo como a un área. La clase tiene muchas características y mecánicas no obvias, sabiendo que puedes obtener una ventaja significativa sobre tus enemigos. Además, por el momento, el hechicero es la clase más variada del juego, no tiene habilidades que no puedan usar a su favor, e incluso las habilidades activas más específicas tienen varias formas de usarlas. Para la mayoría de los principiantes, el hechicero parece ser la clase más interesante; Incluso sin una construcción adecuada y una comprensión de la mecánica del juego, al principio es muy fácil jugar tanto en PvE como en PvP, pero cuanto más avancemos, más habilidades obtendremos. Dependiendo de la clase que adquieras, convertirte al final de nuestro camino es muy exigente en cuanto al estilo de juego correcto, buena comunicación con los aliados y uso rápido y oportuno de las habilidades, mientras que un error te costará la mayor parte del daño y posiblemente la vida. , pero la recompensa por una combinación de habilidades jugada correctamente a tiempo será muy alta. Sin embargo, esto vendrá más tarde, ahora propongo descubrir qué debemos hacer para desbloquear el potencial del hechicero. Sección Ⅱ. Estudiar talentos, elegir el equipo adecuado y desarrollarlo. En Skylore, los factores más importantes en tu progresión son estudiar talentos y elegir el equipo adecuado, comen cemos analizando el estudio de talentos. Es importante estudiar los talentos para obtener conocimiento sin interrupción, si puedes mejorar el equipo instantáneamente si tienes una gran cantidad de recursos, cambiar un conjunto de habilidades malo por uno bueno por una tarifa modesta y también al instante, entonces los talentos en cualquier caso Deberá Estudiarse durante algún tiempo, y cuanto más avance en las páginas Talentos que avance, más tiempo le llevará estudiar cada talento individual. Si hablamos del orden de aprendizaje de los talentos de un hechicero, primero debes estudiar una habilidad activa o pasiva en la página, en segundo lugar debes estudiar las partículas del caos que te permitirán modificar las habilidades activas para adaptarlas a tus tareas. , en tercer lugar, debes estudiar el poder de las habilidades y el golpe crítico, el tiempo de reutilización de las habilidades en el cuarto, la reducción de la resistencia y concentrarte en el quinto, la salud máxima y la regeneración de salud en el sexto. . . Las excepciones a esta regla son la habilidad pasiva Soporte de espejo y Absorción de energía, la habilidad activa Ruptura espacial, aprendelas después de todo lo demás en la página, habilidades muy situacionales o poco útiles en la etapa inicial del juego en comparación con las mismas partícula s de caos. . Ahora podemos equiparlo. Hasta llegar al nivel 20, puedes usar lo que quieras, aún tendrás que reemplazar estas cosas con equipo de un nivel superior, pero si tienes suerte, usa armadura ligera y joyas frenéticas o equilibradas. Intente gastar piedras de alquimia al mínimo para mejorar la calidad del equipo y obtener los elementos faltantes de calidad rara de la liga de arena, cofres de 12 horas, incursiones de gremios, cofres Skypass premium y otras fuentes. No recomiendo gastar esferas de protección y cristales de adamantium hasta conseguir un equipo de nivel 20. Puedo destacar algunos consejos para mejorar tu equipo de nivel 20, muchos principiantes no conocen estas mecánicas y las aprenden cuando ya no les resulta rentable gastar recursos: 1. Estudie equipos ya preparados de calidad poco común : no gaste oro ni piedras alquímicas para aumentar el nivel y combinar equipos inusuales de nivel 20; Los recursos que gastarán en esto los necesitarán para aumentar la calidad de raro a épico en cantidades muy grandes. 2. Aumente el nivel de equipo raro para un tipo de artículo a la vez : un arma, una armadura y una joya. No debes intentar subir de nivel todos los 9-10 equipos de manera uniforme, entonces ganarás nuevos niveles durante mucho tiempo y no sentirás un aumento en la fuerza de tu personaje porque muy tarde alcanzarás la calidad épica y el siguiente adicional. características del equipo, respectivamente. Debe comenzar a aumentar el nivel de los elementos de la clase de equipo que necesita e, idealmente, con la característica adicional que necesita, pero si no tiene equipo de la clase requerida, es mejor no desperdiciar recursos en aumentar el nivel de equipo inútil, Hablaremos más sobre qué es exactamente lo que necesitas en un hechicero más adelante. 3. Fortalece tu equipo en +15 antes de combinar un objeto raro en uno épico : el precio de la mejora en oro y el conocimiento aumenta al aumentar la calidad, esto también se aplica a los objetos de nivel 10, pero lo ideal es que allí recibirás inmediatamente un objeto raro. artículo y no podrá comenzar a reforzarlo con una calidad más barata. 4. Si no obtiene una característica útil en un equipo de calidad poco común y pronto aumentará su nivel al máximo, cambie la característica adicional reforjando antes de combinar un objeto raro en uno épico : el costo de reforjar en piedras alquímicas. , cristales adamantinos y el conocimiento aumenta 1,6 veces o más en calidad épica, además, si desea conservar la característica que necesita, tendrá que pagar 50 diamantes por cada intento de reforja, pero si obtiene inmediatamente la característica deseada en calidad rara, Existe la posibilidad de que cuando combine con una calidad épica, obtenga inmediatamente la segunda característica que necesita y no necesite gastar diamantes. 5. No intente crear un segundo conjunto completo de equipos ; a pesar de que tenemos un botón para cambiar entre ellos, recolectar incluso un conjunto completo de equipos de calidad épica con la máxima mejora costará más de 20 millones de oro, y eso es sin mencionar cuántas piedras alquímicas, esferas de protección, cristales de adamantium y conocimientos gastarás. Es mejor guardar estos recursos para mejorar su conjunto principal de equipos o guardarlos para futuros equipos legendarios. 6. Después de recibir equipo de nivel 20, no gastes aleaciones para crear equipo endurecido ; esto te dará un pequeño aumento en las características hasta el nivel Ⅲ, que actualmente es imposible de crear, además, es un recurso raro que puedes obtener. en pequeñas cantidades, y es mejor protegerlo hasta el lanzamiento del equipo legendario de nivel 34+, para lo cual necesitarás aleaciones; Además, crear equipos endurecidos es muy costoso en términos de conocimiento. En el juego contamos con tres tipos de equipamiento de nivel 20 para diferentes tareas: 1. Equipos para destructores con características de durabilidad. 2. Equipos para colectores con la característica de potencia. 3. Equipo de videntes con la característica de compostura. El más útil en este momento es el equipo destructor , ya que el contenido PvP en este juego es difícil de cerrar en cosas inapropiadas, el contenido PvE está cerrado en cualquier equipo. Al ignorar los conjuntos de Vidente y Coleccionista, lo único que perderás es que tendrás resultados ligeramente peores en los contratos y que tendrás menos daño en la caza del gremio, pero por ahora no vale la pena obtener las recompensas tanto para el primero como para el segundo. un kit completo específicamente para estos aspectos del juego, con una ganancia neta recuperarás estos gastos después de varios años de juego activo, y después de este tiempo, lo más probable es que se lancen nuevos elementos de calidad legendaria, cuya mejora será mucho más Rentable ya que te proporcionarán más características por el mismo precio, excepto que además, los equipos legendarios no tendrán que ser reemplazados durante un período de tiempo muy largo, en todo caso. Homepage ícil en este momento, el Triunvirato, muere a causa de un abrumador grupo de jugadores, algunos de los cuales están en el mismo kit de destructor. Ahora decidimos la clase de cosas que necesita recolectar y qué características adicionales son las mejores para ellas. Dado que el hechicero es una clase destinada principalmente a causar daños masivos, debes vestirlo en consecuencia: 1. Armadura - ligera , ya que es la armadura ligera la que tiene mayor aumento en el poder de ataque, aunque tiene menos armadura,esta desventaja se compensa con el uso de habilidades defensivas. Características: enfoque y reducción de arrastre. 2. Joyas: frenéticas , personalmente uso 4 joyas frenéticas para causar un daño constantemente alto, pero también puedes llevar una dosjoyas equilibradas para aumentar el golpe crítico, pero en mi opinión es más que suficiente con las armas y con el efecto de rabia. especialmente si tienes un golpe crítico en tu bastón y también lo obtendremos de los talentos, entonces recibirás una penalización porcentual bastante significativa al primer aumento de las joyas de equilibrio, sin mencionar el segundo, solo te darán un poco por ciento, y tendr como que ganar una segunda característica o perder el poder de un golpe debido crítico a la joyería equilibrada, que da un pequeño aumento en esta característica, o tomar una ganancia casi inútil a la velocidad de ataque. Características de las joyas frenéticas: tiempo de reutilización de habilidades y poder de golpe crítico. El poder de las habilidades en las joyas frenéticas aumenta significativamente el daño del hechicero por las habilidades, además, el daño por quema,la curación por regeneración y el tamaño de la barrera resultante aumentan, puedes obtener estos efectos usando per gaminos y entregando un golpe. . fatal al enemigo, la regeneración x2 puede sacarte casi de la tumba, la barrera aparece hasta una cuarta parte de tu salud, lo cual es bastante significativo. En un conjunto completo de joyas frenéticas, tendrás menos protección contra el daño mágico, pero en PvP esto no se notará mucho si eres el primero en atacar al hechicero enemigo o juegas con un alquimista, mientras que otras clases (cazador, sombra y El guardián). ). tiene daño predominantemente físico, el alquimista tiene una pequeña cantidad de daño mágico instantáneo y, dado que los alquimistas generalmente juegan a la defensiva, no recibirás un daño significativo por su daño. 3. Arma - bastón , aquí solopuedes elegir características adicionales, la mejor opción para las características de un bastón es un golpe crítico y el poder de un golpe crítico. Sin un golpe crítico en el bastón, rara vez verás daño crítico debido a que los talentos darán el 6.97% del golpe crítico en el nivel 34 y otro 10% de ira, pero no siempre podrás tener la garantía de hacerlo. Recibir ira en el momento de tu ataque al enemigo, porque es nuestra opción. Critical Strike Power es una buena adición a Critical Strike. Sección Ⅲ. Características de las habilidades activas y pasivas del mago. En esta sección, proporcionaré una descripción general de las habilidades y su papel en las compilaciones, un análisis detallado de las partículas de habilidades, pequeñas características que los jugadores rara vez utilizan y hechos poco conocidos, cuyo conocimiento puede ayudarte a mejorar tu juego. Habilidades activas 1. Bola de fuego : una habilidad con recarga rápida que se utiliza para crear configuraciones con el mayor daño a distancia. Partículas Llama Ardiente se utiliza en construcciones de daño de alto nivel, ya que funciona tanto en la propia bola de fuego como en el daño del área que causa. Convergencia Ignea es significativamente inferior a la alternativa en niveles altos. ES POCO Probable que siempre pucedas usar la bola de fuego inMediateatamente después de sufriamiento, Cada Habilidad Tiempiison y Mientras la anamaciison N de Otra Habilidad, La Bola de Fuego Con Esta Partícula de Caos Está Inactiva, Multiplicando Por Cero El Bon . Ificación para reducir el tiempo de reutilización en PvE, en niveles altos en PvP nadie te impedirá presionar esta habilidad con tanta frecuencia. A pesar de la descripción que nos promete -1 segundo de enfriamiento de la habilidad debido al mecanismo de restar este segundo, en la práctica el efecto será más débil, porque primero tendrás una reducción en el tiempo de enfriamiento de la habilidad básica, y solo Entonces las bonificaciones de Reducción de los tiempos de reutilización de habilidades de los talentos entran eny equipo, talento del Gremio Carga Completa, Consumibles d E la Tienda del Gremio Inyección de Adrenalina, Compensación en El Acuerdo Lluvia de Golpes y Otros Aceleradores, Como Resultado ado , en lugar de los 4.9-1 = 3.9 segundos de habilidades jemplo sin el uso de consumibles, talento de gremio y sin cumplir en el contrato. , con ellos los indicadores diferirán aún más no favor de esta partícula de caos. Ilusion Ignea es significativamente inferior a la alternativa. Crear una ilusión reducirá tu daño a un objetivo no estático, ya que desactivará el efecto de Autosuficiencia, no podrás destruir rápidamente la ilusión sin Destrucción, en la mayoría de los casos reducirá el daño de todos tus habilidades y durante efectos mucho tiempo, además , causar una ilusión de daño en la arena le dará al enemigo puntos de superioridad por Knockout, en un contrato tal ilusión puede salvarte en niveles bajos, pero en niveles altos puede empeorar tu Los resultados se deben al hecho de que los monstruos lo atacarán y le impedirán reunirlos de manera efectiva para obtener el mejor resultado en el pasaje. No recomiendo usarlo en niveles bajos debido a la presencia de partículas de caos más útiles, y en niveles altos esta partícula desactivará la autosuficiencia con demasiada frecuencia y reducirá su efectividad en el combate. Crea una ilusión después de acumular tres efectos de Fire Juggler ocultos al hechicero de la vista de los enemigos durante una fracción de segundo. Combustion Se Utiliza En La Acumulación de Daño, Ya Que No Reduce El Daño de la Habilidad Autosuficiencia, No Le Da Al Enemigo Fáciles de Superioridad En Knockout, no interfiere con la finalización efectiva de los contratos, además, el Daño por quemaema aumentó debido a la capacidad de Autosuficiencia. Descarga Ignea es significativamente inferior a la alternativa. El aturdimiento en esta partícula de caos funciona con una probabilidad aleatoria, lo que significa que si queremos atrapar al enemigo bajo control, es mejor usar la habilidad activa Chain Lightning, que lo hará de forma garantizada y desde una distancia mayor, pero si aún no Estás en el nivel 29, hay otras habilidades para un control garantizado, por ejemplo Energy Wave. No recomiendo usarlo en niveles bajos debido a la presencia de partículas de caos más útiles, y en niveles altos Chain Lightning es más adecuado para controlar al enemigo. Onda Explosiva se usa en acumulaciones de daño porque al causar daño en el área, el daño de la habilidad aumenta significativamente, además, el daño de Blast Wave no se puede bloquear, esquivar ni ocultar en la invisibilidad, por lo que si quieres infligirmas daño al guardia que puede bloquear el 50% del daño, sombras en invisibilidad, el cazador usó el efecto cegador en ti, es mejor presionar la habilidad en el enemigo que se encuentra cerca del que quieres dañar, y no en el objetivo mismo. Además, Blast Wave puede dañar un número ilimitado de objetivos dentro de su radio. 2. Esfera de hielo : una habilidad con un tiempo de reutilización medio que se utiliza para crear configuraciones con el mayor daño a distancia. Detalles de la información: Fuerza Artica se usa en acumulaciones de daño ya que la asignación del 10% funciona tanto en la Esfera de Hielo como en Blizzard. Corazón de Hielo es significativamente inferior a la alternativa. La mayoría de las veces querrás usar esta habilidad para causar rápidamente mucho daño a un objetivo, y para esto el Chaos Mote anterior funciona mejor. A pesar de la descripción que nos promete -2 segundos de tiempo de recuperación de la habilidad debido al mecanismo de quitar este segundo, en la práctica el efecto será más débil, porque primero tendrás una reducción en el tiempo de recuperación de la habilidad básica. . , Y Solo Después de la Reducción Las Bonificaciones de Los Tiempos de Reutilización de Habilidades de Los Talentos Entran El El Equipo, El Talento Del Gremio Carga Completa, C ONSUMIBLES de la Tienda Del Gremio Inyección de Adrenalina, Bonificación en El Acuerdo Lluvia de Golpes y Otros aceleradores, como resultado, en lugar de 14.8-2 = 12.8 segundos de recarga de habilidades prometidas en la descripción, obtendrás 13.2 segundos de recarga de habilidades, lo cual es 0.4 segundos más de lo que podría parecer en la descripción inicial, y este es un ejemplo sin el uso de consumibles, talento de gremio y sin cumplir en el contrato, con ellos los indicadores diferirán aún más no favor de esta partícula de caos. El único momento en el que tiene sentido usar este Chaos Mote es si quieres combinar el tiempo de reutilización de tu Ice Sphere con otras habilidades, pero en la mayoría de las situaciones la alternativa funciona mejor. Ilusión Gelida utilizada en construcciones curativas, la ilusión de hielo invocada, debido a la mayor cantidad de salud en comparación con los otros dos tipos de ilusiones, restaurará mucha salud a tu personaje cuando uses la Translocación de energía. Crea una ilusión al golpear a dos o más enemigos ocultos al hechicero de la vista de los enemigos durante una fracción de segundo. Furia Helada se usa en acumulaciones de daño ya que la aplicación de furia funciona en la propia Esfera de Hielo, Blizzard y otras habilidades de hechicero. Obtienes un 10% de probabilidad de golpe crítico y un 30% de daño crítico en tus estadísticas actuales, lo que significa que si tienes el 0% de golpe crítico y el 150% de daño crítico estándar, mientras estás enfurecido obtendrás un total de 10% de golpe crítico y 180% de daño crítico. poder de ataque, que es bastante respetable. Por supuesto, no siempre podrás darte cuenta de este caos, ya que no hay garantía de que haya dos oponentes cerca, pero de hecho, tales situaciones no son infrecuentes, con la excepción de los jefes, pero la mayoría de ellos llaman a los monstruos. . . Ayúdalos si también golpean al jefe ya los monstruos convocados por él, recibirás el efecto de ira. Teniendo en cuenta que el tiempo de recuperación de la Esfera de Hielo en sí no es mucho más de 10 segundos, si se usa correctamente, mantendrás el efecto de ira en ti mismo muy a menudo. Nevasca se utiliza en todas las construcciones viables con Ice Orb. El daño de tormenta aumenta varias veces el daño total de la Esfera de Hielo si el enemigo se encuentra en ella, y permanecerá en ella si tú o tus camaradas implementan correctamente su control. Las dos partículas de caos anteriores de la Esfera de Hielo actúan sobre esta partícula de caos, el daño de la tormenta aumenta en un 10% y puede ser crítico, lo que significa que el daño de la habilidad aumenta aún más. Halo Gelido es una de las partículas de caos más débiles del hechicero. Por lo general, antes de atacar a un jugador, tú o tus compañeros atrapan al enemigo en control, por lo que él, en principio, no podrá atacarte y, por lo tanto, no podrá activar el efecto del resplandor helado, pero en el Caso de los monstruos en un grupo. juego, son provocados por el guardia y ya no te ayudará a atacar, y nuevamente el efecto simplemente no funciona. Las dos partículas de caos anteriores de la Esfera de Hielo no funcionan en esta partícula de caos, el daño del resplandor helado no aumenta en un 10% y no puede ser crítico, lo que significa que se pierde una gran parte del daño. No puedes obligar al jugador a atacarse a sí mismo, no puede hacerte daño mientras estés bajo el efecto de esta partícula de caos. En cuarto lugar, el daño base del efecto es extremadamente pequeño, incluso si te atacan bajo él, es más probable que el enemigo muera de risa que por el daño de este efecto. La palabra no tiene ningún uso y claramente requiere procesamiento y fortalecimiento. 3. La destrucción es una habilidad con un tiempo de reutilización lento, tu habilidad principal que no puedes eliminar de la barra de habilidades. Informe detallado: Aura Poderosa : significativamente inferior a la alternativa. La mayor probabilidad de golpe crítico y el daño de golpe crítico proporcionan mucho más daño que el 5% de daño del efecto de Poder, y el efecto de Poder se acumula según la intensidad del efecto, no la duración del efecto, una diferencia de Rabia . Aura Furiosa : aumenta significativamente el daño del hechicero y sus aliados, la mejor opción para usar en cualquier configuración. Con esta partícula de caos podrás fortalecerte enormemente a ti ya tus aliados. Además, el efecto de ira se acumula a lo largo de la duración, por lo que usar esta Mota del Caos y Escalofrío furioso a menudo te dará un efecto de ira duradero por tu cuenta. Ilusionista – nos permite aumentar significativamente el daño de Destrucción, ya que ahora podremos explotar un 50% más de ilusiones al mismo tiempo. Además, existe la opción de confundir al enemigo con una gran cantidad de ilusiones convocadas; Contra jugadores buenos esto funciona muy mal, pero contra principiantes puede funcionar. Grieta Temporal es claramente inferior a la alternativa. La ilusión convocada será de tipo aleatorio, lo que significa que no se puede garantizar que la utilices ni para una curación efectiva ni para la ignición garantizada de los objetivos de nuestra próxima. Destrucción. Además, invocar una ilusión con esta habilidad prácticamente te privará de la oportunidad de recibir daño adicional y capacidad de supervivencia de la Autosuficiencia y reducirá tu efectividad en el combate, ya que solo después de usar la destrucción de las ilusiones, y ahora incluso este método. . . no trabajará. Al crear una ilusión, se oculta al hechicero de la vista del enemigo durante una fracción de segundo. Destrucción Incendaria : se utiliza en construcciones de daño. Si Explotas Tres iLusiones de Fuego Contra Un Enemigo, SU Salud Literalmente Se Consumirá Y Existe Una Alta Probabilidad de Qeel El El El El Efecto de Miededo Más Fácil Acabar Con él, O No Podrá USAR LA Poción de Purificación Y Eliminar Los Efectos de quema de sí mismo. Destrucción Congelada : se utiliza en construcciones curativas. En los ajustes de combate, no se muestra de la mejor manera, las ilusiones de hielo causan poco daño al explotar por Destrucción en comparación con las ilusiones de fuego, además, el efecto de aturdimiento se aplica solo con la primera ilusión que golpea al enemigo . , El Tiempo de Aturdimiento Es no es acumulativo y no se actualiza, esto significa que si albo -quedo 1 segundo de aturdimento Desde la Primeraeraeraa Illusia n, las iLusiones de Hielo posteriores que golpearán al objetivo no aturdirán al enemigo y, Considrando El Tiempo de reutilización de la habilidad de Destrucción, controlará durante 1,5 segundos. cada más de 30 segundos parece muy débil. Funciona mucho mejor en construcciones curativas para completar contratos, donde puedes usar una ilusión de hielo para aturdir a los oponentes en movimiento, reunirlos en un grupo para una destrucción más efectiva o, durante el aturdimiento, invocar más ilusiones y ser tratado con Translocación de Energía. 4. Doble : una habilidad con un tiempo de reutilización lento que se utiliza para crear configuraciones con un gran daño en un corto período de tiempo. Crea ilusiones al usar la habilidad oculta al hechicero de la vista de los enemigos durante una fracción de segundo. Detalles de la información: Sigilo es significativamente inferior a la alternativa. Los efectos de daño en el tiempo continúan dañándote mientras eres invisible. Puedes recibir daño de las habilidades de área de efecto mientras eres invisible. Provocar a un guardia o provocar a otro hechicero puede sacarte de la invisibilidad. Si te vuelves invisible mientras estás cerca de un enemigo, él puede revelarte y la invisibilidad desaparecerá después de hacerte daño. En la práctica, esta partícula de caos se muestra muy mal, antes se podía usar como sexta habilidad para poder usar la invisibilidad para desapercibido, si no pasar se tienen en cuenta las ilusiones que aparecen y desaparecen al usar la habilidad, pero ahora Ya no Puedes reemplazar la habilidad en el panel si está en tiempo de reutilización. Barrera mental : se utilidad en una configuración con un gran daño instantáneo. Permite otorgar habilidades al enemigo sin recibir daño o ignorar parte del daño enemigo. También puedes usar la habilidad con esta partícula de caos como sexto botón de reemplazo para completar las tareas diarias de la cadena Growing Madness, que se abre en el nivel del personaje 23, sin recibir daño. Espejo Igneo es la mejor opción para usar en una configuración con un gran daño explosivo. Una partícula de caos te permite causar mucho daño al enemigo en unos segundos después de su explosión de Destrucción si no usa el consumible Elixir de Purificación y lo mejor es que todos los efectos de quema causan daño al mismo tiempo. y cuantos más haya sobre el enemigo, mayor será la probabilidad de que reciba miedo. Además, los ataques automáticos de ilusiones de fuego, si no se detonan, causarán mucho más daño que otras variaciones de ilusiones, y también tienen la posibilidad de imponer un efecto de quema al enemigo, además, en la arena Knockout, causando daño a Tales. . Las ilusiones darán menos superioridad al enemigo que en el caso de otros tipos de ilusiones, porque las ilusiones de fuego tienen la reserva de salud más pequeña. Espejo Gelido es significativamente inferior a la alternativa. Las ilusiones de hielo causan menos daño al explotar que las de fuego, no prenden fuego al enemigo al explotar, a diferencia de las ilusiones de fuego, y el efecto de aturdimiento de la explosión de las ilusiones no se acumula ni se actualiza. Si dejas estas ilusiones por el bien del daño, entonces esto parece aún más dudoso, porque el daño base de sus ataques es menor que el de los de fuego, no hay posibilidad de prender fuego al enemigo con un ataque básico, y el efecto de congelación, aunque activa el ingenio arcano, al mismo tiempo desactiva por completo los efectos de la autosuficiencia. Además, en el conjunto de trabajo con división no hay habilidades que te permitan realizar esta compensación al daño; Después de usar las habilidades, te mantendrás lo más lejos posible del enemigo hasta que se recarguen, de lo contrario existe un alto riesgo de morir antes de este momento. Desplazamiento : significativamente inferior a la alternativa. No sólo podrás expulsar fácilmente al enemigo fuera del alcance de tus habilidades, sino que también evitarás que nuestros aliados utilicen sus habilidades. Además, el efecto knockback actúa una vez y no periódicamente. El poder de x2 no justifica las desventajas enumeradas anteriormente. Distracción : se utiliza en una configuración con un gran daño instantáneo. Te permite teletransportarte cerca del enemigo para extender el control sobre él y hacerle explotar ilusiones de fuego. Illusion Taunt se activa a través de Scroll of Fury: Unstoppable, y también ignora el efecto anticontrol de Full Invulnerability cuando resucita en las arenas Bounty Hunt y Tower Defense. Tú y tus ilusiones también obtienen un efecto de protección, que aumentará ligeramente tu capacidad de supervivencia y la posibilidad de que tus frágiles ilusiones de fuego no mueran antes de alcanzar su objetivo después de usar Destrucción. También podrás dejar ilusiones para controlar al enemigo, ya que cada 6 segundos cada uno de ellos provocará hasta tres enemigos en una radio de 6 metros desde él hasta destruirlo o desaparecer. 5. Ola de energía : una habilidad con un tiempo de reutilización medio, utilizada en casi todas las configuraciones debido a la presencia de efectos importantes. Crea una ilusión al golpear a dos o más enemigos ocultos al hechicero de la vista de los enemigos durante una fracción de segundo. Detalles de la información: Descarga Concentrada : se usa en configuraciones donde la Destrucción no es tu principal fuente de daño; Además, esta partícula de caos te ayudará a infligir un poco más de daño al enemigo antes de que los aliados lo ayuden, funciona muy bien cuando juegas en la arena contra un alquimista. , a menudo hay situaciones en las que matar al enemigo antes de que tenga tiempo de curarlo, no hay suficiente daño, esta partícula de caos ayudará a resolver este problema. Poder Oculto : se usa con mayor frecuencia en configuraciones donde la Destrucción es su principal fuente de daño, la principal desventaja de tales configuraciones es que después de usar División y Destrucción causa poco daño, esta partícula de caos ayudará a reducir el tie mpo que lleva usar esta combinación. de habilidades nuevamente. El principal problema es que la primera vez que atacas a un enemigo, no te beneficiarás de esta partícula de caos, ya que usarás la primera Ola de Energía antes de usar Destrucción, lo que significa que el efecto de reducción de tiempo de reutilización de la habilidad no funcionará la primera vez. tiempo, y dado que el objetivo de la construcción es de donde proviene el daño principal: la destrucción es matar rápidamente al enemigo con una combinación de habilidades, a veces una partícula alternativa para un 10% de daño parece aún más preferible. Onda de fuego : se utiliza principalmente en enemigos que son inmunes a los efectos de control de masas, como monstruos, jefes y campeones de élite. También se utiliza en ensamblajes para completar contratos grupales o contratos individuales de bajo nivel. Grilletes mágicos : se utilizan en oponentes que no son inmunes a los efectos de control, como jugadores o monstruos débiles, comunes y más fuertes en el mundo abierto. Te permite evitar eficazmente que el enemigo cause daño, funciona especialmente bien con la Esfera de Hielo y la explosión de ilusiones de Destrucción. Energía de fuego : el efecto de división ayuda a reducir efectivamente la armadura y la resistencia del objetivo, por ejemplo, para un guardia con un 40% de armadura y un 30% de resistencia, este efecto dejará solo un 20% de armadura y un 10% de resistencia, lo que aumentará significativamente. tanto daño físico como mágico. Ahora, en la mayoría de los casos, esta partícula de caos se usa en construcciones PVE debido a la reducción del efecto de división, anteriormente daba una reducción del 30% en armadura y resistencia en lugar del 20%, y también debido al fortalecimiento de una alternativa en la forma de control, pero se puede usar en la arena cuando se juega con compañeros de clase de apoyo competentes, junto con un hechicero armado con silencio, o en niveles bajos donde la mayoría de los jugadores no juegan particularmente bien. Energía de hielo : debido a la combinación de esta partícula de caos con Magic Shackles de la misma habilidad, podemos atrapar a oponentes sin inmunidad para controlar casi en un aturdimiento incluso a través del Scroll of Rage: Indomitability, la diferencia con el aturdimiento es que El Jugador Poder Usar Consumibles, Por Ejemplo, En La Arena, El Enemigo Pueede alejarte de él y aturdireto el Pergamino de Destrucción: Rafaga de Tormsenta, ESCONDER TE DURANTE 2 Segundos En La Invisibilidado La Copia de Nieve Consumible de Año Nuevo Sin Permitirte Para ejercer control sobre él, usa el consumible Bola de nieve de Año Nuevo sobre ti y aturdete, en el mundo abierto el enemigo puede beber una poción curativa, convocar a un minion para provocarte, etc., sin embargo, en PvP la partícula del caos es muy fuerte, especialmente antes de que se desbloquee Chain Lightning. 6. Teletransportación : una habilidad con un tiempo de reutilización medio, utilizada en construcciones para aumentar la movilidad o activar los efectos de otras habilidades activas. Crea una ilusión al usar la habilidad oculta al hechicero de la vista de los enemigos durante una fracción de segundo. Detalles de la información: Rastro Igneo : utilizado en construcciones de daños. Rastro Gelido : esta utilidad en configuraciones PvE para controlar monstruos y curar. Teletransporte seguro : se utiliza en configuraciones donde la reducción de daños es más importante que la movilidad, por ejemplo, en una configuración PvE para contratos individuales de alto nivel. Flujo por Inercial : se utiliza en configuraciones donde reducir el daño aumentará ligeramente la capacidad de supervivencia y será preferible aumentar la maniobrabilidad, por ejemplo, en configuraciones PvP para la arena o configuraciones para ubicaciones PvPvE. Disonancia prácticamente no se usa en PvP debido a que en la mayoría de los casos es mucho más confiable mantenerse alejado del enemigo y causarle daño desde lejos, o poder teletransportarse hacia atrás después de reducir la distancia y dañar al enemigo. Funciona bien en PvE contra grandes concentraciones de monstruos en contratos grupales de alto nivel debido al daño instantáneo que causa a un número ilimitado de enemigos en una radio alrededor del punto de generación. Destello : se usa en casi todas las configuraciones populares de PvP debido a un aumento significativo en la debido movilidad a la posibilidad de dos teletransportaciones para 16 celdas en total y 6 segundos de prisa, lo que ayudará a reducir aún más la distancia con el enemigo , también se usa en Construcción PvE para contratos individuales de alto nivel porque obtenemos 12 segundos de protección en total, a diferencia de los 7 segundos de Split, y gracias a esto podrás usar una partícula importante de caos en la Translocación de Energía. 7. Chain Lightning : una habilidad con un tiempo de reutilización medio, utilizada en construcciones para controlar al enemigo o causar un daño enorme a varios enemigos. Informe detallado: Purificar : utilizado en PvP para eliminar los efectos de regeneración de un guardia, un alquimista, un personaje que usó el consumible Pergamino de absorción: desencarnación, etc., reduce significativamente la capacidad de supervivencia de las clases de apoyo y la capacidad de curar a Los Aliados. Saturación : se usa en PvE para recibir un daño enorme y prender fuego a monstruos en tratados de bajo nivel. Carga concentrada : se usa en PvP para infligir daño a un solo objetivo, lo principal es darle un rayo al enemigo original, no a su ilusión, clon o espíritu; De lo contrario, reduciremos en gran medida el daño de la habilidad en comparación con el caos alternativo. particular. Carga Acumulada : se usa en PvE para infligir mucho daño a monstruos en tratados de bajo nivel, ya que el mayor daño se inflige al último objetivo de la cadena, es mejor usar un rayo en un monstruo débil y preferiblemente un poco más lejos de El objetivo con mayor salud, de modo que el rayo rebota en los monstruos débiles y es más probable que mate a un monstruo común. También tiene grandes perspectivas de uso en batallas PvP masivas. Pararrayos : se usa en PvP para controlar al enemigo antes de dañarlo con otras habilidades, no olvides que si el enemigo ya está aturdido y usas Chain Lightning sobre él, el efecto de aturdimiento no se extenderá ni renovará, debes esperar hasta al final del efecto. de aturdimiento anterior e inmediatamente tan pronto como el enemigo se salga de control, usa tu Chain Lightning, evitando que use la ventana entre aturdimientos para usar consumibles y habilidades de protección. Alto voltaje : se usa en PvE para infligir mucho daño a los monstruos en tratados de bajo nivel, aumenta aún más el daño de una partícula del caos. Acumulación de carga y al mismo tiempo te permite matar a un enemigo más, por lo que en algunas oleadas de enemigos. Podemos matar instantáneamente a los 5 monstruos débiles con una habilidad con la suerte adecuada con el lugar de su aparición en un lado o dos lados que se cruzan en el centro si estamos parados en la esquina de la ubicación. Habilidades pasivas : 1. Engaño ilusorio es una habilidad pasiva débil del hechicero. Puede salvarte de la muerte con la suerte adecuada, ocultándolo de los ojos de un jugador inexperto. La desventaja es la alta probabilidad de morir antes de que se active debido al daño que te matará antes de que tu salud caiga por debajo del 20%, además, puedes ser rematado por el daño de área de la habilidad, también puedes morir por varios Daños en el tiempo. efectos y, en la práctica, a menudo morirás antes de que se active, especialmente en niveles altos. 2. Vista Secreta es la habilidad pasiva promedio de un hechicero. Tiene una ventaja obvia, esta habilidad aumenta el daño a cualquier objetivo con un nivel de salud inferior al 20%, incluido un aumento del daño en un 15% a todos los monstruos fuertes, monstruos de élite, jefes y campeones, lo que significa que tiene sentido colocarlo antes de las habitaciones con jefes en mazmorras, incursiones y caza. La desventaja es una limitación importante en la forma de comenzar a trabajar solo en un enemigo con un nivel de salud inferior al 20%. Recomiendo cambiarlo a Arcane Wits cuando no estés luchando contra objetivos inmunes al control. 3. Apoyo Espejado es una habilidad pasiva débil del hechicero. La desventaja es una baja probabilidad de activación, un efecto débil y una corta duración de acción. Tiene sentido usarlo solo en una incursión o caza, y solo en los casos en que no se necesita capacidad de supervivencia. 4. Neblina Caliente es una habilidad pasiva débil del hechicero. Las condiciones de activación ya suenan más adecuadas que las de Mirror Support, pero cuando recordamos que una gran parte de las habilidades que usan las clases enemigas son habilidades de área de efecto y no se pueden evitar, entendemos que el efecto de agilidad es extremadamente débil. . . por ejemplo, una sombra con sus construcciones actuales puede hacerte recibir daño de tres habilidades de área que no se pueden esquivar y luego rematarte con la habilidad Paso de las Sombras, la única habilidad dirigida que recientemente no se puede esquivar. 5. Independencia es una fuerte habilidad pasiva del hechicero. Te Permite Recibir Menos Daño Antes del Inicio de Tu Ataque E Infligir Más Daño a Cualquier Enemigo, Simplemente Explota Las Ilusiones AUMPO Y AUMENTAR TE TU DAño EN Corto Período de Tiempo, Se Muestra Perfectamente Tanto En DireCciones Pvp Como Pve. . La desventaja es la peculiaridad de nuestras habilidades para invocar ilusiones sin la capacidad de apagarlas, por ejemplo, Wave of Energy invoca una ilusión cuando golpea a dos o más oponentes, Teleportation invoca una ilusión después de su uso en modo de combate, etc. 6. Ingenuidad de Hechicero es una fuerte habilidad pasiva para un hechicero. Funciona muy bien contra criaturas sin inmunidad de control, ya que hay una desaceleración en Ice Sphere y Frost Shield, inmovilización en Energy Wave, el hechicero tiene suficientes formas de activar este daño en el momento adecuado tanto en dirección PvP como en PvE. La desventaja es que algunos monstruos poderosos, monstruos de élite, jefes y campeones son inmunes a esta habilidad. Recomiendo reemplazarlo con Arcane Vision cuando luchas contra oponentes que son inmunes al control. 7. Escudo de Escarcha es una fuerte habilidad pasiva para el hechicero. Además del hecho de que da el efecto protector de absorber daño con un escudo y ralentizar a los oponentes, puedes actualizar el escudo en cualquier momento fuera del combate, por ejemplo, mataste a un enemigo y en el proceso perdiste tu escudo en la arena, mientras esperas que se recarguen las habilidades activas mientras estás parado a una distancia del enemigo, puedes cambiar el escudo a cualquier otra habilidad pasiva y volver a colocarlo, y el efecto Escudo de Escarcha aparecerá en ti nuevamente. También puedes cambiar el Escudo de Escarcha por cualquier otra habilidad pasiva en la arena antes del inicio de la batalla, el escudo permanecerá sobre ti incluso sin la habilidad pasiva que le otorga en la ranura, y seguirá actuando, y en lugar de 3 habilidades pasivas. . Tendrás al menos 4 minutos antes del momento en que el escudo no sea derribado, por supuesto. La desventaja es el sistema para actualizar esta habilidad; si cambias una construcción con un Escudo de Escarcha a otra construcción con un Escudo de Escarcha, entonces el informe hasta que se actualice la habilidad comenzará desde el momento en que se cambió la construcción, por ejemplo, tienes Quedan 25 segundos antes de actualizar el Escudo de Escarcha y cambiaste la construcción a otra con la misma habilidad pasiva, después de que se acabe el Escudo de Escarcha del primer ensamblaje, aparecerá uno nuevo solo 35 segundos después del final del primero, también en Knockout, si terminas la primera ronda a los 40 segundos, en la segunda ronda no tendrás un Escudo de Escarcha durante los primeros 20 segundos, solo se actualizará 20 segundos después del inicio de la segunda ronda, a menos que lo actualices manualmente usando el método descrito anteriormente. 8. Absorción de energía es la habilidad pasiva más débil del hechicero. Esta habilidad aún no está disponible para que los jugadores la aprendan, pero a juzgar por la descripción del juego, ya parece haber muerto. La desventaja es la compleja condición para efectos tan débiles, una de las cuales no tenemos ninguna garantía. Necesitamos convocar al menos 3 ilusiones con un 20% de probabilidad de ganar x1 de poder y restaurar el 3% de la salud máxima. 3 ilusiones son al menos 1,5 de la habilidad del hechicero, debes usar Split y quemar una ilusión usando Teletransportación, mientras que al comienzo de la batalla no tiene sentido restaurar la salud, porque estará llena, lo que significa que si atacar primero, solo quedan 20 efectos útiles % de probabilidad de poder, mientras que tenemos la habilidad pasiva Mirror Support, que al crear 3 ilusiones con las mismas habilidades activas, puede darnos x3 de poder, cada una con un 20% de probabilidad, que ya es 3 veces más fuerte que la Absorción de Energía, mientras no nos obligan a quemar una de estas 3 ilusiones, y también recibiremos efectos de poder para nosotros y para las ilusiones. ¿Quizás necesitamos comenzar a atacar al enemigo después de que él nos ataque para poder implementar la curación? Para empezar, en este momento, si caes bajo el control del enemigo en niveles tan altos, lo más probable es que estés muerto y es muy recomendable atacar primero. Si asumimos que sobrevivimos, tengo 45199 de salud, el 3% de este valor de salud son 1356 unidades de salud, esto es extremadamente poco para 1.5 habilidades utilizadas para activar la pasiva, esto es más de 6 veces menos de lo que es una poción curativa en El mundo abierto nos devolverá este nivel. A modo de comparación, Scroll of Rage: Bloodsucker por 500 de oro en la tienda del juego, que está disponible a partir del nivel 2, tiene una probabilidad de restaurar el 50% de nuestra salud del daño de nuestro ataque con una probabilidad del 10. %, y esta es la Efecto de un consumible barato para el cual no necesitas desarrollar tu personaje meses hasta el nivel 35, y el efecto parece más fuerte que la habilidad pasiva final que nos mostramos. Además, usar esta habilidad te obliga a jugar a través de una configuración de ilusiones, pero si juegas a través de dicha configuración y mantienes constante activadas varias ilusiones para recibir los efectos de quemar ilusiones adicionales, la autosuficiencia no funcionará durante tu ataque. lo cual parece mucho mejor que este malentendido porque los efectos funcionan en condiciones más simples y, además, los efectos en sí son mucho más fuertes. Si esta habilidad no se modifica, nadie la usará, como era el caso del antiguo Escudo de Escarcha, que anteriormente solo daba el efecto de ralentizar al enemigo que nos atacaba durante 5 segundos cada 30 segundos. Para resumir lo anterior, cada habilidad activa del hechicero tiene su propio uso en el juego, lo que no se puede decir de todas las partículas del caos y habilidades pasivas, muchas de las cuales tienen una efectividad extremadamente baja y, por lo tanto, rara. . vez se usan o no se usan en absoluto. También me gustaría compartir 3 opciones de construcción para un mago de nivel 34 que usa con más frecuencia: 1. Build para PvP, reemplaza el ensamblaje con Fireball por uno más efectivo, pero no muy inferior en daño. Lo principal en esta colección es usar cualquiera de las dos habilidades con control, usar la Esfera de Hielo sobre el enemigo y ampliar el control con la segunda habilidad, si la situación lo permite le damos Destrucción con un clon del segundo teletransporte y nos movemos. lejos, nuestras habilidades retrocederán rápidamente y gracias a la abundancia de control y daño al enemigo es difícil regresar si no recibió el primer daño, incluso si el enemigo fue tratado por un alquimista, esta configuración se trata de eliminar recursos del enemigo go, y si Adivinas los momentos y presionas constante con control y daño, el enemigo aún morirá. La construcción funciona especialmente bien cuando se combina con un alquimista experto que te dará la oportunidad de intercambiar tus habilidades de manera aún más efectiva. No te quedes en una posición por mucho tiempo, trata de construir una posición para que los oponentes, en teoría, puedan llegar rápidamente a ti, pero solo de tal manera que los enemigos estén cerca unos de otros en el proceso de cubrir la posición. distancia, este será el momento ideal para tu ataque. 2. Build para PvE, ayuda a completar contratos individuales de nivel 34 gris y verde. En el caso de tratados grises, usa la primera opción de ensamblaje y el refuerzo Lluvia de Golpes, ya que será lo más cómodo para completar el tratado, cogiendo Berserker o Sangre Hirviente no podremos soportar muchos más recursos, pero sí Nos complicará El Paso, en el caso de los verdes tratados, usar la segunda opción de ensamblaje y mejora Berserker, porque tomando Sangre Hirviendo y bajando el tratamiento nos será mucho más difícil sobrevivir, pero podremos cortar. Elimina la ya pequeña resistencia del hechicero con tratamiento de tres ilusiones de hielo, 20% de restauración máxima de salud usando Translocación de Energía y protección casi permanente contra Teletransportación. Usa constantemente la Bola de Fuego en los monstruos cercanos que aparecen cerca de ti, el objetivo prioritario son los monstruos comunes, los débiles y morirán a causa de la Esfera de Hielo cuando reúnas a los monstruos en una multitud en una de las esquinas del acuerdo. . . Calcula tu tratamiento correctamente, si tienes salud casi completa al momento de usar Translocación de Energía, el tratamiento usado en vano puede resultar en la necesidad de gastar una poción curativa en el futuro. Si haces todo correctamente, podrás pasar por la oleada 7 en el contrato gris y la oleada 8 en el contrato verde sin desperdiciar pociones curativas. 3. Construido para PvE, funciona bien en contratos de bajo nivel, especialmente en contratos grupales de bajo nivel. Tomamos la mejora Berserk, porque una Lluvia de reducir golpesá nuestro daño y no podremos matar monstruos con una sola habilidad sin usar consumibles, y Sangre hirviendo reducirá en gran medida la curación de las latas curativas que aparecen en la ubicación a medi da que avanzamos. A través del contrato, a pesar de la muerte casi instantánea, a veces los monstruos a distancia todavía nos golpearán un par de veces. Dado que la mayoría de los oponentes mueren por cualquier habilidad y todos tenemos daño de área, matamos pequeños grupos de monstruos, si aparecen en un lugar inconveniente para nosotros y se mueven de tal manera que no podemos reunirlos rápidamente en una multitud, luego matamos. la multitud reunida de monstruos con una o dos habilidades. No olvides beber las pociones curativas que aparecen en la arena, es recomendable pararte cerca de ellas antes de que los monstruos corran hacia ti para no perder tiempo corriendo a buscar tratamiento cuando necesitemos matar a los monstruos. Si haces todo correctamente, podrás pasar la oleada 9 en un solo contrato gris de nivel 8 y la oleada 10 en un solo contrato verde de nivel 9 sin gastar pociones curativas; en contratos grupales de bajo nivel, incluso con clases de apoyo en el equipo. ... Con esto concluye mi guía del mago, te deseo batallas divertidas y un juego divertido.
-
- 1
-
-
Welcome Players 👏 __________________ This time I'll show all the tips and trick to you in one post, take your popcorn and milk, sit down and watch carefully. 🔶 Dungeons Map System 🔶 Every dungeon maps always have 6 room Where 1 room for main boss, 2 room for mini boss and 3 room for average mobs. The way to reach the main boss only by this formula 👉2 average mobs, 1 mini boss, and after that you will meet the main boss. All you have to do just always remember those formula no matter if it starts with the mini boss first in your first room, the formula always the same. 👈 🔶 Dungeons Chest Rewards System 🔶 If you wants to get the maximum reward chest on dungeon use the auto queue dungeon, do not search for party dungeon on world chat This way probably take some time but when you finish it you get the chest that according to your level, even if the members of your party are lower than you. You can do it while doing your daily quests to manage your time. 🔶 VIGOR 🔶 Vigor can be check on top left of your character when you check character profile on top left of main screen. 👇Vigor information👇 . Win arena increase 300 points Complete dungeon increase 1000 points Kill one mob reduced 100 points 🔶 World boss chest for every class🔶 If you stressed because didn't get any chest from world boss here are the tips for every class. 👉 Guardian, all you need to do only to take and survive from the boss damage, if your low level this is good for you let the higher level tank taunt the boss you just have to take the damage from the boss and survive till the boss fall 👉 Shadow, it's also easy if you are shadow all you need to do only do a damage to the boss, hit and run, repeat it until the boss fall 👉Hunter, it's still the same as a shadow, the damager only have to focus on give a damage to the boss and don't forget survive till the boss fall. 👉 Mage, Mage also have the same role like hunter and shadow as a DPS. 👉 Alchemist, it's job is very simple didn't have to give too much damage to the boss, but only have to heal everybody around or themselves as much as possible. TO BE CONTINUE
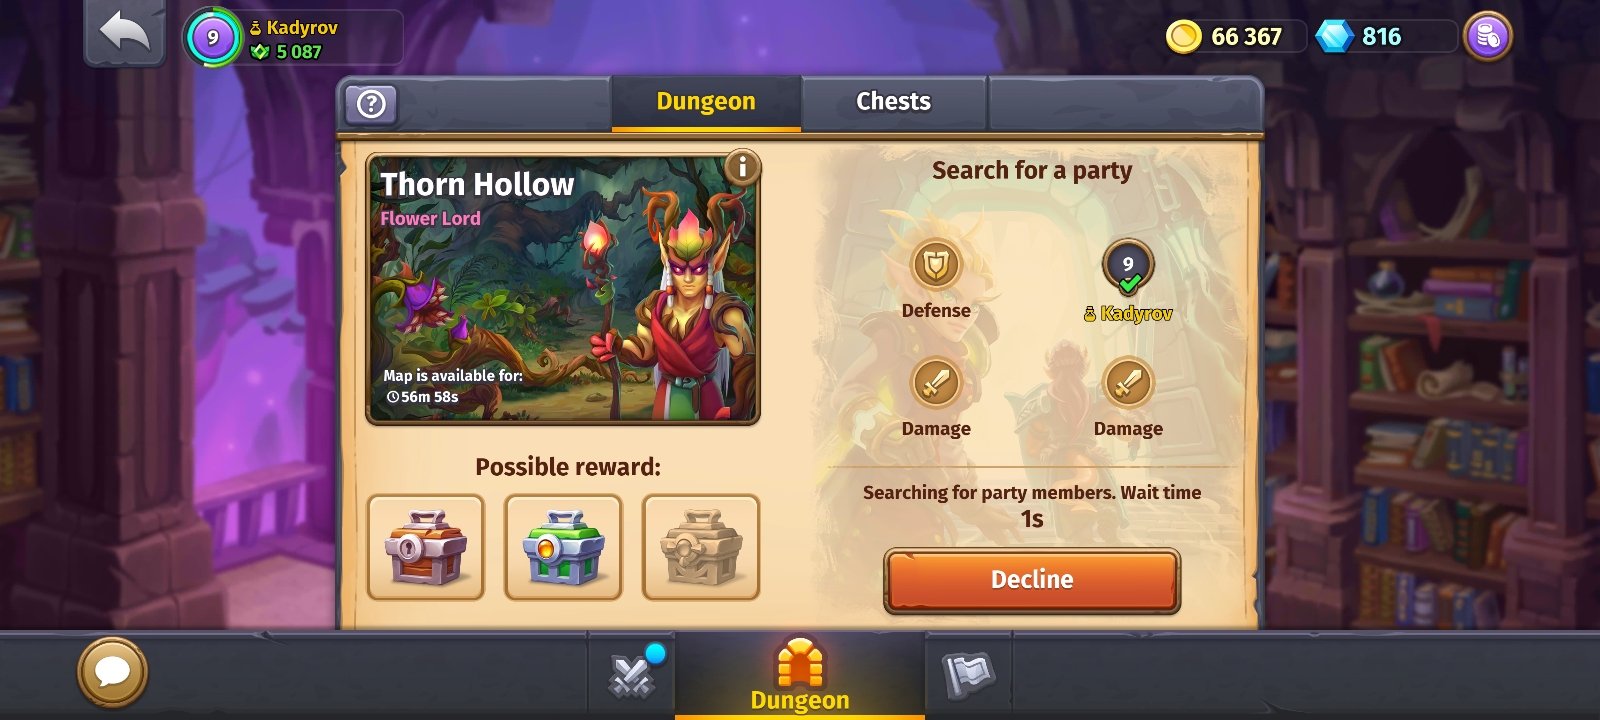
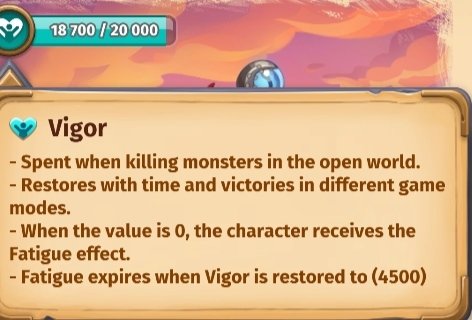
- 6 replies
-
- 1
-
-
- legionaire
- tips and trick
- (and 11 more)
-
Some tips that i posted in reddit some time ago... Of course there's nothing "Game Changing" for those who already play the game for a while, but it can be useful for people starting. 01 - Prioritize making the arenas in a group to increase your chances of winning. 02 - Before level 20, always complete the arena league of your level to receive the rewards (green and blue equipments). 03 - Avoid spending, if possible, alchemical stones and defense orbs before obtaining level 20 equipment. 04 - Do not reforge non-lvl 20 and above equipment. This will only make you spend resource, in lvl 20 those equipments will be changed. 05 - Always try to make the world bosses (Gnawer, Baladrog, Decayra) if you have shards to unlock the chests and if the drops are available. 06 - Try to be in a guild that can active buffs that give more gold and knowledge. 07 - When possible, participate in Guild Raids to earn gold and knowledge. 08 - Farm contract of gorgors. By the way some monsters drop those contracts before lvl 20 (word say that boars and wolfs in mountain). You can separate a day to do all contracts at once. If you can get the rest buff, guild buff and skypass buff they will give you a good amount of gold and knowledge. Some people in this lvl wait to have more level than the lvl in the contrat, maybe this make easy to make they. Stay in mind that some class have huge trouble completing those, so be prepare. 09 - It's up to you if you will rush to lvl 20 merging rare gear you get or leveling slowly waiting to drop the right equipments that you want and levelling those. If you want to combine equipments before lvl 20 is up to you (pass they of uncommon to rare). I do not recomend though as this will consume a lot of resources, but if you do, get all rewards from the league before and do this only to one or two... 09.5 - What i say in item 9 can apply for equipments above lvl 20 too. 10 - Do not level up "uncommon" level weapons (green), after lvl 17 leagues have rewards that drop "rare" level weapons. Therefore, it is not necessary to level up a weapon of an "uncommon" level. 11 - I would always prefer to level rare equipments, but is not the end of the world leveling uncommon, just make with caution. 12 - When you reach level 20, be patient. Prioritize getting rare items (blue) over matching items of the uncommon type (green). You get rare items through league rewards, bg, and 12-hour chests. 13 - At lvl 20, consider purchasing the item "Blacksmith's Chest" from the guild shop. This chest can drop both common and uncommon quality items, as well as being able to drop common quality items with hardening. Remember that leveling an item up to the highest qualities requires a lot of resources and is not advisable. It gives two kind of scrolls too, one you can use in pvp the other one in pve. 14 - Events always give good amount of gold and knowledge, so do not miss those. 15 - If you can do not let your talent page too far behind. 16 - Arena of level 20 forward, especially in the beginning, its hard. If you want to increase your chances of winning buy and use the scrolls from the guild shop.
-
- 1
-

-
Hello all, newer player here, roughly been on for about a month(?) now, maining a Nox Mage (Lvl14)...just want some general tips, advice, etc if anyone could offer? Couple key points; tips for arena? Holy hell, why is it so hard to win? Skillwise I Godstomp every player I've encountered, but it just doesn't matter I get wrecked by bads. Also, is there a efficient way to level up faster WITHOUT spending money in their greedy and overpriced shop?
-
.thumb.png.6e2dd9e873c4f9def0a23752d15db0bc.png) Knowledge of Dungeons: The Key to Golden Chests in Skylore In my guide I will use color scheme, so be aware of that: blue sentences are boring/known part; green sentences are the key to understanding how to be good; purple sentences will represent subjective point of view. Introduction. You are able to go to the dungeons from as low as 6th lvl. Yet, you shouldn't. All two maps and four bosses of the dungeon are available to you right away. Until level 8, the only chest that you can get from completing a dungeon is the common "Explorer's Chest". Oh, and also sweet 950 vigor, which available for you for succeeding in dungeon of any lvl. Any. So help lower lvl players if you need only vigor. From lvl 8 you can get "Monster Hunter's chest" and from lvl 16 "Monster Slayer's chest". "Can" is the main word - the type of chest received for success is random. In my experience, the ratio will be every third chest is green and every ninth is golden. Requirements apply to your entire party. The dungeon monsters and reward based on the lowest level in your party. If there is a level 7 player, only grey chests are available, and if there is a level 15 player, only grey and green chests are available. Your main goal in completing the dungeon is to kill the main boss within 11 minutes. Preparation. The main thing about dungeon is that it's a group PvE activity - you won't be able to complete it alone. Which means that you need a group. And as I said before, usually you need a group of specific lvl players, 6+ or 10+ or 16+ or 20+. Wait, isn't only levels 6, 8, 16 are affecting reward? Not only. These numbers are important because, based on your level, you will also receive different "tier" items, which is a topic for another guide. While we are here: the only items that you can get from dungeon chests will be items with Might as first attribute, reffered to as PvE items. In preparation, you also want to buy potions of the same lvl as your dungeon, any higher will be downleveled. Now that we know what lvl do we want, what classes do we wan't? "Meta", or usual group, will consist of one healer, one tank, two DPS. However on higher lvl's you will be able to consistently pull off a one tank/healer three DPS strategy. Does this means that Only this "meta" can go through a dungeon? No. But it's the easiest one when you play with people that you don't know. I get through a 16+ lvl dungeon with four DPS and with four healers, but it was more for fun. How do we get a group of those specific classes? Common brain would queue up and retreat Every time when you get auto-quarteted with non-meta classes. Bureaucratic brain would use Tavern functionality(open where the chat is, and it will be second tab listed in the bottom of screen) and select missing classes in his request. Big brain uses chat and write something like "dg 16+(lowest lvl required) 2/4(number of ppl already in party), healer/tank needed(specify classes that you need) ". Free thinker just goes into Adamant Caves and invite characters of needed class and level into his party, while copy-pasting in their direct messages "dg?" This is how I got most of my friend in the game btw. Dungeon Every dungeon consists of 6 rooms, inside 1 of which will be main boss, 2 contain mini bosses and 3 contain average/strong minions. Every room can have exit on Upper, Down, Right or Left part of it, which can create different paths to main boss. And since dungeons are procedurally generated - it does. Yet, there are few rules, true for each dungeon. On the Real path to main boss: can be only 1 miniboss; only 2 rooms with minions; main boss always in 4th room of this path. This leaves two rooms, one with the boss and one with minions, which referred to as the "trap room", or "trap" for short. It's a good rule to always write in party chat that room is a trap-room, before anyone starts blasting. Boss Strategies I honestly don't think that most of you need a guide for mini-bosses, minions, or even the main bosses. So here it is: my ranking and a short description of each dungeon. Note that from the last update, mobs in Thorn Hollow have changed, making tanking two groups together much harder. Elariel - tree girl. Hard run. The group needs to know the scheme: "kill root on player -> kill firelings -> kill boss", which is just too hard to juggle with. "Always focus boss even when green cloud, that can be killed with 3 auto-attacks, will restore ~10% of total hp to him. That's what you're saying, Rog?"; "Read that Swarm ability can transfer in 3-meter radius, so when you attacked by it don't come closer to party members? Huh??" Flower Lord - yeah. Normal run. Nothing unusual. Kill the healers first, avoid the AoE ability because it can oneshot DPS, then kill the boss. Magnetron - big metal boy. Easy run. This is when you want to spam dg with randos, because his AoE is slow, it's hard to get oneshoted by it and...there is some trick. Also, just kill the engineer and repair robot first in the mob rooms, please. Spineslasher - chainsaw goblin. Hard run. Because of the hard main boss. All his abilities have the possibility of killing you fast, even the tank. So study them properly and avoid getting within their range at all costs. Tips and Tricks More runs - easier runs. It sounds too obvious, but I've seen a lot of people who gave up on the idea of dungeon runs after their first failure. Don't be scared to use party chat. It's a great tool to communicate, not only about trap rooms but also about who goes first, who to focus on, and at the end, say thanks and maybe propose a few more runs if anyone needs them. It's always better to skip a room. Don't agro the mobs as soon as you enter the room, look around and see if there are any roads available to you. Often mini-bosses can be skipped and it's a good thing. It's always better to try another room if you saw that there's no road in the first half of the room. This is an advanced tip, but it helps me in all my runs. For more information, read https://en.wikipedia.org/wiki/Monty_Hall_problem. It looks like you get more golden chests from dungeons than from the arena. This is just mine and my friends observation, but it's nice to consider. Conclusion Dungeons - is a great PvE content of Skylore. When you get how to go through them it can become great accumulator of friends and fun. Hope that you now: Understand 60% of messages in global chat Won't upset when after auto-queue your party retreats Someone leaves your dg party just when he joined and saw your lvls and classes. P.S. Make Mandragore easier, pls, I hate this miniboss. TL;DR(because I love them) Dungeons in Skylore can be completed starting from level 6, but it I recommend to wait until level 10 to receive better rewards. The goal of a dungeon is to defeat the main boss within 11 minutes. A successful dungeon run requires a group consisting of one healer, one tank, and two DPS. You can form party by using tavern tab, chat, or inviting players in dm. Dungeons are procedurally generated and consist of 6 rooms, including the main boss, mini bosses, and minions. To reach the main boss, there is a specific path which includes 1 mini boss, 2 rooms with minions, and the main boss in the 4th room. To defeat each boss, you should use different strategies, they aren't born equal. Written by Rogravi, leader of Havoc clan. More guides will be in Havoc Skylore discord channel. Feel free to post questions there and here in the comments.
Knowledge of Dungeons: The Key to Golden Chests in Skylore In my guide I will use color scheme, so be aware of that: blue sentences are boring/known part; green sentences are the key to understanding how to be good; purple sentences will represent subjective point of view. Introduction. You are able to go to the dungeons from as low as 6th lvl. Yet, you shouldn't. All two maps and four bosses of the dungeon are available to you right away. Until level 8, the only chest that you can get from completing a dungeon is the common "Explorer's Chest". Oh, and also sweet 950 vigor, which available for you for succeeding in dungeon of any lvl. Any. So help lower lvl players if you need only vigor. From lvl 8 you can get "Monster Hunter's chest" and from lvl 16 "Monster Slayer's chest". "Can" is the main word - the type of chest received for success is random. In my experience, the ratio will be every third chest is green and every ninth is golden. Requirements apply to your entire party. The dungeon monsters and reward based on the lowest level in your party. If there is a level 7 player, only grey chests are available, and if there is a level 15 player, only grey and green chests are available. Your main goal in completing the dungeon is to kill the main boss within 11 minutes. Preparation. The main thing about dungeon is that it's a group PvE activity - you won't be able to complete it alone. Which means that you need a group. And as I said before, usually you need a group of specific lvl players, 6+ or 10+ or 16+ or 20+. Wait, isn't only levels 6, 8, 16 are affecting reward? Not only. These numbers are important because, based on your level, you will also receive different "tier" items, which is a topic for another guide. While we are here: the only items that you can get from dungeon chests will be items with Might as first attribute, reffered to as PvE items. In preparation, you also want to buy potions of the same lvl as your dungeon, any higher will be downleveled. Now that we know what lvl do we want, what classes do we wan't? "Meta", or usual group, will consist of one healer, one tank, two DPS. However on higher lvl's you will be able to consistently pull off a one tank/healer three DPS strategy. Does this means that Only this "meta" can go through a dungeon? No. But it's the easiest one when you play with people that you don't know. I get through a 16+ lvl dungeon with four DPS and with four healers, but it was more for fun. How do we get a group of those specific classes? Common brain would queue up and retreat Every time when you get auto-quarteted with non-meta classes. Bureaucratic brain would use Tavern functionality(open where the chat is, and it will be second tab listed in the bottom of screen) and select missing classes in his request. Big brain uses chat and write something like "dg 16+(lowest lvl required) 2/4(number of ppl already in party), healer/tank needed(specify classes that you need) ". Free thinker just goes into Adamant Caves and invite characters of needed class and level into his party, while copy-pasting in their direct messages "dg?" This is how I got most of my friend in the game btw. Dungeon Every dungeon consists of 6 rooms, inside 1 of which will be main boss, 2 contain mini bosses and 3 contain average/strong minions. Every room can have exit on Upper, Down, Right or Left part of it, which can create different paths to main boss. And since dungeons are procedurally generated - it does. Yet, there are few rules, true for each dungeon. On the Real path to main boss: can be only 1 miniboss; only 2 rooms with minions; main boss always in 4th room of this path. This leaves two rooms, one with the boss and one with minions, which referred to as the "trap room", or "trap" for short. It's a good rule to always write in party chat that room is a trap-room, before anyone starts blasting. Boss Strategies I honestly don't think that most of you need a guide for mini-bosses, minions, or even the main bosses. So here it is: my ranking and a short description of each dungeon. Note that from the last update, mobs in Thorn Hollow have changed, making tanking two groups together much harder. Elariel - tree girl. Hard run. The group needs to know the scheme: "kill root on player -> kill firelings -> kill boss", which is just too hard to juggle with. "Always focus boss even when green cloud, that can be killed with 3 auto-attacks, will restore ~10% of total hp to him. That's what you're saying, Rog?"; "Read that Swarm ability can transfer in 3-meter radius, so when you attacked by it don't come closer to party members? Huh??" Flower Lord - yeah. Normal run. Nothing unusual. Kill the healers first, avoid the AoE ability because it can oneshot DPS, then kill the boss. Magnetron - big metal boy. Easy run. This is when you want to spam dg with randos, because his AoE is slow, it's hard to get oneshoted by it and...there is some trick. Also, just kill the engineer and repair robot first in the mob rooms, please. Spineslasher - chainsaw goblin. Hard run. Because of the hard main boss. All his abilities have the possibility of killing you fast, even the tank. So study them properly and avoid getting within their range at all costs. Tips and Tricks More runs - easier runs. It sounds too obvious, but I've seen a lot of people who gave up on the idea of dungeon runs after their first failure. Don't be scared to use party chat. It's a great tool to communicate, not only about trap rooms but also about who goes first, who to focus on, and at the end, say thanks and maybe propose a few more runs if anyone needs them. It's always better to skip a room. Don't agro the mobs as soon as you enter the room, look around and see if there are any roads available to you. Often mini-bosses can be skipped and it's a good thing. It's always better to try another room if you saw that there's no road in the first half of the room. This is an advanced tip, but it helps me in all my runs. For more information, read https://en.wikipedia.org/wiki/Monty_Hall_problem. It looks like you get more golden chests from dungeons than from the arena. This is just mine and my friends observation, but it's nice to consider. Conclusion Dungeons - is a great PvE content of Skylore. When you get how to go through them it can become great accumulator of friends and fun. Hope that you now: Understand 60% of messages in global chat Won't upset when after auto-queue your party retreats Someone leaves your dg party just when he joined and saw your lvls and classes. P.S. Make Mandragore easier, pls, I hate this miniboss. TL;DR(because I love them) Dungeons in Skylore can be completed starting from level 6, but it I recommend to wait until level 10 to receive better rewards. The goal of a dungeon is to defeat the main boss within 11 minutes. A successful dungeon run requires a group consisting of one healer, one tank, and two DPS. You can form party by using tavern tab, chat, or inviting players in dm. Dungeons are procedurally generated and consist of 6 rooms, including the main boss, mini bosses, and minions. To reach the main boss, there is a specific path which includes 1 mini boss, 2 rooms with minions, and the main boss in the 4th room. To defeat each boss, you should use different strategies, they aren't born equal. Written by Rogravi, leader of Havoc clan. More guides will be in Havoc Skylore discord channel. Feel free to post questions there and here in the comments.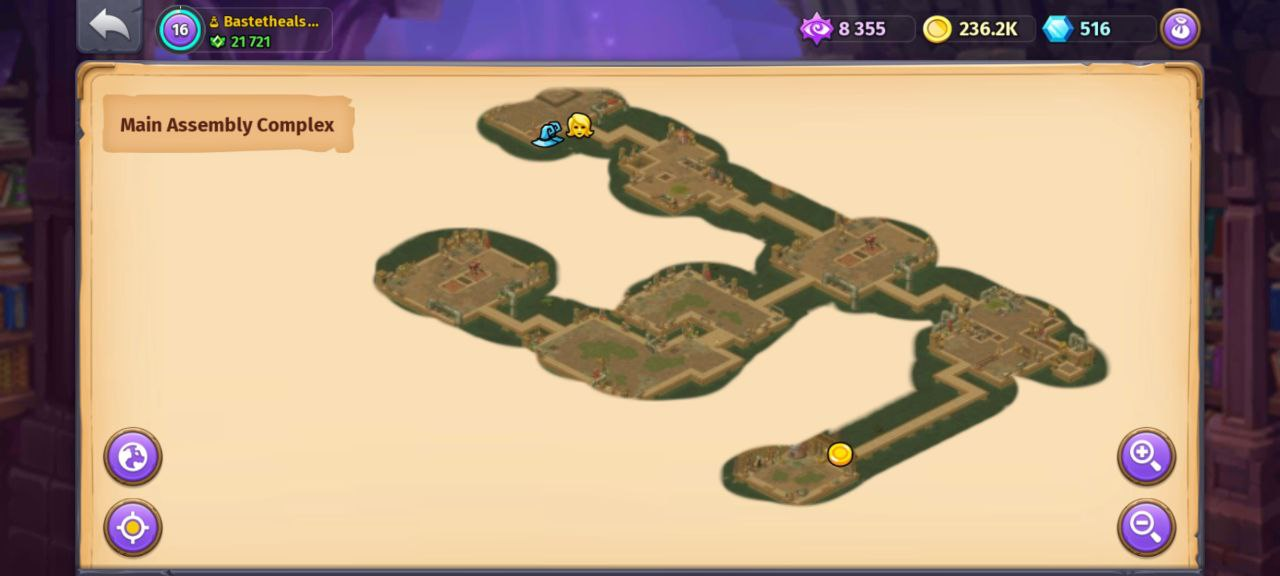


-
Hello , I've been playing Skylore online for a while now and I have about 300 in-game hours spread around all my charcters so here are the tips and tricks I learned throughout my journey that will prevent you from doing the same mistakes I did in the beggining and hopefully help you progress faster ! How to level up in the early game (Properly) - At first it looks like an easy task that doesn't need much explaining , but you you are wrong! The game doesn't forgive mistakes in the early game and If you don't follow these tips you will waste a lot of time , resources! It will considerably slow your progression leaving you to wonder what to do next and constantly have the feeling of being stuck on the same level for ages. 1. Do not upgrade your common gear ! The common gear you get from the begging of the game will be used only for a short amount of time after which you will swap it for uncommon gear which you can get from arena or dungeon chests. These Uncommon gear pieces give a bonus stat that can be either: - Resilience for PvP (arena and open world) - Composure for PvE (extra damage on weaker mobs) - Might for PvE ( extra damage on Bosses) BONUS TIP: Its easy to complete arena in the first leagues (4-9 , 10-13) and its the fastest way to get uncommon gear pieces thats why i suggest you to start doing it as soon as you get access. 2. Talent Tree progression and chaos shards. On the talent page the most important thing to get first is the skill , secondly the chaos shards and after that everything else ! Chaos Shards are used to upgrade abilities , which make your charcter a lot stronger (Both for PvP and PvE). 3. Do dungeons to get more KNOWLEDGE ! Knowledge is an essential resource in the game , because it is used to gain permanent mastery by learning talents such as new abilities , passives , chaos shards and its also used for enchancing , reforging and combining gear pieces. To boost your progression to the SKIES you should farm mostly dungeon chests as begginer that way you get lots of knowledge by unlocking them every 3 hours. BONUS TIP: You will need at least one alchemist to complete dungeons fast and efficiently! 4. Using Soul Shards efficienctly. Soul shards are used to cleanse the trasures that you get from the adamante caves. DO NOT use them to cleanse grey treasures its a waste of resources ! Cleanse Epic treasures (dropped from world bosses) , because they are the most VALUABLE - opening them provides you with Defense orbs and Adamante crystals that are used for enchaning and reforging items(also you can sell them for extra gold , but I don't recommend it). Anther option is Uncommon treasures (dropped from cave mini-bosses) they give you a little bit better loot than the grey trasures. Focus on the chests that give knowledge instead of gold. 5. How To efficiently use Vigor ? Vigor is consumed after killing a mob. If you can defeat a mob on your own (even if its harder) DO IT , because you will get more resources that way - if you do it with another player you will get only 50 % of the rewards from the kill. High Level players usually farm mobs that are outside the adamante cave receiving knowledge and gold per every kill and ocassionaly a "Gorgor Contract" as drop - its more efficient method of farming. Also try to spend your vigor before doing your daily quests. There are a lot of people at these zones and it will be hard to solo kill a mob. Vigor is recharged by doing arena , dungeons or battlefields. (For 20000 Vigor you can get about 2000-3000 knowledge and gold or more ) BONUS TIP: If you don't have enough space and keep getting a full inventory use the FREE diamonds the game gives you to buy more inventory slots! 6. Join a Guild. Guilds are a great way to boost your progress ! Advanced and active guilds give you acces to passives such as increased gold and knowledge intake , more loot drops , stats boosts and much more. Also if the guild has raid talent unlocked and active members to do it you can get more resources and valuable items from doing a raid! Don't Forget to contribue to your guild by doing the daily guild assignments which reward you with tokens to use in the guild shop and help the guild to grow! WARNING: Most advanced and active guilds that have raids unlocked usually look for players that are at least level 12! 7. Extra Daily Quests You will receive an extra daily quest at levels 13 and 16- If you are close to or have the resources to reach it DO IT as soon as you can because it gives you acces an extra daily quest that you can run twice every day (1 per 12 h) which increaseas your daily income and youprogress a lot quicker! BONUS TIP(CREDIT : Rogravi ) : At level 23 YOU DON'T get an extra daily quest , BUT your first quest UPGRADES! 8. STOP overusing potions ! Potions can be useful , but they are not a must in order to progress or survive. Also they can become sinkhole for your gold if you use them too often due to their price ! The healing potions have proven to be the most useful - saving you in tough situations which reduces your repairing costs , but only use them if you cannot survive without one ! The Strenght/Health boost potions can be used rarely for harder tasks such as completing "Gorgor Contracts" or when fighting "World Bosses/Raids" which makes them unnecessary to progress. 9. Look for a party or create one. If you struggle to progress in arena league or dungeon runs keep failing due to people retreating try looking for a party or create one! A lot of people are looking for parties in world chat who have difficulties completing these tasks , but you can manage do them together. You will also meet awesome people and possibly make new friends along the way to level together and who knows maybe even you might get invited to join a guild! BONUS TIP : Tavern is usually not used by many people , but i think it deserves to be used more often! 10. Dungeon Floors - Most of the time you need to pass 3 floors and meet the main boss of the dungeon on the 4th floor - If you have reached the 4th floor , but you don't see the main boss you should go back a floor or two and find another path instead of starting a fight , because it will be a waste of time and as we all know the dungeon time is LIMITED to 11min. BONUS TIP: Sometimes the mini-boss rooms can be skipped and you can go to the next floor if you don't trigger boss aggro when walking.
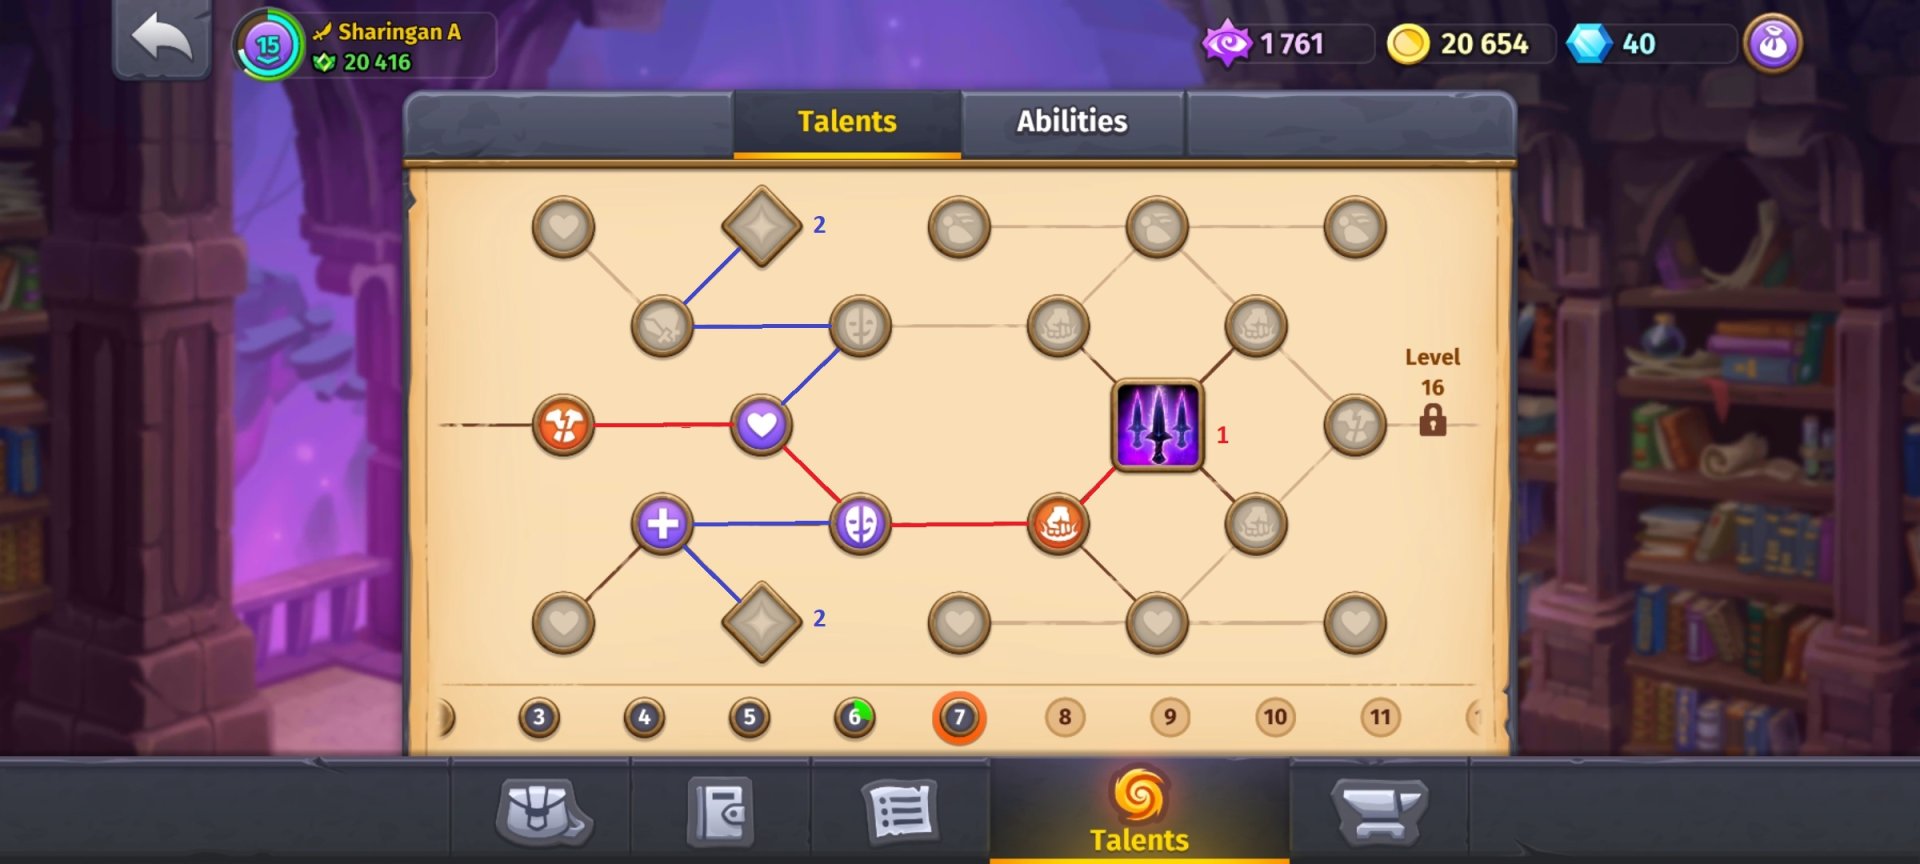
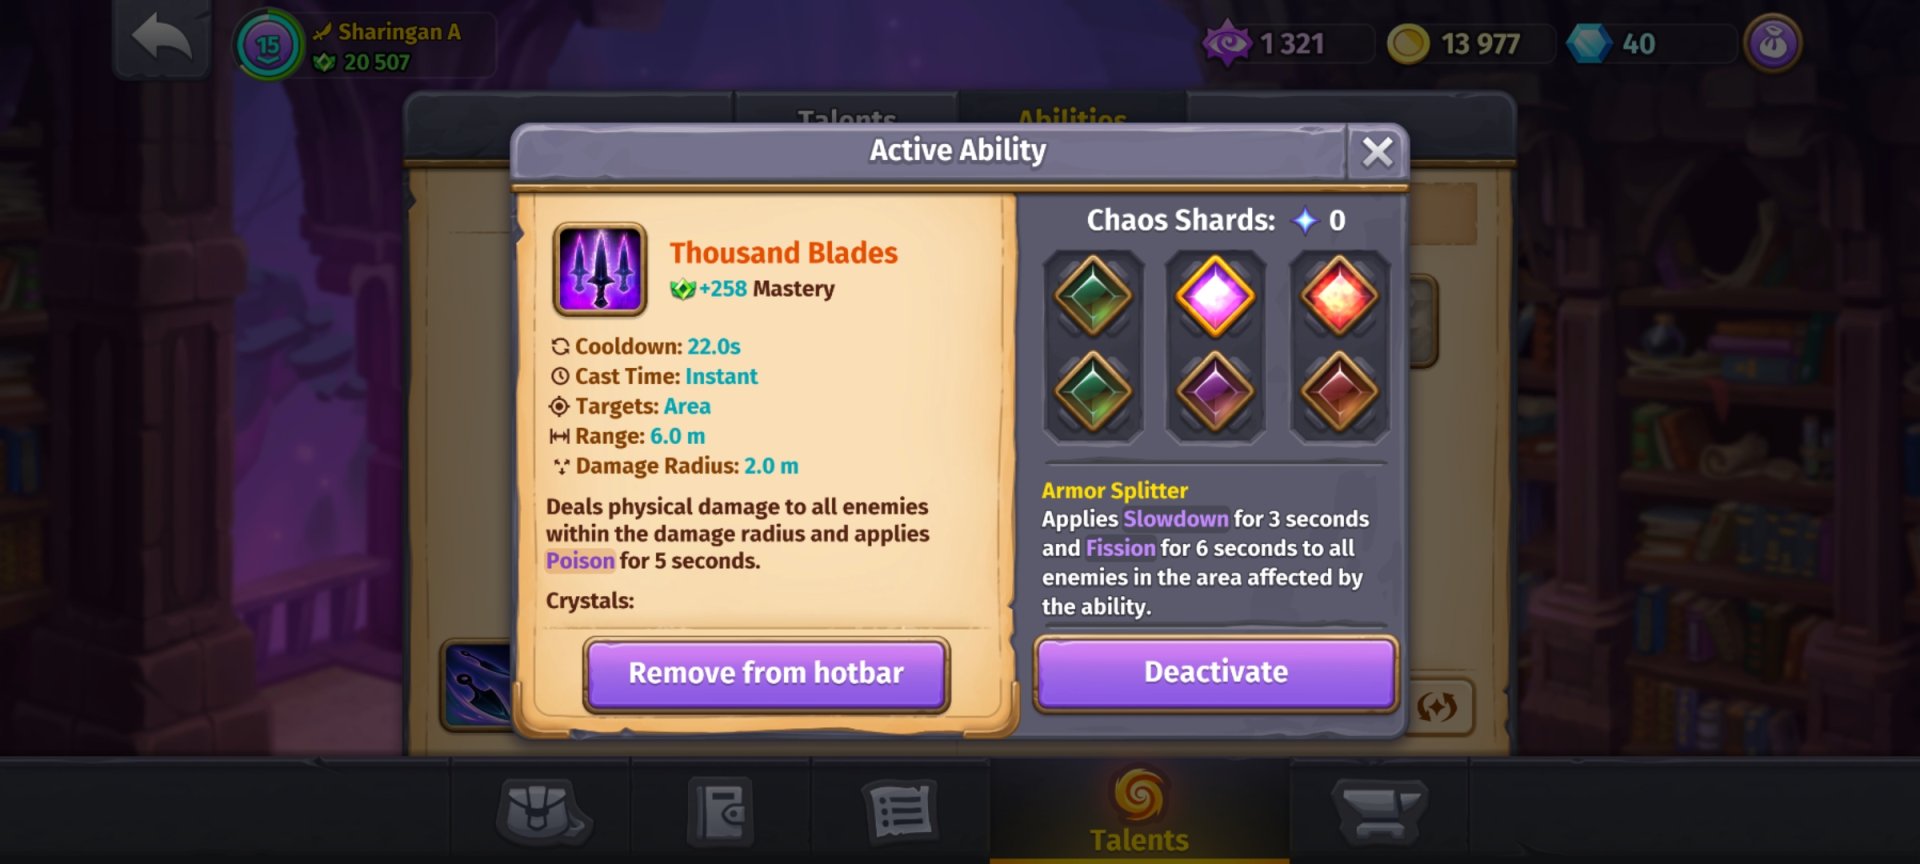

.gif.79800f6081a36851d0b6a068f3960d5b.gif)

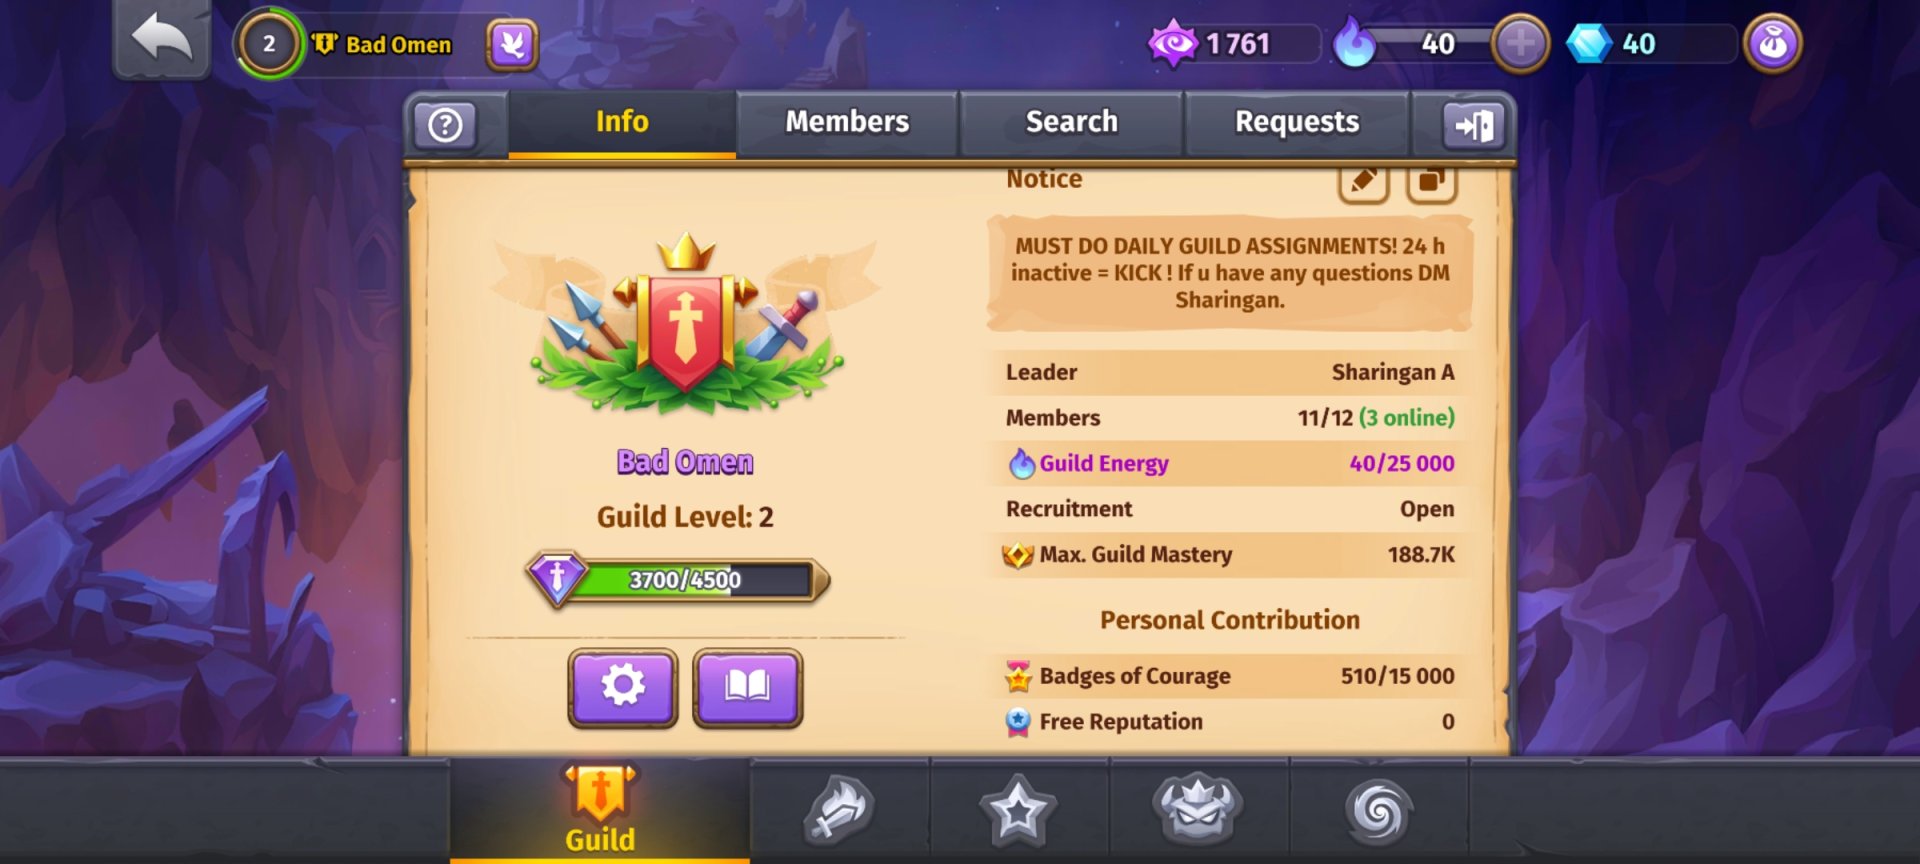


.gif.60d20964e42a8d7a68d0bb2353a11dee.gif)


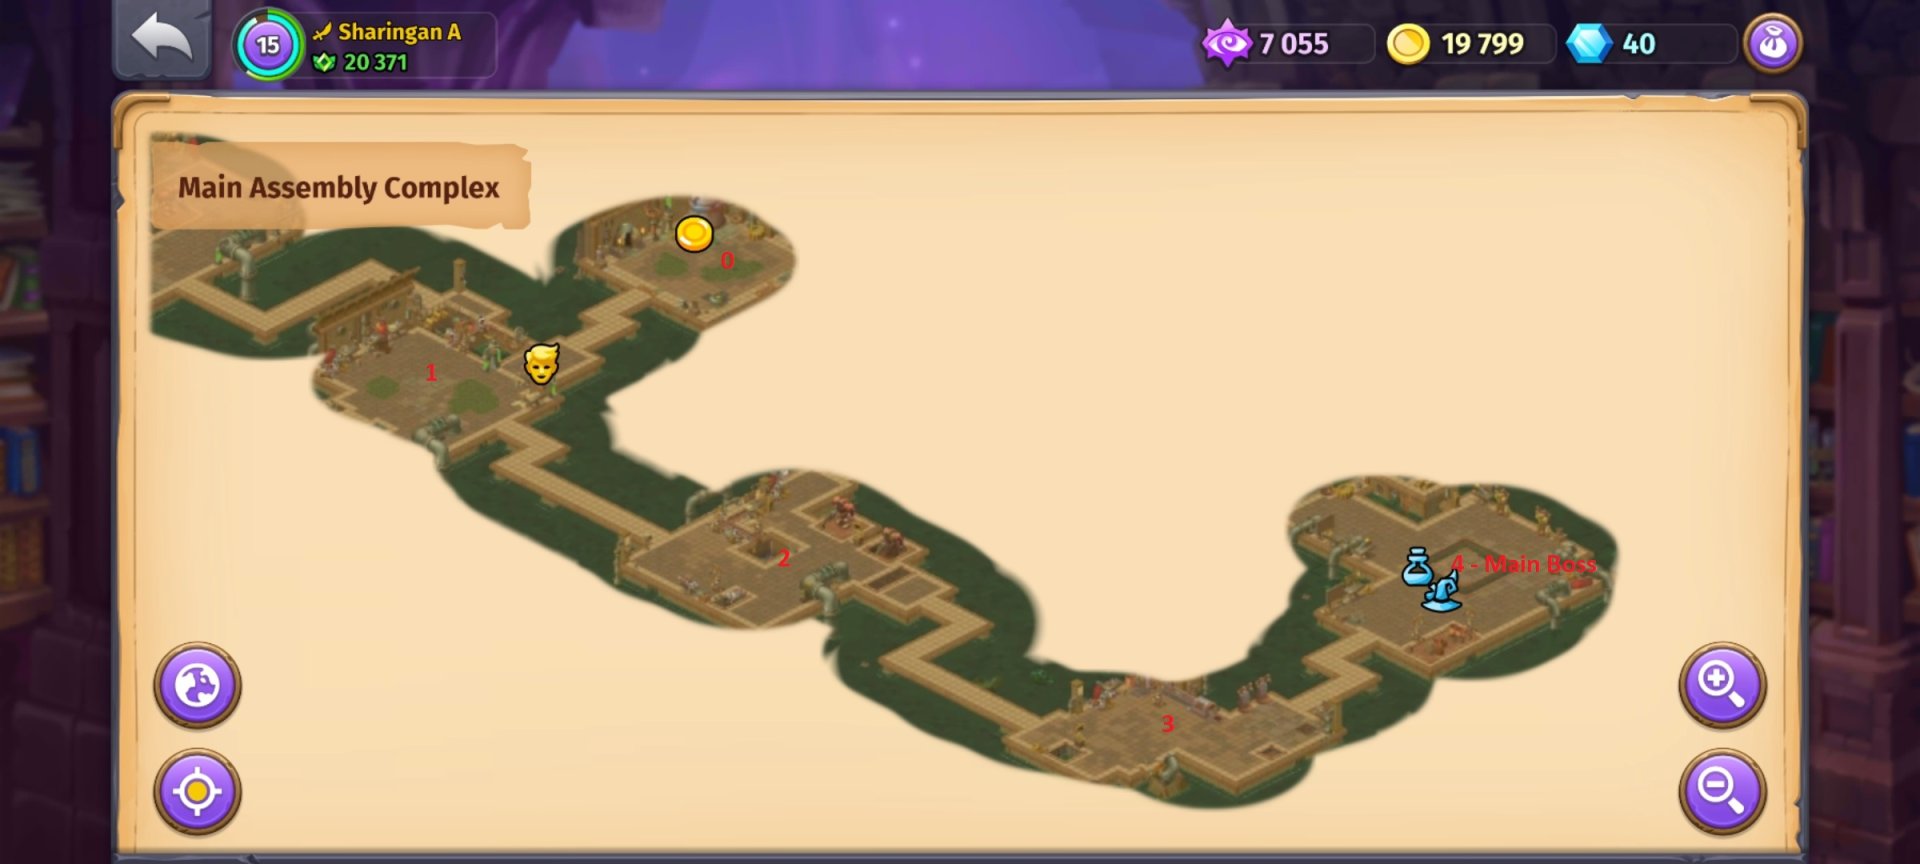


.gif.1f8958c81cd564e39ecc629f53c8d52a.gif)
.gif.cc91d35f5f4fd86d22d723d6dd586e55.gif)

-
Effective Level (Grow Smart) Different areas and instances in the game might have “Level Downscaling '' like PvEvP areas, Dungeons or Raids (Where your current Level is lowered) Or "Level Upscaling" which is currently present at arena matches, where it's meant to reduce the disparity between the contenders by upscaling the Lv of all players to that of the highest Lvl player in the match. This mechanic in skylore is named as “Effective Level”, is meant to keep the game competitive at all levels and to maintain the relevance of the content at all times. Essentially most of the time you will spend in the game revolves around the accommodation of your character lv to suit the content. This gameplay experience might be troublesome, confusing and sometimes frustrating, so I will try to explain some concepts that will help you have an easier time in your journey through Skylore. To begin this guide I want to state an important fact to keep in mind while you read all of this: What does that mean? And how do I know if I'm strong for my level? To answer this question we will focus on three aspects to evaluate your real strength: 1.Ability strength or Damage 2.Health 3.Special attributes ----------------------------------- 1. Damage and Ability Strength To explain this, I will introduce a concept that in this guide we will call "Level Capacity" or "LC" for convenience. LC: How far have you progressed through your Lv? Each character Lv in this game has a certain amount of "Mastery" obtainable before you actually Lv Up. This is essentially how much of the potential available to your Lv you are actually using. While your total "Mastery" is essentially an indicator of the overall strength of a character, we will use the mastery required to progress to the next level as a measure of LC attained. Let's give an example: This is important to know because it's one of the many things the game takes into consideration to measure and upscale your character against higher Level enemies. So, in an Arena match upscaled to Lv30 a character of Lv22 with LC 50% is weaker than a Lv21 with LC 90% also upscaled to Lv30 This is also relevant in Lv Downscaling too… If you are high Lv going to a zone of Lv20, the downscale applied to your character is based on your LC, so a LV20 with LC 90% might deal more damage/heal than your LV 26 at LC 20%. (That's if we were to ignore special attributes) In conclusion, even if everyone is being scaled to be on the same Lvl, there are still noticeable differences in strength due to LC, at least in terms of damage and ability strength. 1.1 Mastery Composition: How much of your current Mastery actually comes from Damage or Ability strength? As we know there are different ways to build your character, Light/Frantic, Medium/Balanced, Guardian/heavy, or just a mix of those. But there are differences in mastery even between two characters with the same build. This is because some players will prioritize weapons to Lv up, while others prioritize accessories or armor. Maybe some players have a mix of high level and low lv equipment. Or maybe, someone prioritized studying magic talents ignoring everything else in the talent tree. Perhaps you like to enchant your equipment rather than Leveling up, or you are wearing equipment without identifying it and consecutively won't have mastery from special attributes. This is the reason as to why some players could have abnormal stats for their current mastery. This stays true in the arena and any other area in the game. Seeing players with only weapons as a main way to lv up to dominate lower lv areas is not a common occurrence but they do exist. Big differences may come from those aspects, yet, if you want to dig deeper there are more details: Chestplates and Pendants cost 12% additional mastery than smaller pieces (Boots, gloves, helmet, rings, cloaks, earrings) Surprisingly they give and increment in stats beyond 12%... how much? If we compare a Chestplate to a small piece of the same kind it will give +21% Armor/Damage and +33% resilience/might/composure than smaller pieces of the same set (Heavy/medium/light). Meaning that those pieces are more effective to attain more strength without reaching the max LC. Of course, the cost of upgrading them is exceptionally higher too. Interesting enough, Heavy/Guarding variants of those great size pieces (Pendants and Chestplates), give +30% additional armor instead of +21% than small Heavy/guarding pieces. There is also an increment in special attributes, but it varies depending of the stat, so i will share some info about that in the Attributes Section at the end of the guide Another small fact.. If we talk exclusively about small size equipment, shoes and earrings are the weakest ones by a small percentage. Why? They give -12,4% less Resilience/might/composure. Essentially those are just minor details and differences, so you might be better by ignoring them altogether. ------------------------------------------ 2. Health Points (HP) Edit: Health system has been revamped in update 1.15, two weeks after this guide was published to fix the issues presented here. So this section has become outdated, skip to "Health Points Revamped" to see how the new system works. [Outdated] For your health points the games evalues you in a way similar to LC, but this time is not "Mastery" but your progress in the talent tree. (By progress I'm referring specifically to the HP Talents) Let's say that at Lv 20 there are around 25 HP talents total to study through the whole tree up to that LV. If you studied all 25, you will be a Lv20 at full capabilities with 100% of the attainable HP. So if the game were to upscale you to LV30 in arena, it will give you HP equal to a LV30 with 100% of the HP attainable for that LV. And it goes both ways: (Lv30 at 20% of the attainable HP ---> Lv 20 with 20% of the attainable HP) As players Lv up very quickly thanks to the mastery of the equipment, they unlock plenty of pages in the talent tree and consequently more HP Talents that they don't have time to Study. (Lv 20 with full hp talents comparison against rushed Lv23 player) For this reason it is very common to see matches in the arena between players with 35k HP and players with 25k HP. (Lv 27 being adjusted to Lv 30) The best strategy for players as they progress in the game is to always have the HP talents as a priority to avoid such disastrous disadvantages: A small detail about HP, is that a higher level will be considered to have higher capacity in terms of HP even if you have all talents avaliable studied. This is because, health points can also be obtained from equipment. If you increase your lv, by logic you should be able to have another extra increment of HP from equipment alone due to the extra maestry that could be obtained until you reach LC 100%. So its normal, that even if you did things right and have studied all HP talents avaliable to see your HP (At effective levels) be lower than the one you had at previous levels. In short terms the game thinks you should have HP attributes in your equipments so it treats your character as if you did have them and tries to balance those increments of HP at areas with lv scaling. This is why for some people their strongest levels are the ones where talents pages are unlocked (18, 20, 23, 26 ,29, 32, etc) [Outdated] 2.1 Health Points Revamped The new system changes how health is attained and consecuently the mechanics of how its going to be scaled or downscaled. a) Health increments are obtained each time you Level up: This means that each level has a minimum or base health predetermined by the game. Thanks to this change, whenever the game changes your effective Level you will automatically obtain the base health of the target level. So huge health disparities as shown before are not going to occur. b) Aditional Health attributes are still obtainable at the talent tree, but the increments are realtively small compared to your total health and what they used to give: Scaling: The relevant aspect here is that "Aditional health" obtained from talents do no scale upwards. If you go to an arena instance of Lv30 while being Lv20, your 1721 HP from talents will stay as 1721 HP. Only your base health will be incremented accordingly. On the other hand, these aditional health points can be scaled downwards if your effective Lv were to be lowered, yet they are still an advantage against lower lv players that dont have the complete talent tree. The importance of HP talents is not as important as before, but they cant be neglected either, 2k-4k of extra health could be what determines whether you live or die against the massive damage from certain raid bosses, ---------------------- 3. Special Attributes: (Efficiency and its technical aspects) In Skylore, each attribute (with the exception of HP and Damage/Ability strength) is measured by a percentage that represents its effectiveness. This means that at 16,000 points in defense "could" translate into 50% effective defense However, the relationship between the attribute "points" and "percentage (%)" is not linear. An incorrect analysis would be to assume that: If 16,000 = 45%, then for every 1000 points you will get an extra 2.8%, and therefore 32,000 points = 90% effective defense. (But this is incorrect) This is because of two reasons: 3.1. Stat Adjustment: Each attribute has a predetermined limit set by the game. It's important to know that these values are just theoretical and can't be achieved by normal means in a logical build. They do exist as part of the game structure, but you may realize that obtaining them is not possible in a functional character. So you may as well just forget that they exist at all In practice real limits are way below those percentages, the real limits are the ones that we will refer to in this guide Those are just some of the real values, but it's actually difficult to determine so I'm just giving a few of them as an example. (If you want to contribute with information about the real limits please share in the comments) These limits stay the same throughout all levels, whether it's Lv 8 or Lv 35, neither can get a stat higher than the predetermined limit (At least in terms of equipment). Why is this possible? The reason has to do with the idea of maintaining balance or appropriate gameplay throughout all levels of the game. For example, a low-level guardian needs to be able to tank early area bosses, and to do this, it needs high defense. But to allow low-level players to reach this 55% defense, the requirements to obtain it must be lower than in higher levels. This is why the amount of points needed to obtain 45% or 50% effective defense changes depending on the level in the game you're in. So 16,000 ≠ 55%, for Lv6 it's possible that with only 2000 = 55%. (It goes without saying that obtaining 2000 points of defense at a low level is not an easy task, just as getting 16,000 points at Lv20) This is because the adjustment to the requirements is automatically done each time you Level up. (You can check your stat page before and after to see the small loss of percentage) 3.2. Stat logarithmic behavior: As your character approaches the attribute limit, the percentage obtained for each added point of attribute decreases. This means that the difficulty of increasing the percentage increases with the accumulation of a specific attribute. For that reason, while we can assure that in "Lv20" 16,000 points are equivalent to a 45% defense, we cannot state that 1000 points is equal to 2.8% If we suppose that there is a limit for defense at 50%, the point-percentage relationship for this case would look something like this: (This is an example with arbitrary values, but it reflects the approximate behavior of stats in the game.) Note: We are specifically talking about equipment attributes. Skills, consumables and other external variables can increment attributes above these values temporarily. From this we get two important conclusions: 1- In some cases maximizing an attribute is not necessarily the best option. As you accumulate one specific stat the increase in % slows down. And the cost benefit ratio gets worse. 2- By leveling up, you will suffer from stat adjustment. So the time before you lv up, it's most likely the strongest moment for your character. Going by what we explained in this guide, at LC of 90% your special attributes are also at their highest point. Note: Keep in mind that by leveling up, the content tailored for your character is going to increment its difficulty. The best example for this are gorgor contracts. If you can keep your character at LC 90%, your damage, stats, and everything else are going to be strong enough to obtain good results in it. But if you happen to Lv up, even tought the stat adjustment affect only your attributes and not your base damage, the Lv of the enemies are going to be higher and consecuently their HP. And again you are on the run to obtain proper base damage for your new Lv to get the results you used to have before leveling up. 3.3. Stat effectiveness: Secondary stats such as dodge, defense, critical chance, etc. Have different intensity depending on the type of equipment. Yet they will all give the same amount of Mastery… So, are you choosing your stats in an efficient way to get the most advantage possible? As a golden rule, one would think to always choose the attribute with the highest intensity to get the highest amount available for that specific set. Note: You may have noticed that "Class Attributes" and "Resistance Reduction / Armor Penetration" are not present in this table, thats because the effectivenes of such attributes its the same for all equipments (4 stars). While this is mostly true, the logarithmic behavior of special attributes and the real effectiveness in gameplay according to our class makes all of this a challenging decision. Now.. If we think of small size equipment (Boots, rings, gloves, helmets, cloaks, earrings), the stat will be the same on all pieces as long as they have the same Intensity, and it's different in great size equipment: Chestplates and Pendants give a greater amount of special attributes than small size equipment. But here is where it gets a bit tricky, the increment it's not the same for all stats. Highlighting the relevant data about this: 1- Instinct gives the same amount whether it is on a chest/gloves/boots. (Dont know if its intended or just a bug, but as of now hunters should look for a different stat on Chestplates to get better benefits) and it has the lowest effect on Helmets 2- Class attributes stats have the lowest effect of all stats when applied on Chestplates 3- Health and CD have higher intensity on Chestplates than it has on pendants Knowing all about special attributes, your strength in this section will depend on your ability to choose the best combination of attributes that: -Suit your class and gameplay -Keeps the highest amount of intensity but also maintains a good ratio of Percentage/points. (That's something that I will not dive in this short guide as it requires a deeper analysis and it's specific to every player) 4. Conclusion and final thoughts: This guide is not meant to change the way you play, but to work as a short introduction to some of the technical aspects from the game. Its not the idea to maintain your character strong at all times, because that could be considered a waste of time and resources if you are aiming to reach top levels as soon as possible. A better approach with all this information is to know “when” your character is strong, and maybe take advantage of those moments or to understand the reason for some of the disadvantages present against other players. To some people these mechanics are not very relevant since other factors such as experience, amount of secondary stats, passive and active skills learned, chaos shards, etc, could be more influential to determine if you win or lose. So this is just a small contribution to a simple but at the same time complex game that is skylore. Made by Disperpetual (Darkill Guild)
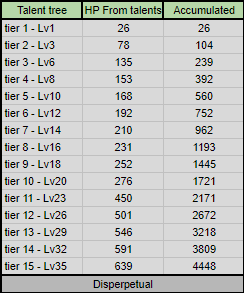
-
 Getting Started: a Skylore Guide from Character creation to the basic mechanics of the game. Topics covered so far ( I will be editing and updating ) : • Character creation • Classes Overview • How the game works Now let's get Started When you first create an account to play Skylore you will need to create a character, but before entering in details let me introduce you to some of the characteristics of Skylore: • The game has lots of missions and an unique levelling system ( Killing monsters and completing missions don't change your level and I will talk more about it later ) • Guilds ( With Guild Wars, Raids, Buffs for the guild members and exclusive shop ) • Arenas ( PvP ) • Dungeons ( PvE ) • Unique Caves ( PvPvE areas ) • The max level is 34 and since they are still adding content for higher levels, you aren't missing anything so you don't need to rush. Now let's create the character… Otherwise how would you enter this beautiful world? Character Creation The first thing you need to do is select your character appearance and class.¹ The game has a division between factions but ultimately it doesn't affect the gameplay at all. The only thing that change with this choice will be your starting city and quests. • You can't enter the opposite faction starting city and the missions will be the same after a certain level. • There are the races from the Legion side ( Right ) which includes: Noxes, Goblins and Gorrs. • And the Sentinels side (Left ) which include: Humans, Elves and Muars. Every mentioned race has tons of different appearances to choose from but, since it only affect the character appearance choose the one you like the most… • It is impossible to change your appearance as per version 1.14 For now, if you'd like to have a different appearance you will need to create another character. After you selected your appearance it's time to select your class² and here things start to get interesting. Classes Overview There are 5 different classes in the game and I gotta say from the start that every one of them is pretty balanced in the mid and beyond in the game ( Around lvl 14 ) • Before this level, some classes have the high ground but shouldn't take long to catch up. • Each class has an unique attribute and an Heroic ability ( I will explain further for each class ) Mage ( Ranged Attack Class ): • You will have lots of abilities that affect a whole area, the mage can focus on Burning or Freezing the enemy. • Strangely, the mage is the master of Illusions too, so you can create doppelgangers to attract the attention of the enemy. • The mage also has other interesting abilities such as Teleportation and Energy Wave and also the Heroic ability ( An ability that can't be changed ) Destruction, uses your clones to inflict massive damage in an area. • The unique attribute for this class is called Concentration and it increase the damage of the Destruction Skill • Easiest class to play at lower levels and doesn't struggle with the early content. • If you like mobility and crowd control, the mage is your class. Hunter ( Ranged Attack Class ): • The Hunter is quite the opposite of the mage, in this regard at least… it has an insane high damage against single enemies and abilities can cause poison or bleeding. • Safe to say that the Hunter is the summoner class of the game: You can summon a high damage Wolf, a tanky Boar or a high control Spider ( They are called spirits in the game and you can't have multiple summoned at the same time… ) • In addition to the 3 Spirits, the Hunter has great skills that can silence the enemy and increase the attack speed. ( The skill which summon the spirits is the Heroic ability of the Class ) • The unique attribute of the Hunter is Instinct, it increases the lifetime and the effectiveness of the spirits. • Because of the Boar, other skills and even passive abilities, the Hunter can be quite a tank and hard to kill sometimes • Doesn't struggle in early content. • The Hunter doesn't have high mobility or an "Escape" ability so this is the class for those who are okay with being stationed in position dealing high amounts of damage. Alchemist ( Ranged Attack Class ): • The Healer Class of Skylore, the Alchemist class can cast Heal, Shields and other buffs on Allies. • Alchemists can heal themselves, Allies or use their skills to cause direct damage and disrupt the enemy, they even have some abilities to greatly increase the mobility. And the Heroic Skill for this class improves the healing capability and increase max health • The unique attribute for this Class is Balance and it increase the effectiveness of healing abilities and increase the duration of the Heroic ability ) • As the name of the class suggest yes, you can go wild and make an alchemist focused in disrupting the enemy and causing damage, builds like this are really helpful with PvE content ( but not so good in PvP content ) • Alchemists often act as a second "tank" for the party in various game modes • Does struggle in early content because of the lack of damage. • If you like to play as the support of the team this is the class for you ( This class is needed in every bit of content in the game so it will be easy to find groups ) Shadow ( Close Range Class ) • The Assassin of Skylore, high mobility class who can jump into the enemy, kill with high damage attacks, abilities and become invisible which is is the Heroic Skill of the Class • The unique attribute for this class is Deception and it increases the time you can be invisible and increase the first damage you deal after you leave invisibility mode. • Being a class that deals high damage, surprisingly, the shadow has some nice abilities that can disrupt the enemy by putting them to sleep, silence and stunning them, making the class have enough control to enter the fight, kill the target and leave sometimes unharmed. • You will find it a little bit harder to complete the early content because it doesn't have lots of health and need to stay close to the enemies to attack, but nothing as hard as playing as an Alchemist or Guardian. • The shadow abilities in addition to what I said so far can cause Poison, and applies buffs to self that increase the damage output. • If you liked the description so far, and if you like causing trouble in PvP content, this is the class for you. Guardian ( Close Range Class ) • The Tank/Warrior of Skylore and the true master of crowd control. • The Guardian is treated as a Tank obviously because of the abilities which I will cover next and because of his unique attribute: Block. Block determines the chance of the guardians to half the damage of direct attacks. • Aegis Shield is the name of the Heroic ability of the tank and it has a passive that gives you an aegis charge every time you block. Each charge decrease physical damage taken. • The Guardian has the ability to Taunt enemies, Stun, Heal himself, get a shield to absorb damage and can slow and push enemies toward him making it the master of control. • The Guardian can be built to have massive damage and be played as a Warrior. • Struggle in early content, it will only have high health in the beginning as a differential, and In the start of the game it lacks damage and proper healing capabilities. • High requisited class because of his taunt ability which can force enemies to attack him making the class essential for PvE content. • If you want a class to survive and control the enemy, this is the class for you but be prepared to struggle in early content. Name your character! Now that you have selected your appearance and Class, make sure to name your character properly³. It is above your character in class selection and if you don't change it now, the game will give your character a random name and start the game. • It is possible to change your name after but it will cost you diamonds ( Premium currency bought with real money) • If you by accident didn't change your name and still is at lower levels, it will be easier to just create another character. How the game works Everything done now you're in game! The game will teach you some basics through quests but don't get your hopes to high Why? Skylore has an unique levelling system where your level is based on your mastery. And the way to obtain mastery here is getting better equipment and upgrading your talents. • You can't craft here as there's no such thing as materials dropped from bosses to craft the endgame gear and etc… Before going further: all the way to level 34 there are equipments that require your character to be at: lvl 2, lvl 4, lvl 10 and lvl 20. Equipment rarity can be: common, uncommon, rare and epic ( there is a legendary quality but you can only see it in the Battle Royale mode ) Each set of equipment will have 3 different types ( will explain further ) and in the uncommon and beyond quality, the 3 different types will have different unique attributes. • Common quality gear won't have any bonus. Lvl 2 equipment can't be upgraded in quality. The one that requires lvl 2 is the one you will receive in the introductory quests and missions and equipping it + learning some talents will give you enough mastery to reach lvl 4. • Lvl 4 equipment can be obtained as common and uncommon. And uncommon quality gear will give you an attribute bonus depending of the type, the attributes being: Composure (PvE): this attribute will increase the damage you deal against weak, regular and strong monsters. • Equipment that can have this attribute are obtainable by killing monsters, quests and opening chests from: Quests, cleansing chests touched by insanity , Guild shop ( Blacksmith's chest ) and Battle Royale Chests. ( Those last 2 chests can contain every type of equipment. ) Might (PvE): the name is the same as temporary buff you can receive but this attribute will increase the damage you deal against Elite, Boss and Champion Monsters. • Equipment that have this attribute are obtainable from opening Dungeon Chests. Resilience (PvP): this attribute will reduce the damage taken from other players and also reduce the chance of a receiving a critical attack. • Equipment that have this attribute are obtainable from opening Arena and Arena League Chests. In addition to this, the PvP set is the easiest to obtain in every rarity because of the arena League and is currently the most relevant in the game since the best farming areas are PvPvE zones and you can still complete the PvE content with the PvP without struggling. Now, back to what I was saying: Killing monsters and completing quests will only give you resources here in Skylore. Complete the quests to unlock new locations and get resources to learn some talents and upgrade your equipment, that's all, they won't give you levels. ( Next update in this guide will happen in 8th of February - It is already written and I will cover the fatigue system in game and equipment types but takes a lot of time to transcribe and format it here )
.png.8e51f819b50376a79e9c37f0cefe630a.png)
.png.28ae6ef6120614bc606d0649ee8fed95.png)
_(1).png.ca6199c7df287d70f91c38e1f673da34.png)
_(1).png.9630adedc2910636f9140bf0a7e2e0f9.png)
_(1).png.f676001d39b1e792e8aee577b589140f.png)
_(1).png.ad9c7146eecdeaf9b997f6a6ec6c9785.png)
_(1).png.70382f2b29b0a419ae13ba5e8e3be08c.png)
.png.5407404b10c618465962b0fa2d3ca8e5.png)
.png.c288c06f48c092bc696398f2c39848f5.png)
.png.cc31d14f6a64251114dac9a3685831b8.png)
.png.a27f1645d2855ca2def11b91b477fc11.png)
.png.c6da06784ce198a4d72ba144ea7c7ad1.png)
-
Bienvenue a tout le monde ❤️💥
-
Актуальная версия гайда - Вступление И так, пишу вторую версию своего гайда на стража. По факту это второй отдельный гайд. Но он сделан с мыслью, что читатель уже знает немного о классе и его роли в игре. В этот раз гайд может выйти даже больше ибо игра сильно изменилась в сравнении с прошлым тестами и во вступлении мы вспомним как именно (касающееся баланса персонажей): 1) Теперь нам доступно целых 24 очка хаоса 2) Новые таланты. Из важного - блокирование и максимальное здоровье. 3) Новый навык "Живой доспех" и 2 пассивки: "Адаптация" и "Ответный удар" 4) Полностью переделан баланс снаряжений. Добавлено улучшение уровня брони и оружия, который повышает как основные характеристики предмета, так и дополнительные. Чёткое разделение ПВЕ/ПВП шмота по первому доп. стату. 5) Теперь игроки могут обновлять очки хаоса (а соответственно и менять сборки по ходу игры) 6) Нерфы и улучшения старых навыков и пассивок. Самое важное: а) пассивка "Под защитой" теперь срабатывает всегда, но даёт барьер х1. б) Провокация игроков уменьшена с 1.5 сек до 1 сек. в) Заряды эгиды теперь защищают только на 2% от физического урона. г) модификатор "горящая кровь" на Эгиде теперь даёт мощь х2, вместо х1. д) модификатор "Иссушение" на ударе колосса. Теперь восстанавливает 2% от макс. хп за каждого задетого врага. (Максимум 20%). Это далеко не все изменения в навыках, но остальные, я считаю, особого внимания не достойны. 7) Изменён порядок некоторых талантов, очков хаоса и навыков (пассивок тоже) на некоторых страницах. В основном вначале. На конечную игру особо не влияет. И так, основные моменты, поменяющие баланс персонажа мы вспомнили. Некоторые изменения усилили персонажа, а некоторые ослабили. В целом, я считаю, класс стал слабее в сравнении с прошлым тестом, однако до сих пор один из самых полезных и нужных. Сразу хочу сказать, что этот гайд лишь моё виденье класса и возможно описанная в нём сборка не является лучшей. Однако она точно показывает неплохие результаты. Способности 1. Молот гнева Способность, нацеленная на одного противника. Урон слабый, но и перезарядка быстрая. Особенно с модификатором. Правда при раскастовке скиллов часть пользы теряется ибо последовательность навыков не позволяет применять этот навык часто и эффективно ибо у каждого навыка есть задержка применения и оно может сбить вам все тайминги. В общем, есть некие комбинации с ним, но они приносят мало пользы. В свою конечную сборку навык не войдёт, но до 6-го скилла юзать можете. 2. Героический рывок Один из самых полезных скиллов. На данный момент страж наверное просто не имеет право отказываться от него. Во-первых, это единственный наш шанс догнать противника (хотя лучше не "гоняться", если он далеко), а во-вторых, он даёт очень неплохой контроль. Первый модификатор перманентно уменьшает КД на 2 сек, а 3-й модификатор при наличии 4+ зарядов уменьшает КД в два раза. При 2-м модификаторе у нас выходит 2.5 сек стана каждые 7 сек. А со шмотками на уменьшение КД и того меньше. Поверьте, это достаточно много. Имхо - маст хев. 3. Эгида Наша ульта. Отказаться мы от неё в любом случае не можем, даже если б хотели, хотя слава робастику это и не понадобится. В принцепе, я вижу смысл только в двух первых модификаторах. 3-и глифы я думаю себя не оправдывают. По первым двум я думаю ничего объяснять не нужно. Первый неплохо может урезать КД способности, а второй даёт нам регенерацию. Несмотря на то, что я предпочитаю этот модификатор с регенкой, можно задуматься о его альтернативе, дающей мощь х2. В том же Подземелье оно будет полезнее (ибо в хиле ты не так нуждаешься) и с него легко получить все 10 стаков. В общем, иногда можно переключаться на него, но в ПВП лучше регенка. 4. Провокация Стоит отметить, что провокация действует 3 сек только на мобах. На игроках её время действия сокращается до 1 секунды. За эту секунду враг обязан вас атаковать и он не может применять способности. Дополнительный контроль. Эта способность - наш главный источник зарядов эгиды, благодаря модификаторам за 3 очка хаоса и за 2. А модификатор за 1 позволит нам применять способность чаще. Поскольку сборка нацелена на контроль и выживание - это маст хэв. Стоит так же отметить, что "глухая оборона" блокирует атаки существ даже если они небыли спровоцированы, но в эти 3 сек атаковали вас. Советую вначале игры качать модификаторы именно в "глухую оборону" и "вызов". Это повысит и вашу выживаемость, и пользу в команде, и вашу ульту в том числе. 5. Барьер клинков Скилл, у которого даже имеются хорошие модификаторы, неплохо вписывается в прокаст, но есть одно - сам по себе он бесполезный. Вся его сила - модификаторы. Честно, я лучше бы просто взял бы набор всех его модификаторов, будь они на другой способности. Этот навык плох тем, что эта игра основывается на способностях. А он возвращает только урон с руки и ещё в виде физ. урона, а не чистого. А это минимум -50% от него из-за брони противников. Обойти - легко. Время действия - относительно мало. КД - большое, как для своего эффекта. И мало того - время каста 0.5 сек. Ранее его можно было взять чисто ради доп. урона, ибо альтернатива ему был только молоточек, а сейчас есть скилл, который гораздо лучше. Способность очень слабая. Брать не рекомендую. 6. Удар колосса Очень полезная и сильная способность. Лучше всего подходит для замесов или фарма мобов. (В общем где много противников). Модификаторы такие: уменьшение КД на 4 сек если задело 2+ противника, все враги, попавшие под действие способности получают заморозку и замедление на 4 сек и в области действия нанесение каждую секунду 3 раза физ. дамага. Такие навыки выбраны не случайно. Альтернатива урону - хил в % за каждого врага. Хилит мало, навык ты юзаешь сразу после врыва да и + ситуаций, где он раскрывает себя на максимум, очень мало, а урон неплохой с альтернативного модификатора идёт. Тем более, когда есть замедление на противниках. Его мы выбрали чтобы они так быстро не разбежались и союзники имели время прожать аое дамаг. (В том числе и мы. Скилл полезный, что в ПВП что в ПВЕ. Фармить с ним так же один кайф. 7. Живой доспех Новый, по меркам последнего прошедшего на данный момент теста, скилл. Крайне полезный. Многие могут не понять его действия, но сейчас объясню как он точно работает. Он мало того, что повышает твоё максимальное здоровье на 30%, но и добавляет его в полном размере. То есть что-то типо мгновенного хила на 30%. И + он хилит по 3% в секунду на протяжении 10 сек, а с модификатором максимум 14.5 сек. При максимальном значении и по исходу действия он восстановит нам 42% от повышенного здоровья, что равно 54,6% от стандартного. И к этому всему ранее он добавил нам заранее 30%. Хил знатный, с регенкой жить можно, но вот КД у него целых 40 сек. И да, шмотки на минус КД работают очень хорошо на него, мб даже секунды 3 удастся снять. Впринципи, этот навык хорош и в ПВП массовом, и в 1 на 1 и в ПВЕ. Везде хорош. Модификатор я взял на увеличение действия способности. Объясняю почему это нам нужно - на 4,5 сек дольше будут +30% к макс. хп и + это даст 12% хила. Не знаю как вам, а мне кажется нормально. Единственное условие - союзники рядом. Но они почти всегда рядом. По крайней мере у меня. Единственный минус навыка - время активации 1 сек. В замесе куча станов прилетит - ты умер не заюзав скилл. Поэтому можно даже перед битвой прожать, если врагов реально много. Последовательность прокачки Небольшой ряд советов какие модификаторы качать в первую очередь. Самыми первыми я бы советовал прокачать "Глухая оборона" и "Вызов" на провокацию. Следом "Второе дыхание" на Эгиде. Потом "Нокдаун" на прыжке и "задира" на агре либо "Реванш" на Эгиде чтобы фармить было легче. Потом вы либо копите и оставляете 3 очка хаоса на "Землетрясение" в колоссе, либо качаете "Неукротимость" на прыжке. Если идёте в "Неукротимость", то предыдущее решение лучше "задира". Ну а дальше замедление на колоссе, реванш/задира, что там не вкачано, "Землетрясение"/"Неукротимость"(смотря что до этого выбрали) ну и "Сплочёность" на живом доспехе. Общая схема боя И так, поскольку у нас есть ряд условий на некоторых навыках - нам лучше не забывать об этом. Раньше я всегда начинал битву с героического рывка. Однако при данной сборке это не самая лучшая идея. Да, если противников реально много и они способны выдать много контроля - церемониться не надо, однако если это не так, но начинать битву лучше просто идя в толпу противников и прожать агр. Как только вы начинаете себе стаки эгиды вы можете продолжать (можете впринципи сразу ибо там моментально всё набирается поидее). Продолжаем мы ударом колосса. И тут же можно прыгнуть под себя, заставив всех врагов в одной точке на 2.5 сек. После оглушения ждём пару секунд, используем снова прыжок, ульту, агр. Причём между прыжком и ультой с агром нужно подождать 1 сек примерно, чтобы мы агр не дали в никуда. Ну и там уже снова удар колосса. Так же, битву на арене, например, можно начинать и с ульты рядом с противником, а уж потом агр. Таким образом вначале матча у союзников будет барьер, вы нанесёте урон ультой и подольше потом будете бесить станами. Если вы заметили - я не говорил когда использовать Живой доспех, хотя ранее упоминал, что можно до "врыва". Тут дело вашей выживаемости. Смотрите сами и оцениваете свои возможности сразу. Если вы решите ждать пока вас нормально так накоцают - лучше не надо. Юзайте заранее. Вы легко можете и не выжить. Поля битвы И так, тут я постараюсь объяснить роль стража на ПБ (поля битвы) и его действия по мере игры. Первое что мы делаем - стараемся равномерно пойти по сторонам. В идеале 4 на одну сторону 4 на другую. Если вы видите, что большинство пошло вверх, то сходите вниз. Если вас 1-2, то прям отвоевать цветок вам не получиться, однако ваша задача потянуть время. Если игроки нормальные - они быстро к вам придут на помощь. Не бойтесь умереть, когда это нужно. Главное - не дать забрать цветок. Первый совет - не идите прямо к цветку. ждите 40-ка секунд на таймере обратного отчёта, на расстоянии от цветка, но наблюдая за ним. Как только вы видите 40 секунд на таймере - сотрите на цветок. Если не появилась анимация - идите на другой фланг. Если появилась - готовьтесь защищать. В том случае, если вас много на одном фланге или ровно половина - вы можете попытаться бороться за цветок. При этом убивая врагов. Главное стянуть врагов к себе и давать контроль по КД. Допустим, с цветком разобрались. Что делать дальше? А дальше смотрим по ситуации. У нювас мало искр жизни (очков) - помогайте союзникам убивать. У вас большинство - убивайте стрелков. Дальше, когда объявляется выход союзного разрушителя (големчика) вы можете идти к боссу и настаивать агр на нём. Чтобы потом продлить жизнь вашему разрушителю. Ибо танковать будете вы, а не он. Если идёт вражеский разрушитель, то старайтесь его как можно раньше начинать встречать, а не только тогда, когда он к боссу подойдёт. При этом не забывайте, что Удар колосса накладывает заморозку. Отойдите так, чтобы задевать только вражеского разрушителя и используйте колосс. Тем самый он получит урон и будет 4 сек бить на 50% медленнее. Постоянно следите за скопищами людей и стрелков и старайтесь влетать в них, стягивать, пугать, всячески контролировать. Ваша задача - предотвратить урон по боссу со стороны противников. А так же помогать догонять вражеских персов, если будет такая потребность. Так же, не забываем, что мы может останавливать противников, когда они пытаются убежать из под АОЕ атаки босса. Арена Немного об арене. Особо сказать нечего, всё и так понятно. Сразу скажу - вы командный игрок. Если нет, то страж в ваших руках вряд-ли расскроет себя. К чему я это? Я это к тому, что ваша задача как стража - давать контроль и помогать наносить урон. Особым уроном мы не отличаемся, а бить нас не хотят. Поэтому мы можем использовать ульту 1 раз за дуэль - вначале и забить на неё. Нам важнее по КД прожимать прыжок со станом. Если видите алхимика - фокусите. Помните, что 2.5 сек стана это относительно долго, поэтому при возможности дать стан и проюзать агр не нужно судорожно жать все кнопки по-быстрее. Подождите. И тогда это хотя-бы не будет зря. (Иногда руки прям чешутся нажать сразу, по себе знаю). Так же, изучите навыки и модификаторы своих союзников, если вы катание в пати. Это очень поможет в понимании когда вам нужно использовать ну или иную способность, а когда не нужно. Может следует подождать (например сало навешивает или страх) Примечание: очень сильный бафф защита. Но пока-что он запихан в неприятных местах или с неприятным условием Вот и подошла к концу вторая версия гайда. Спасибо за внимание, жду вашей реакции. Либо благодарность либо критику - всё будет интересно. Дискутировать тоже разрешается и приветствуется. Возможны ошибки. Пишу в 4ч. ночи. Если что - исправьте меня, но только по сути, а не грамматике.

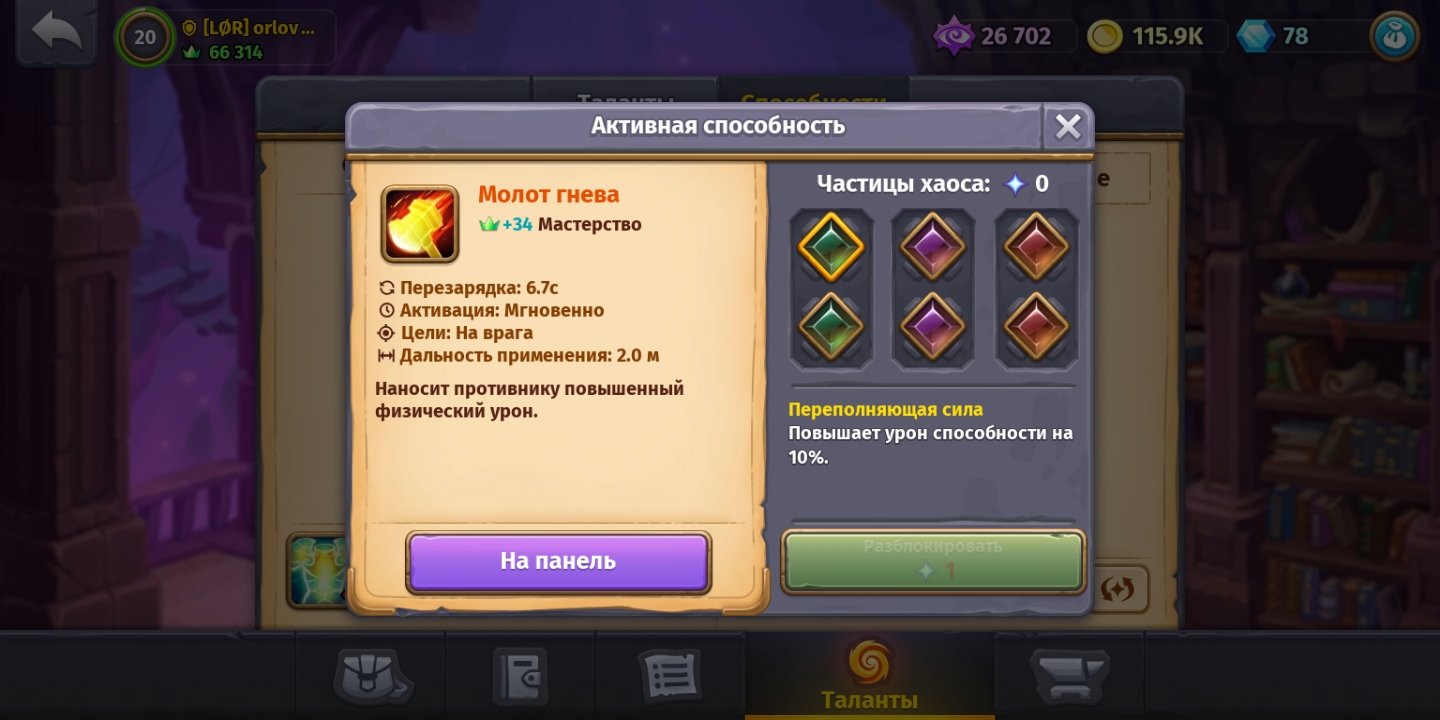

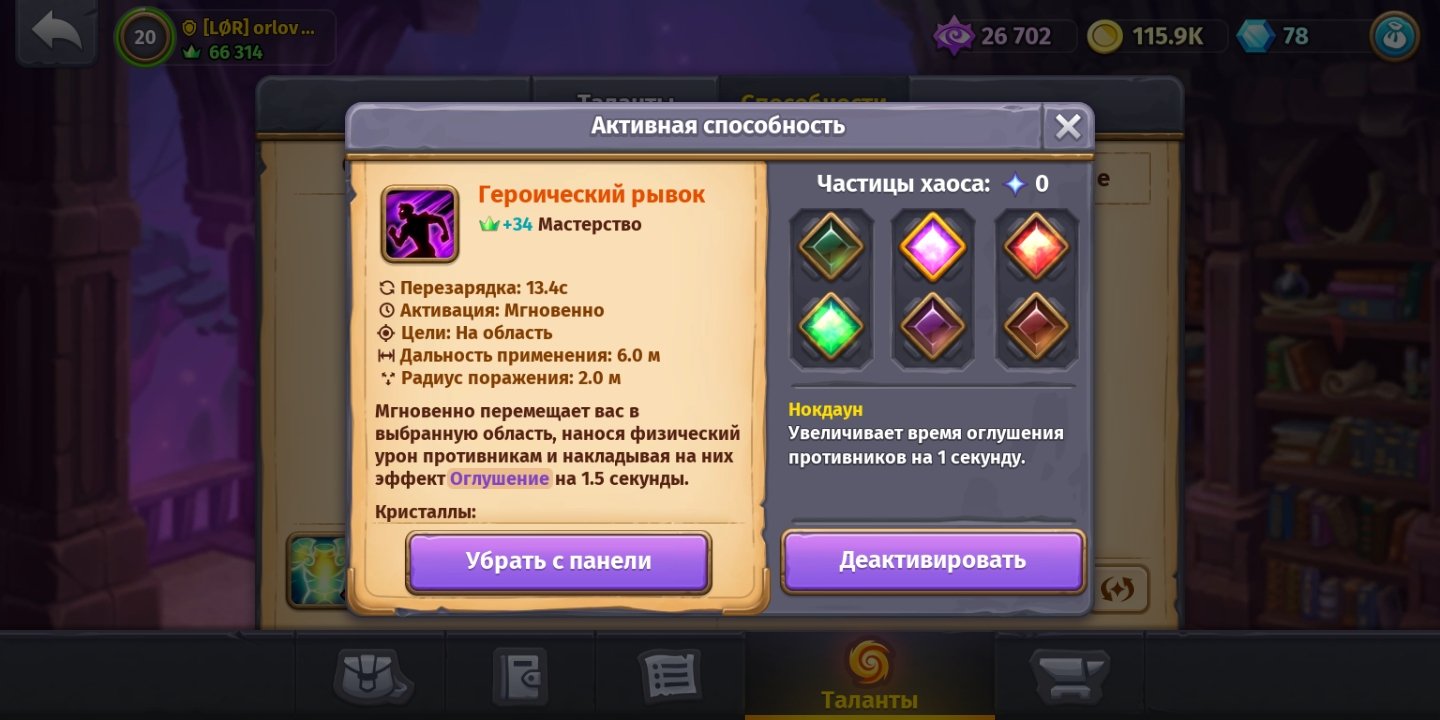
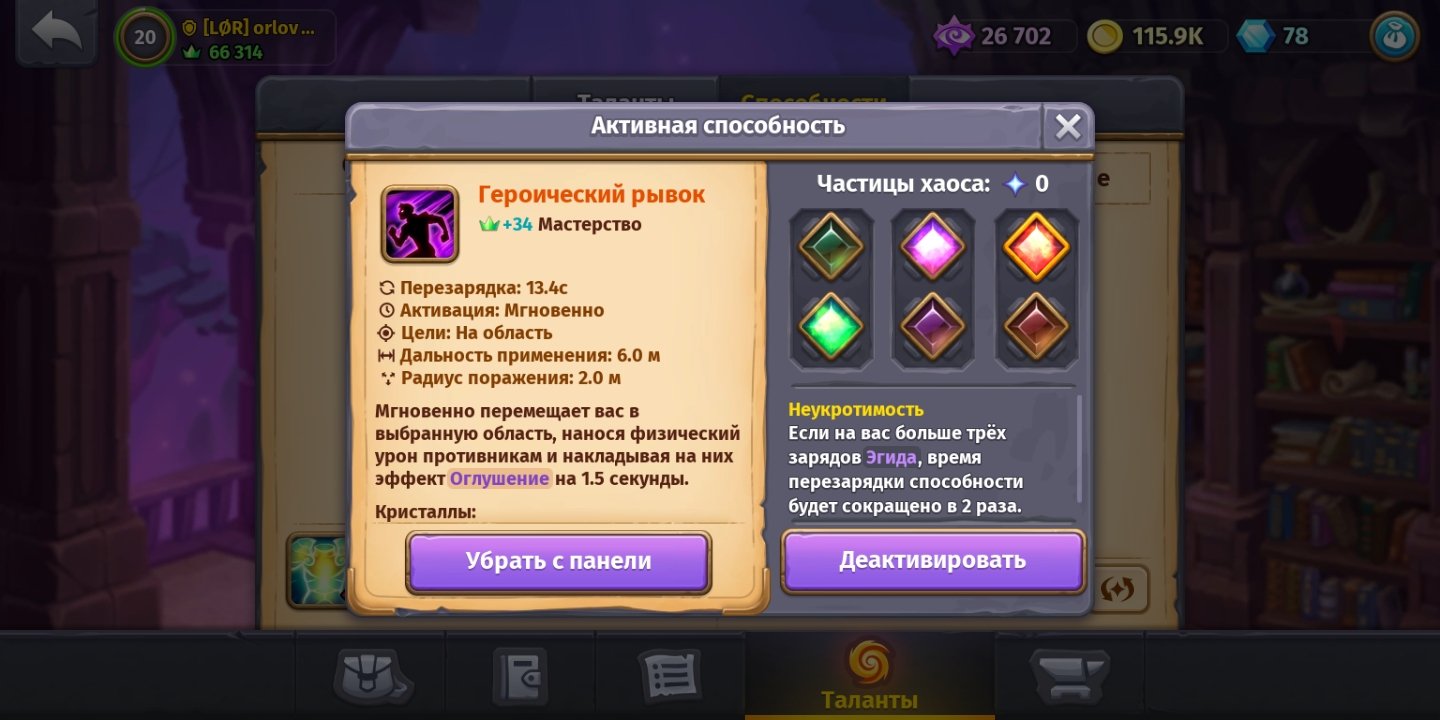
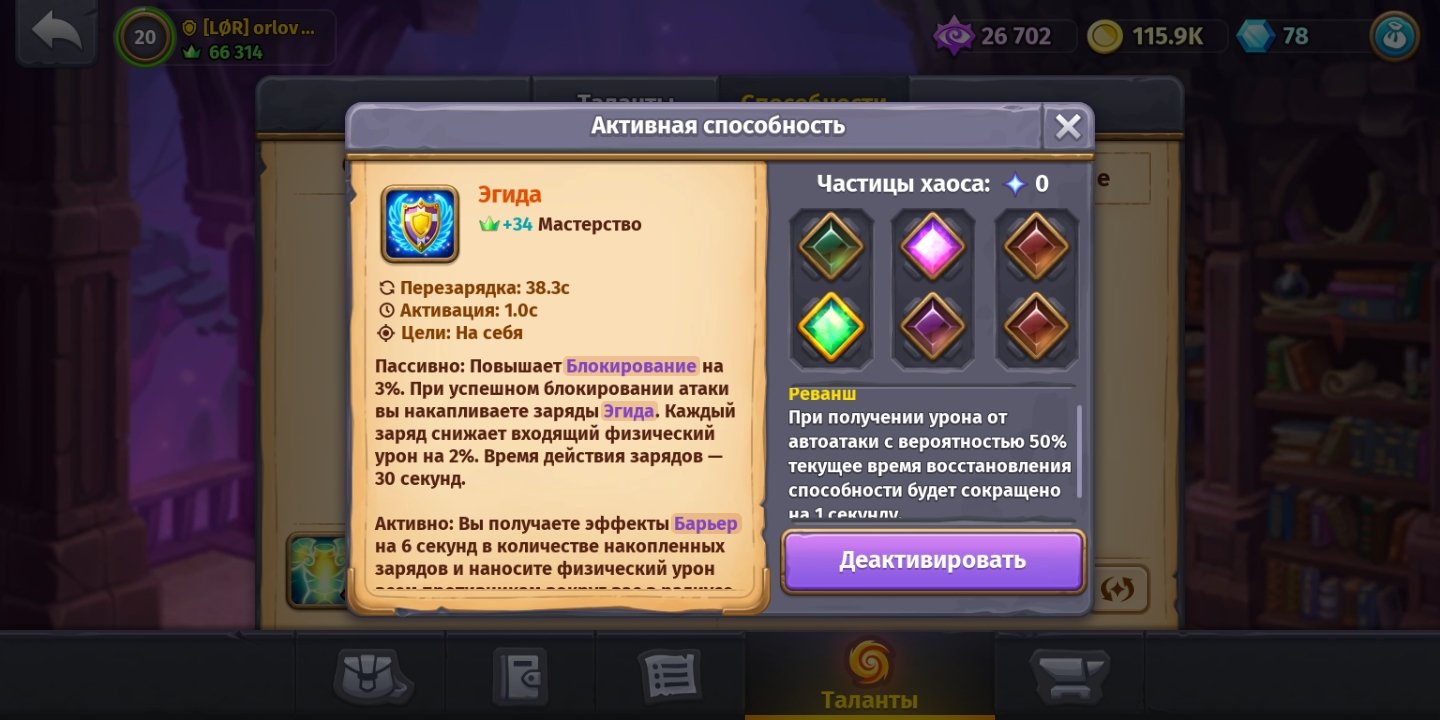
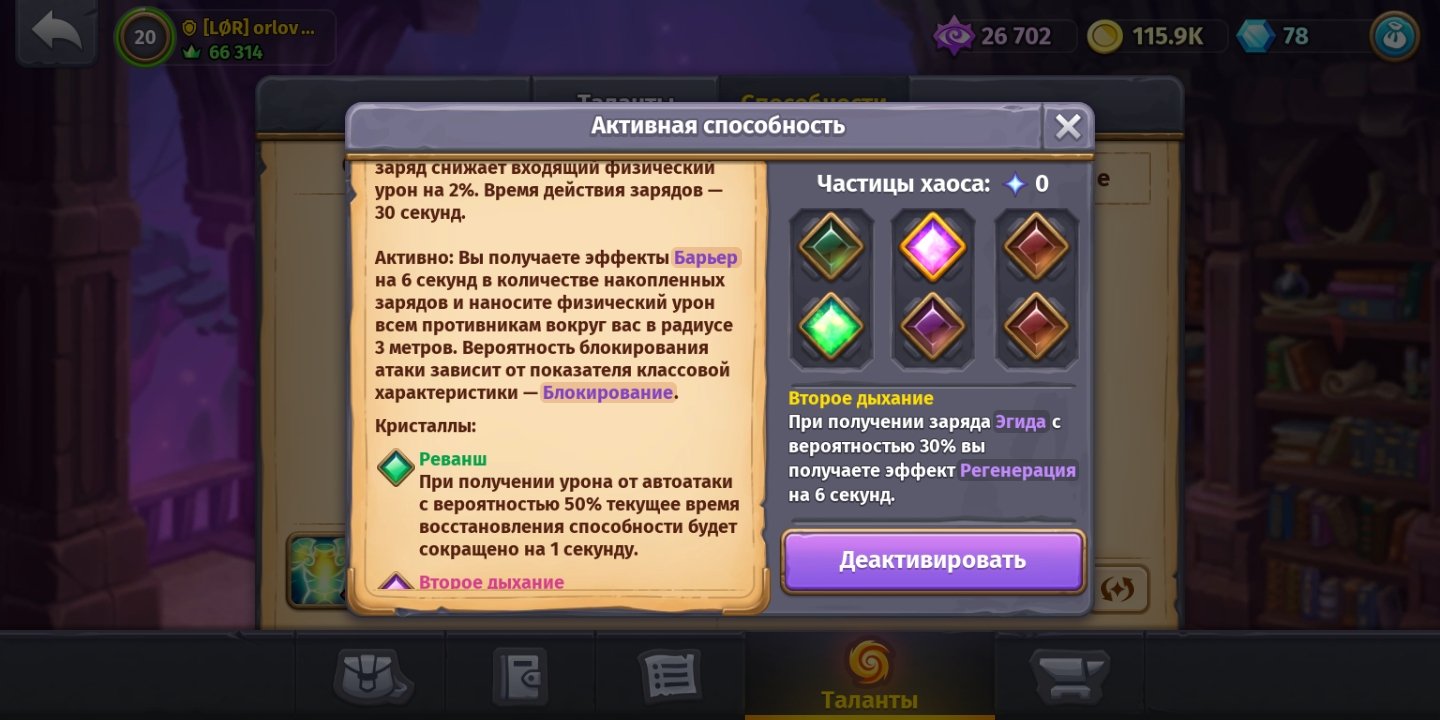
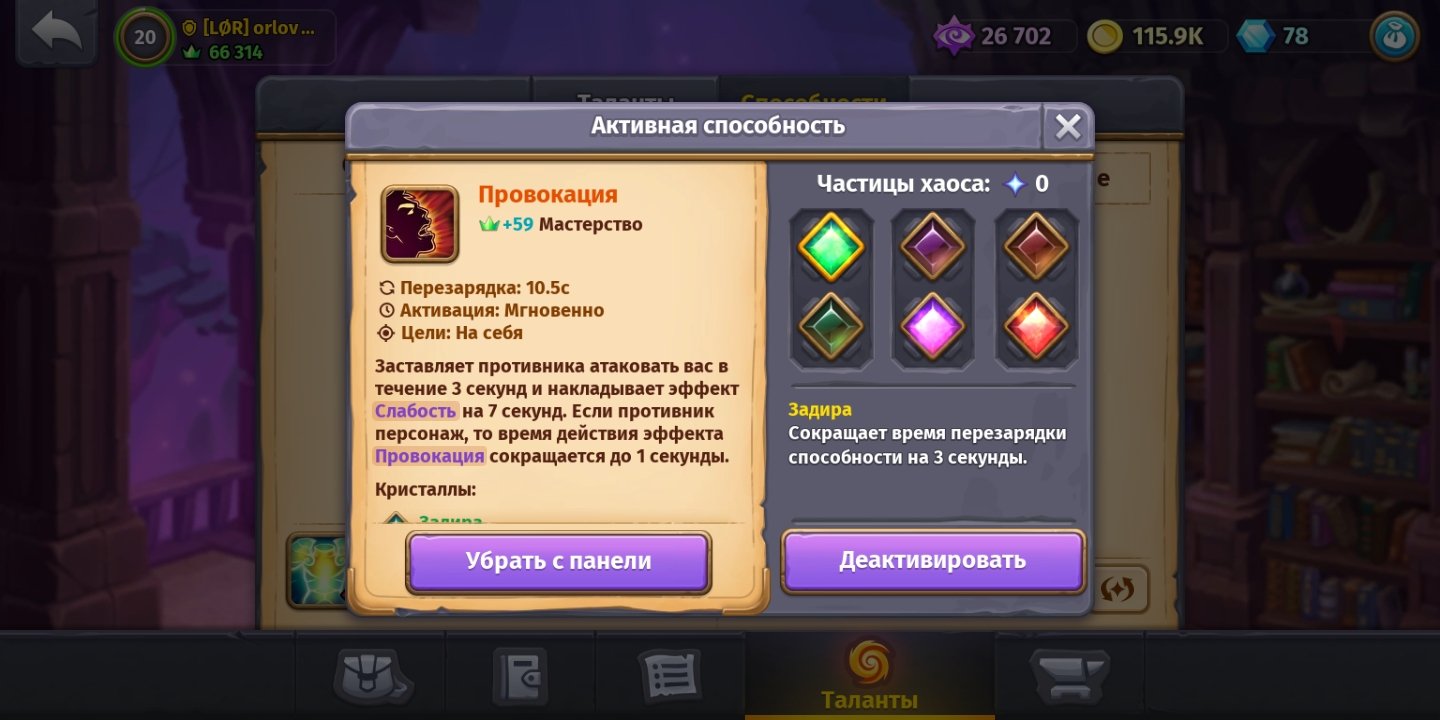

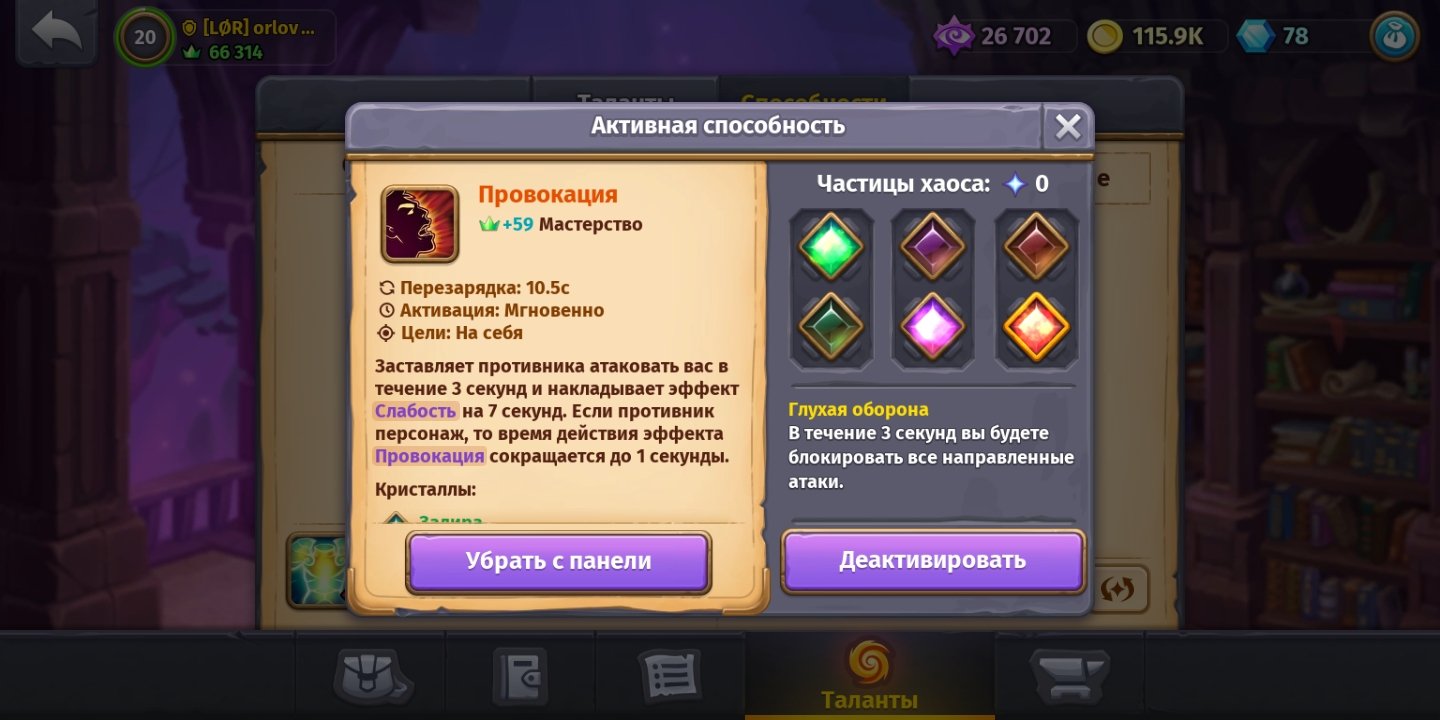
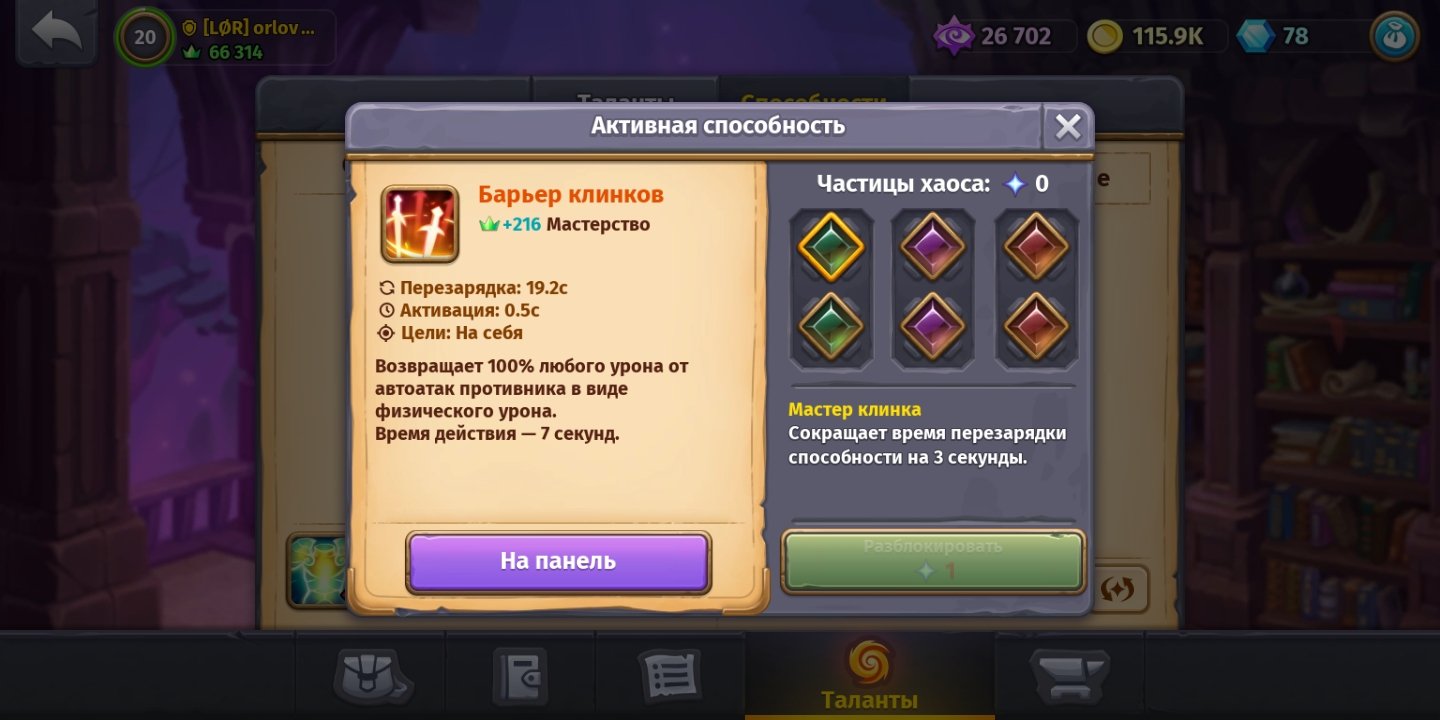


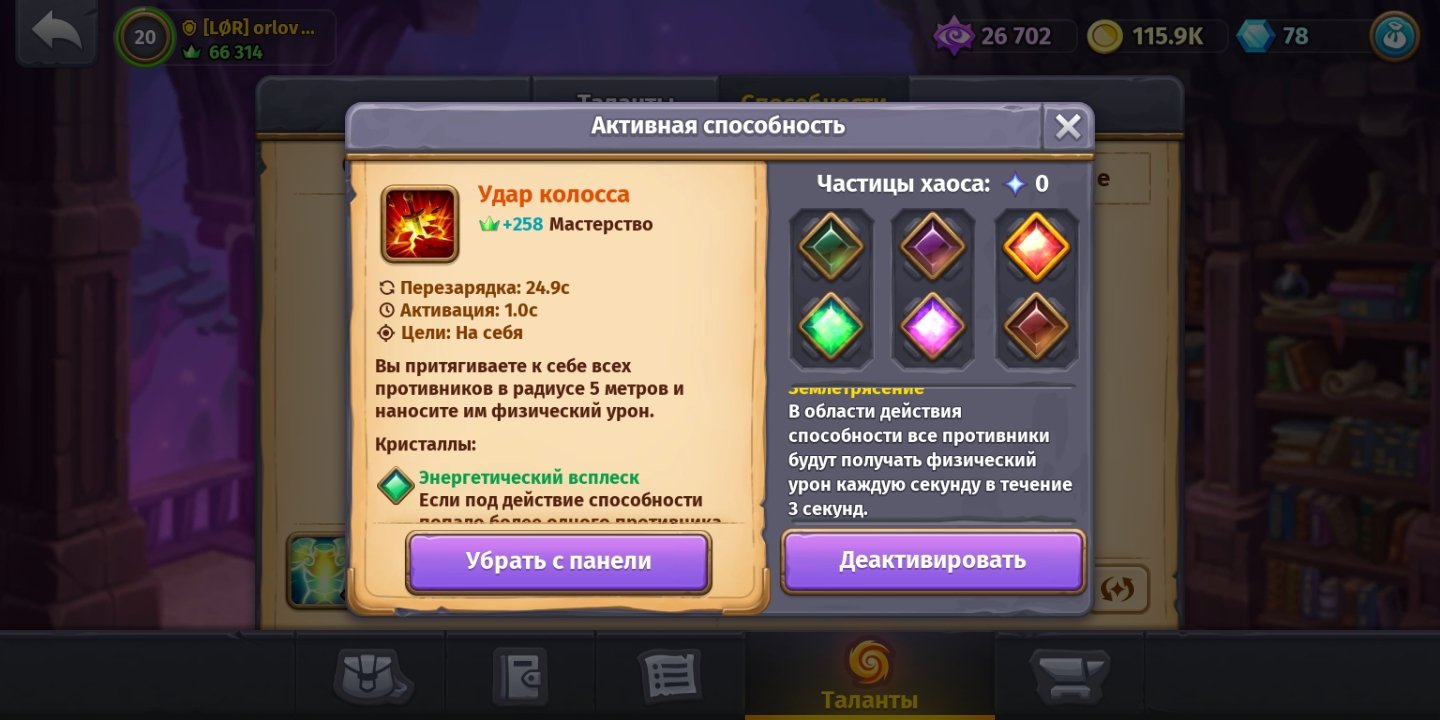
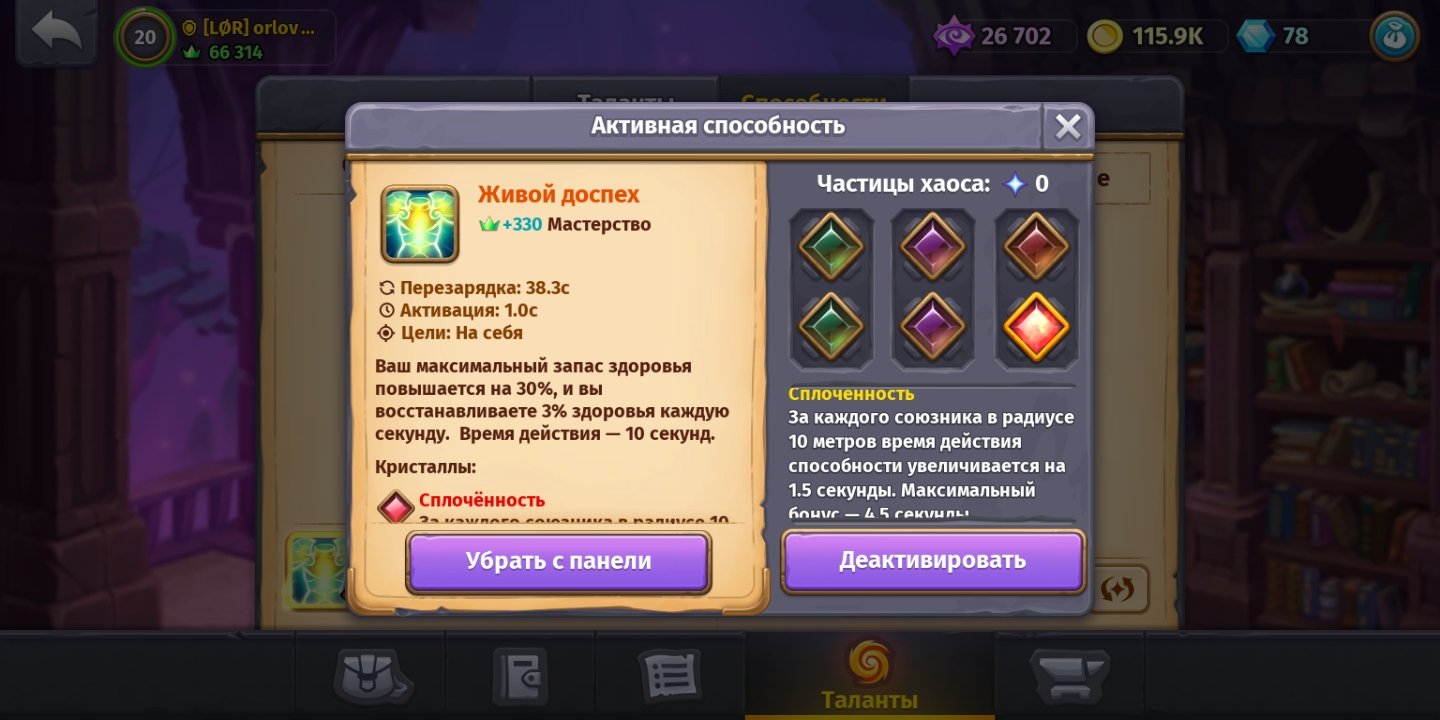
- 36 replies
-
- 13
-
-
-


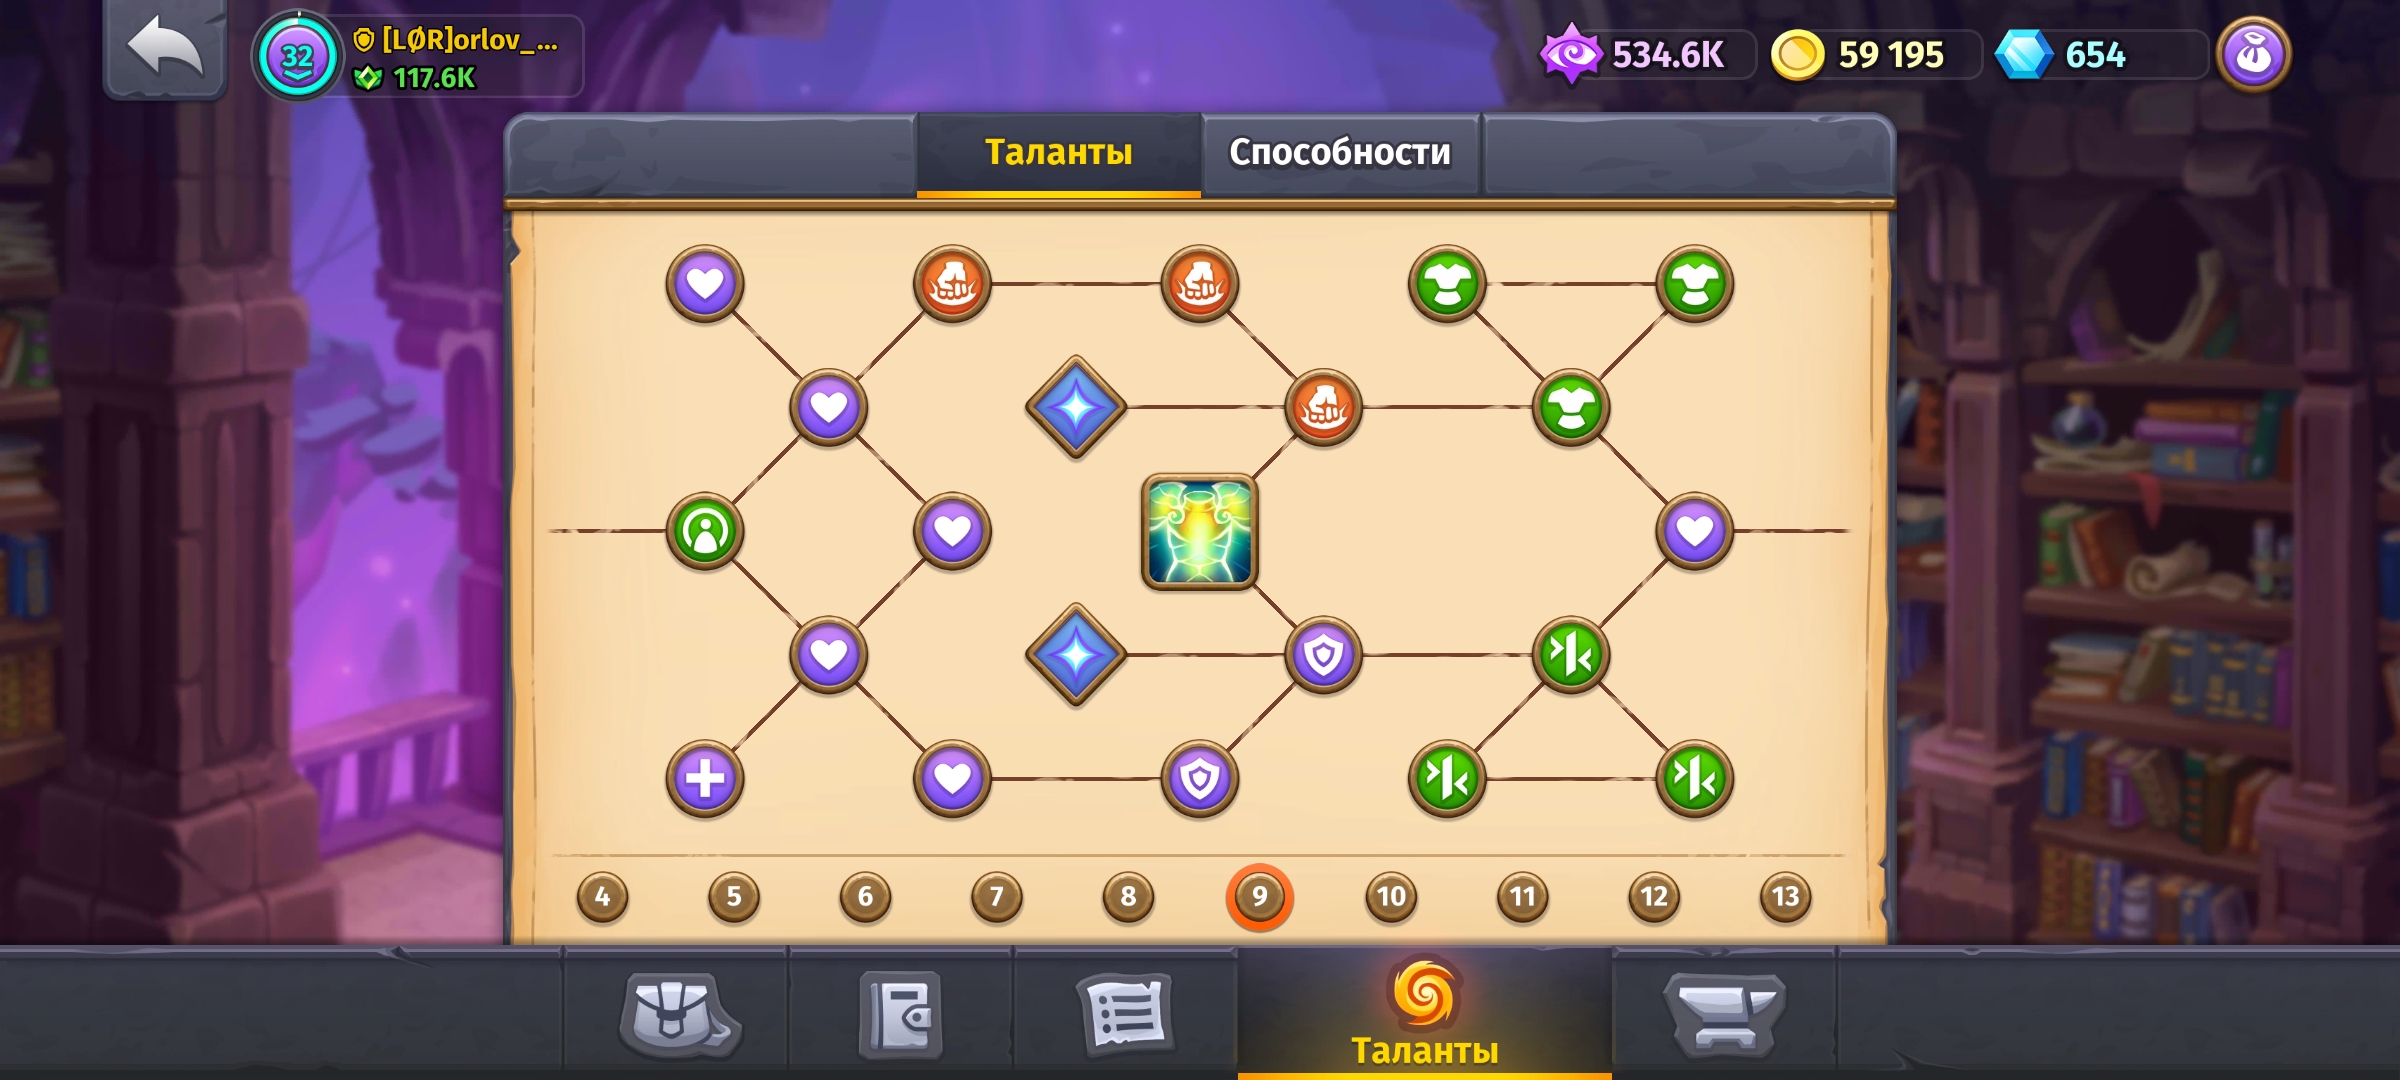
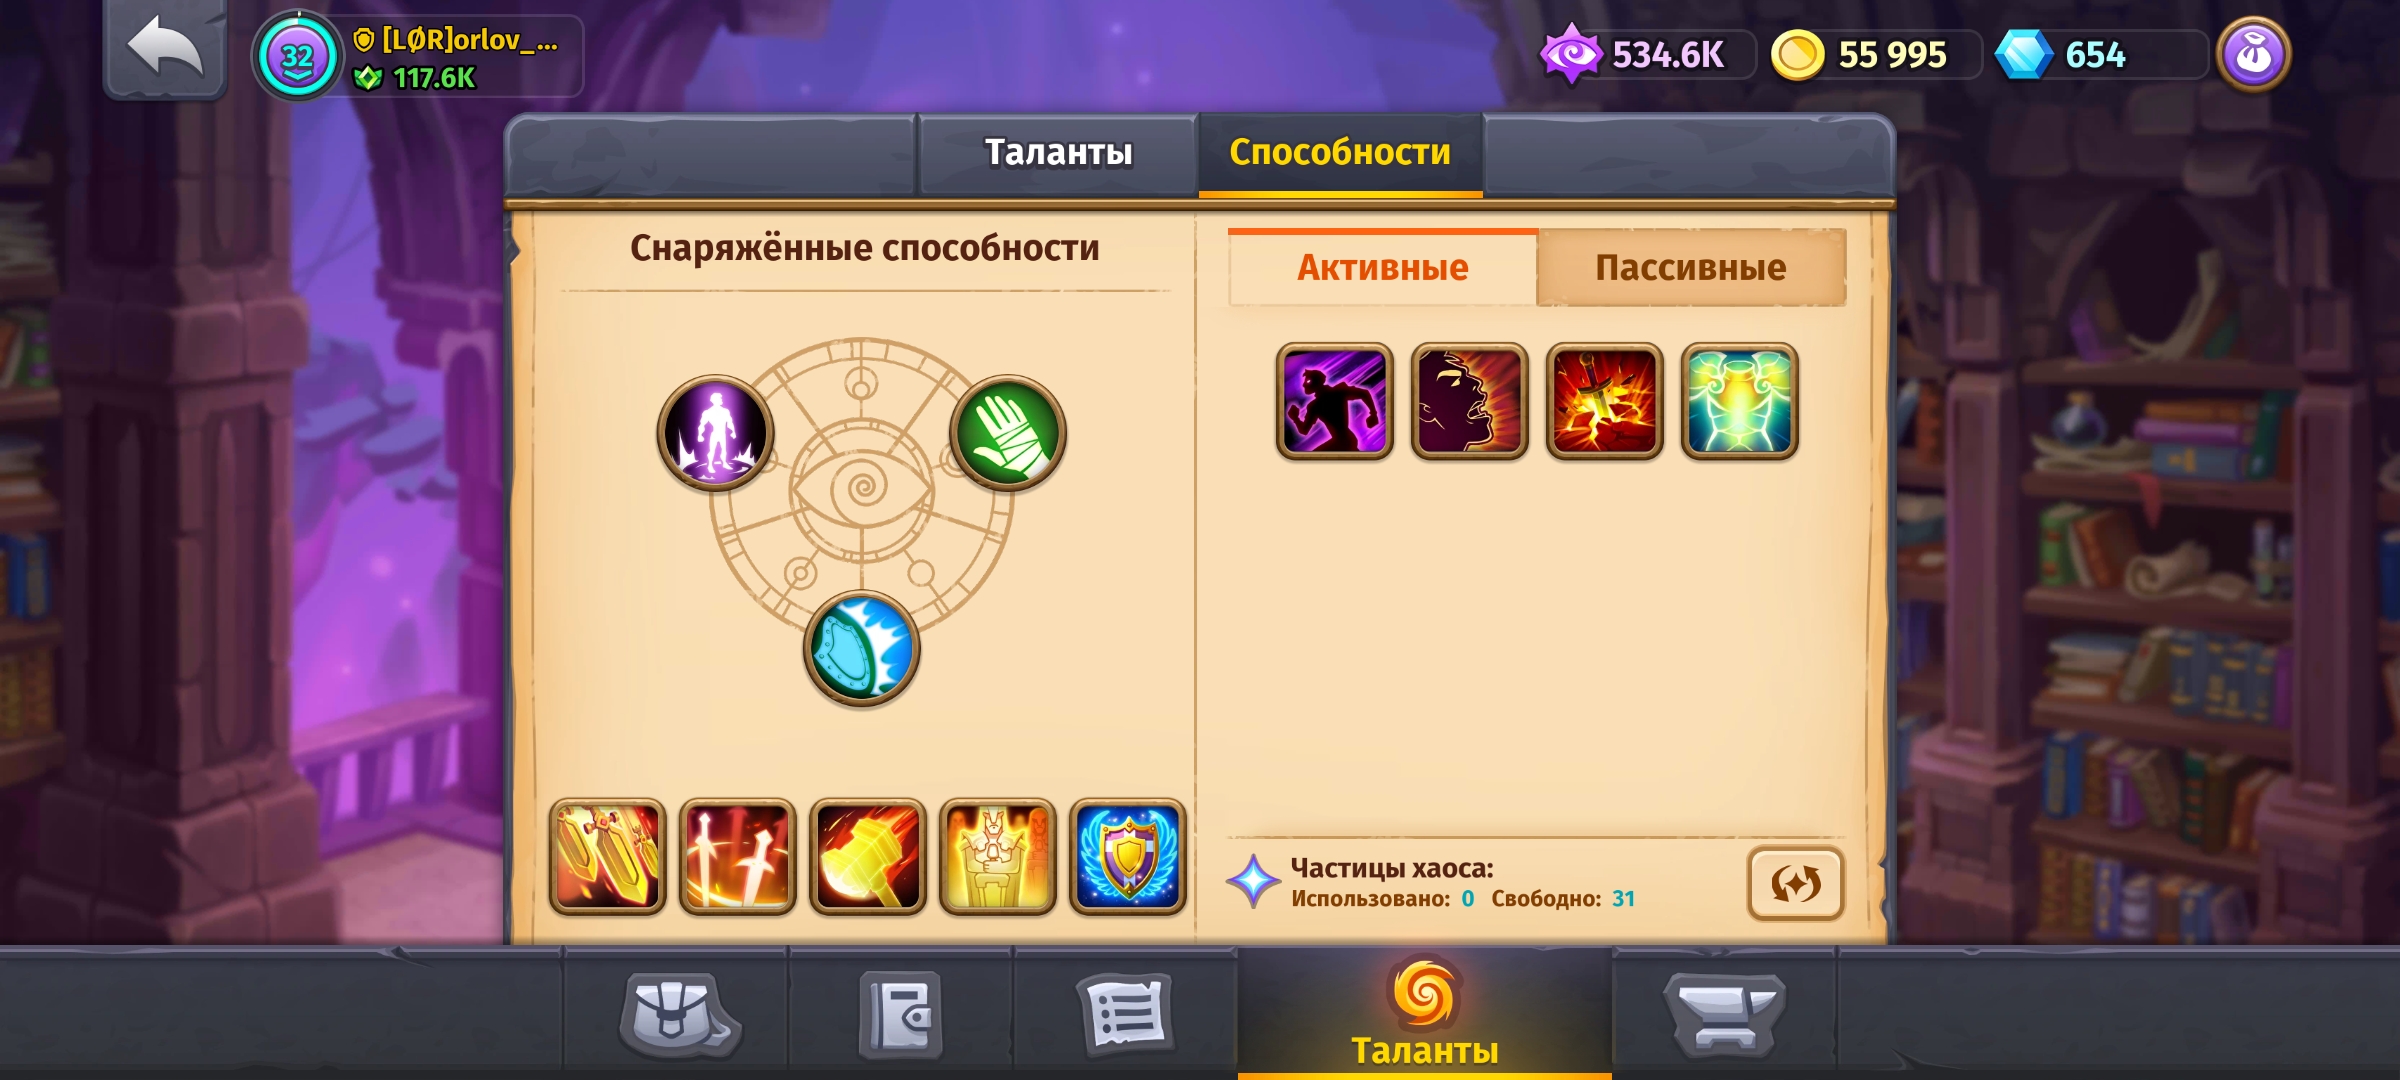
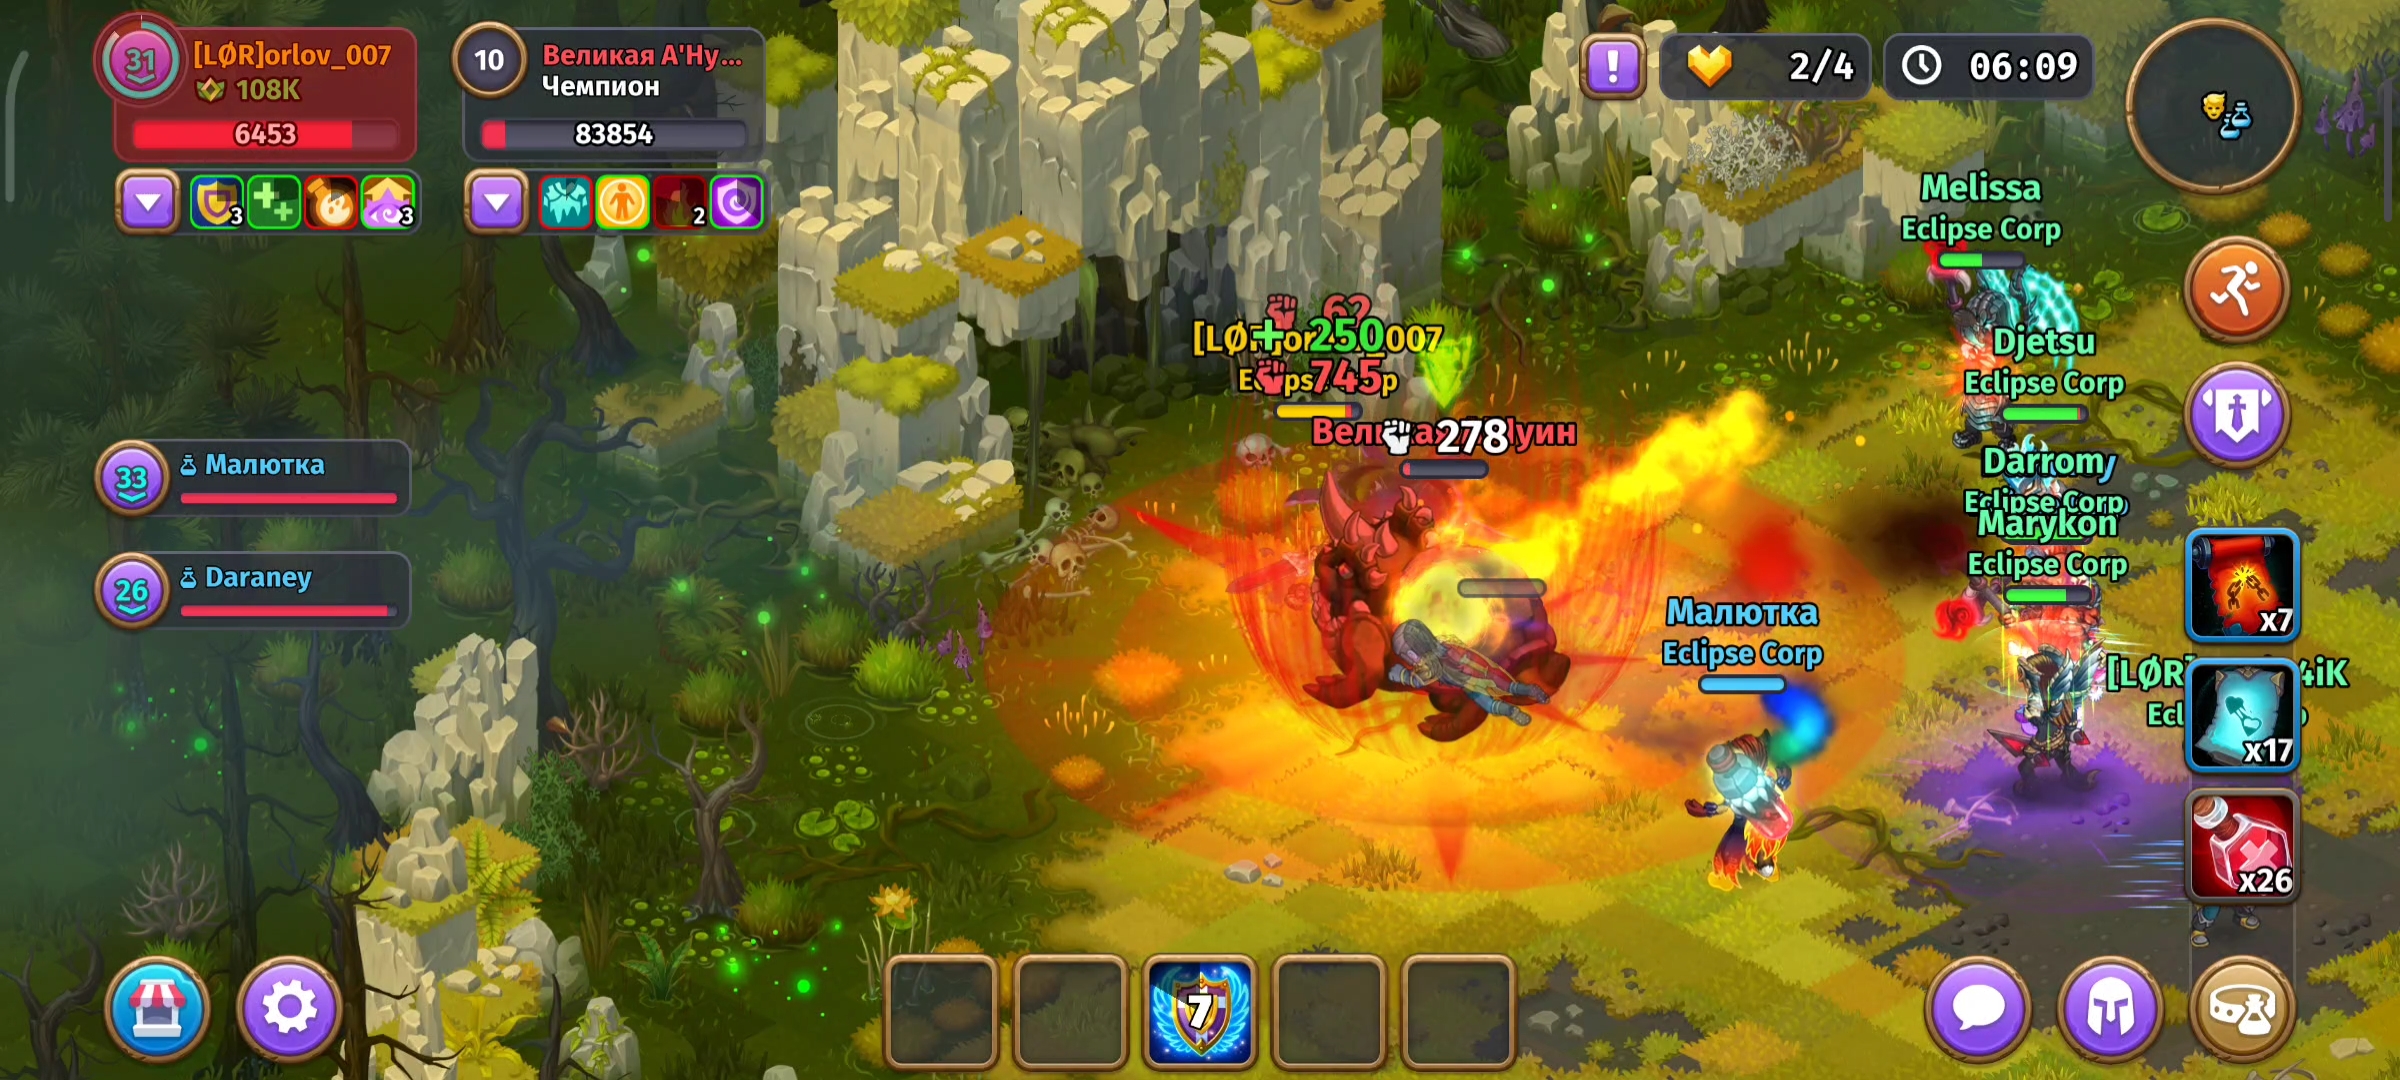


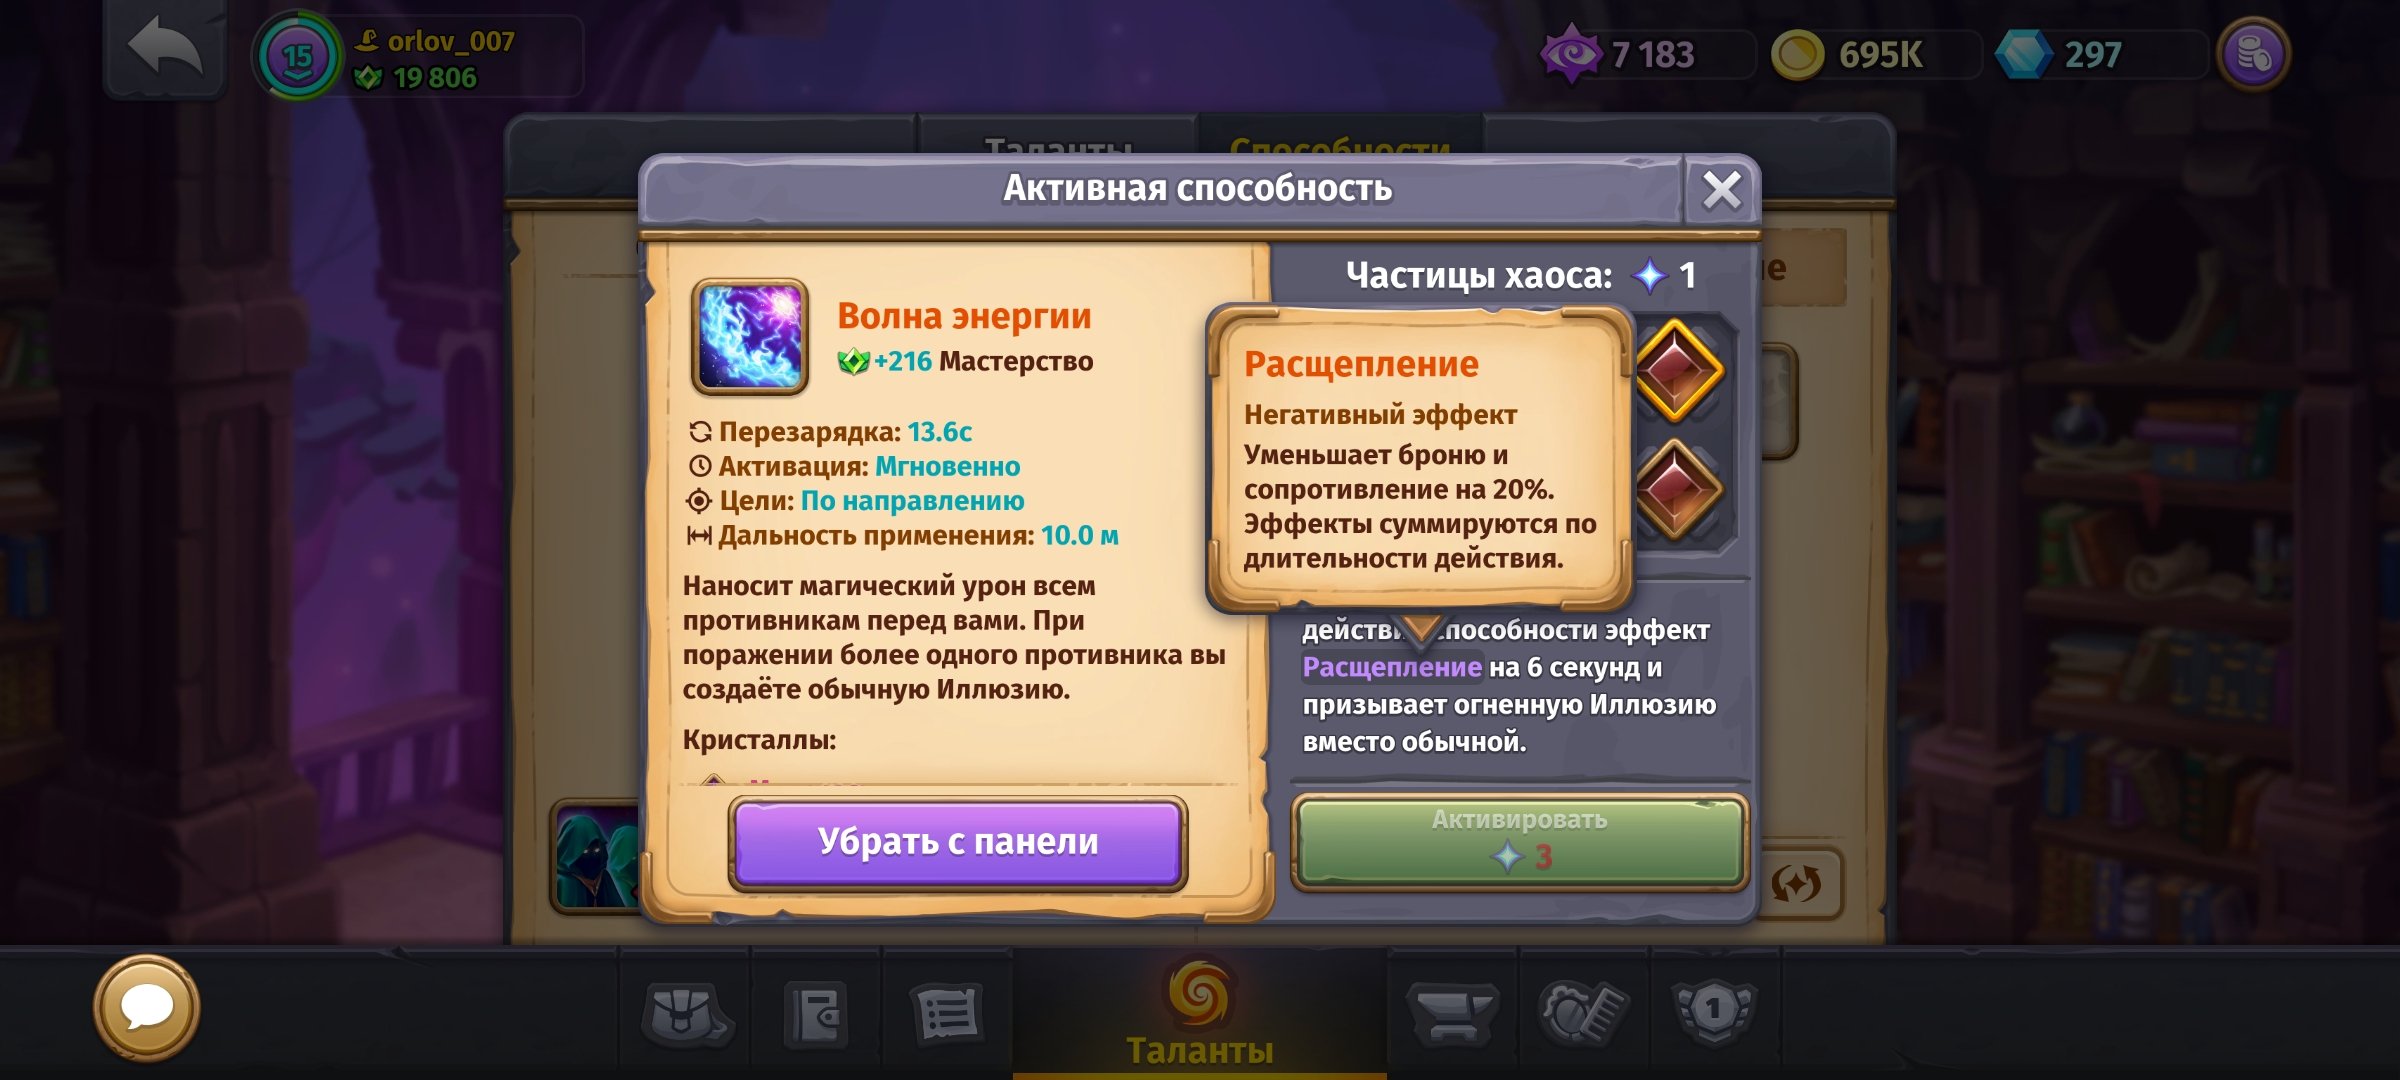
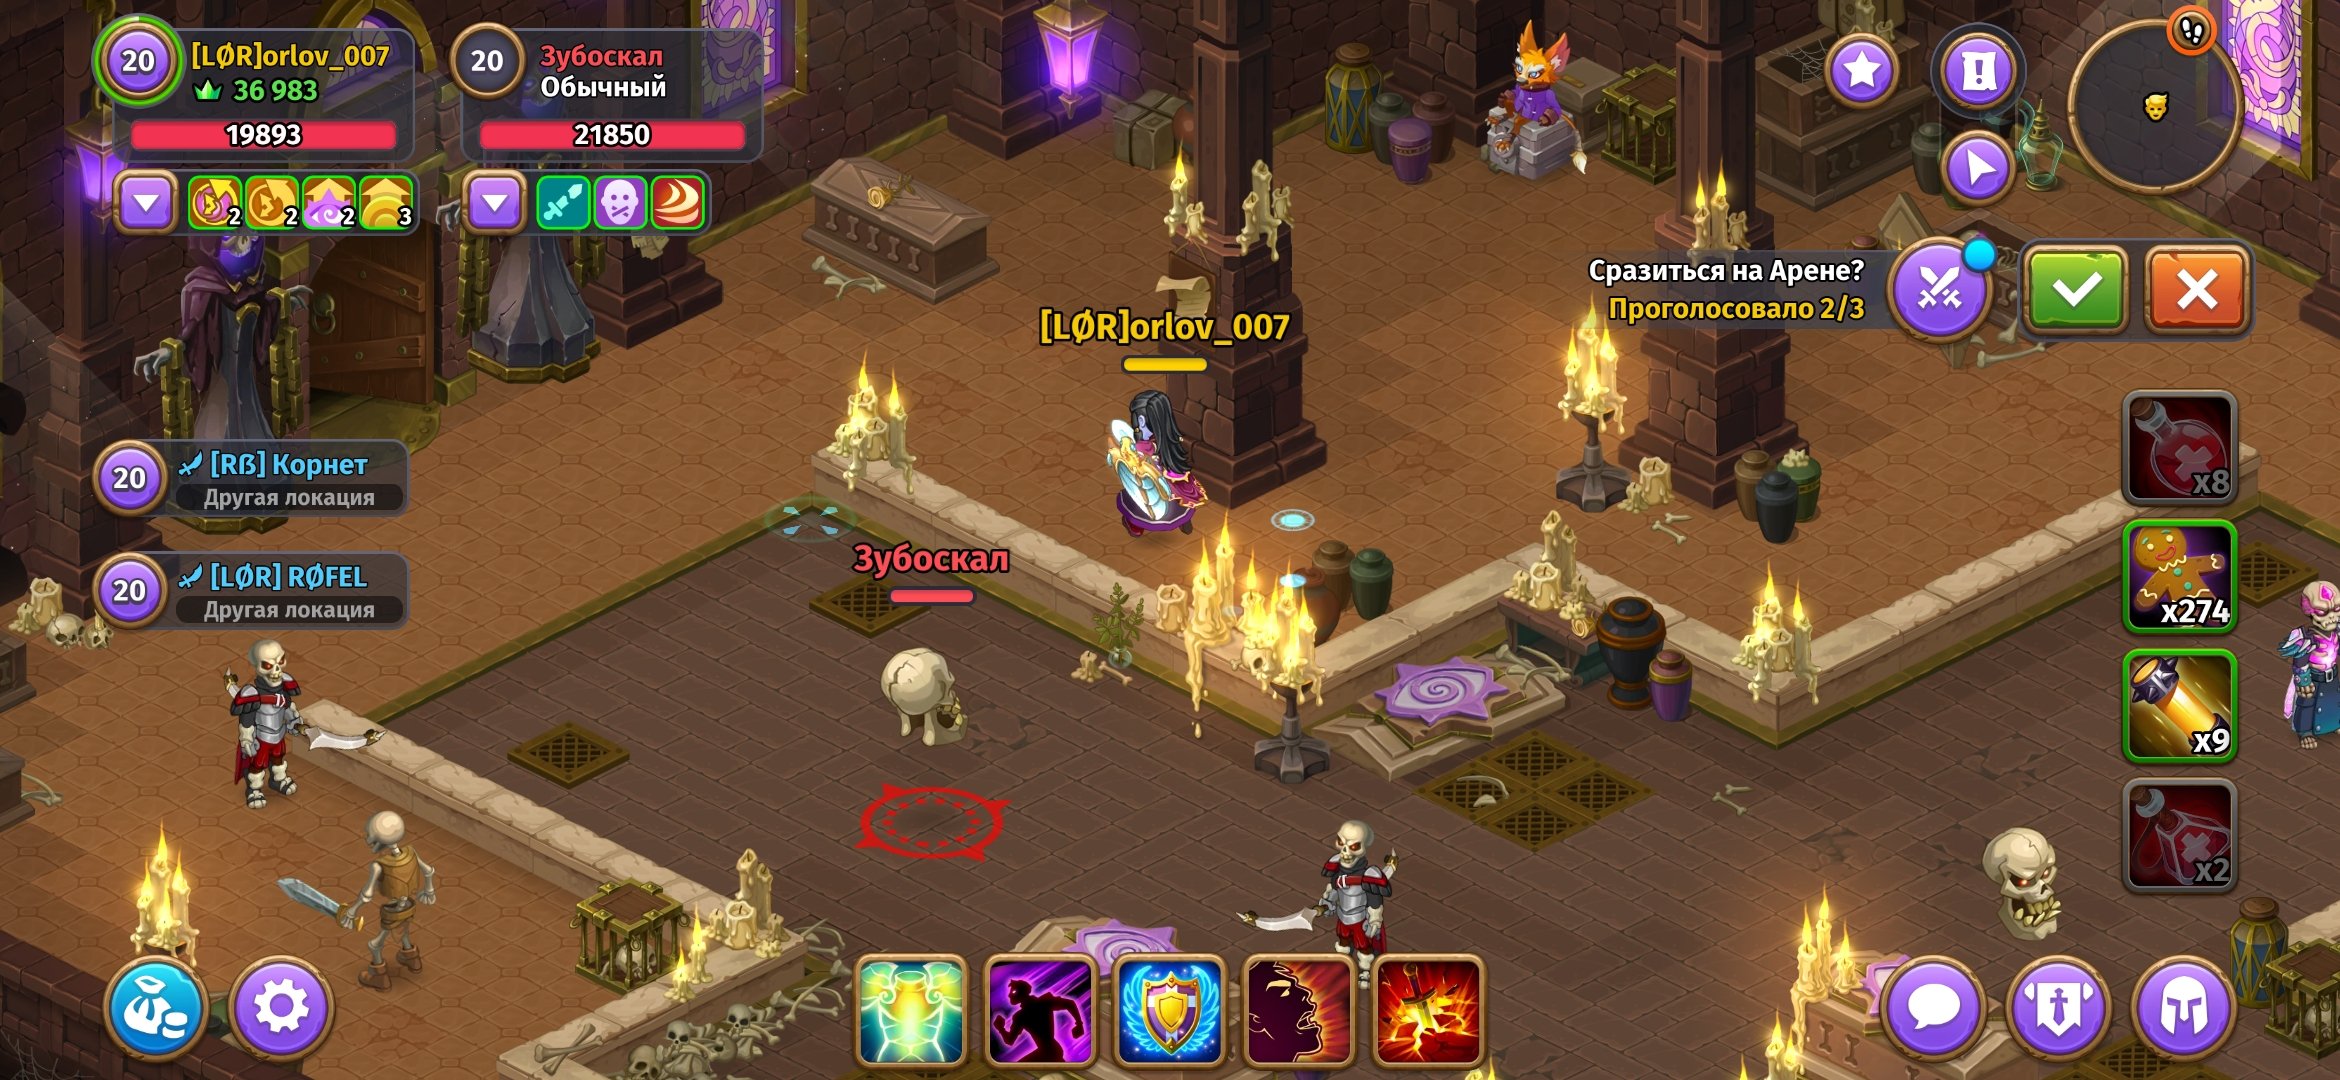


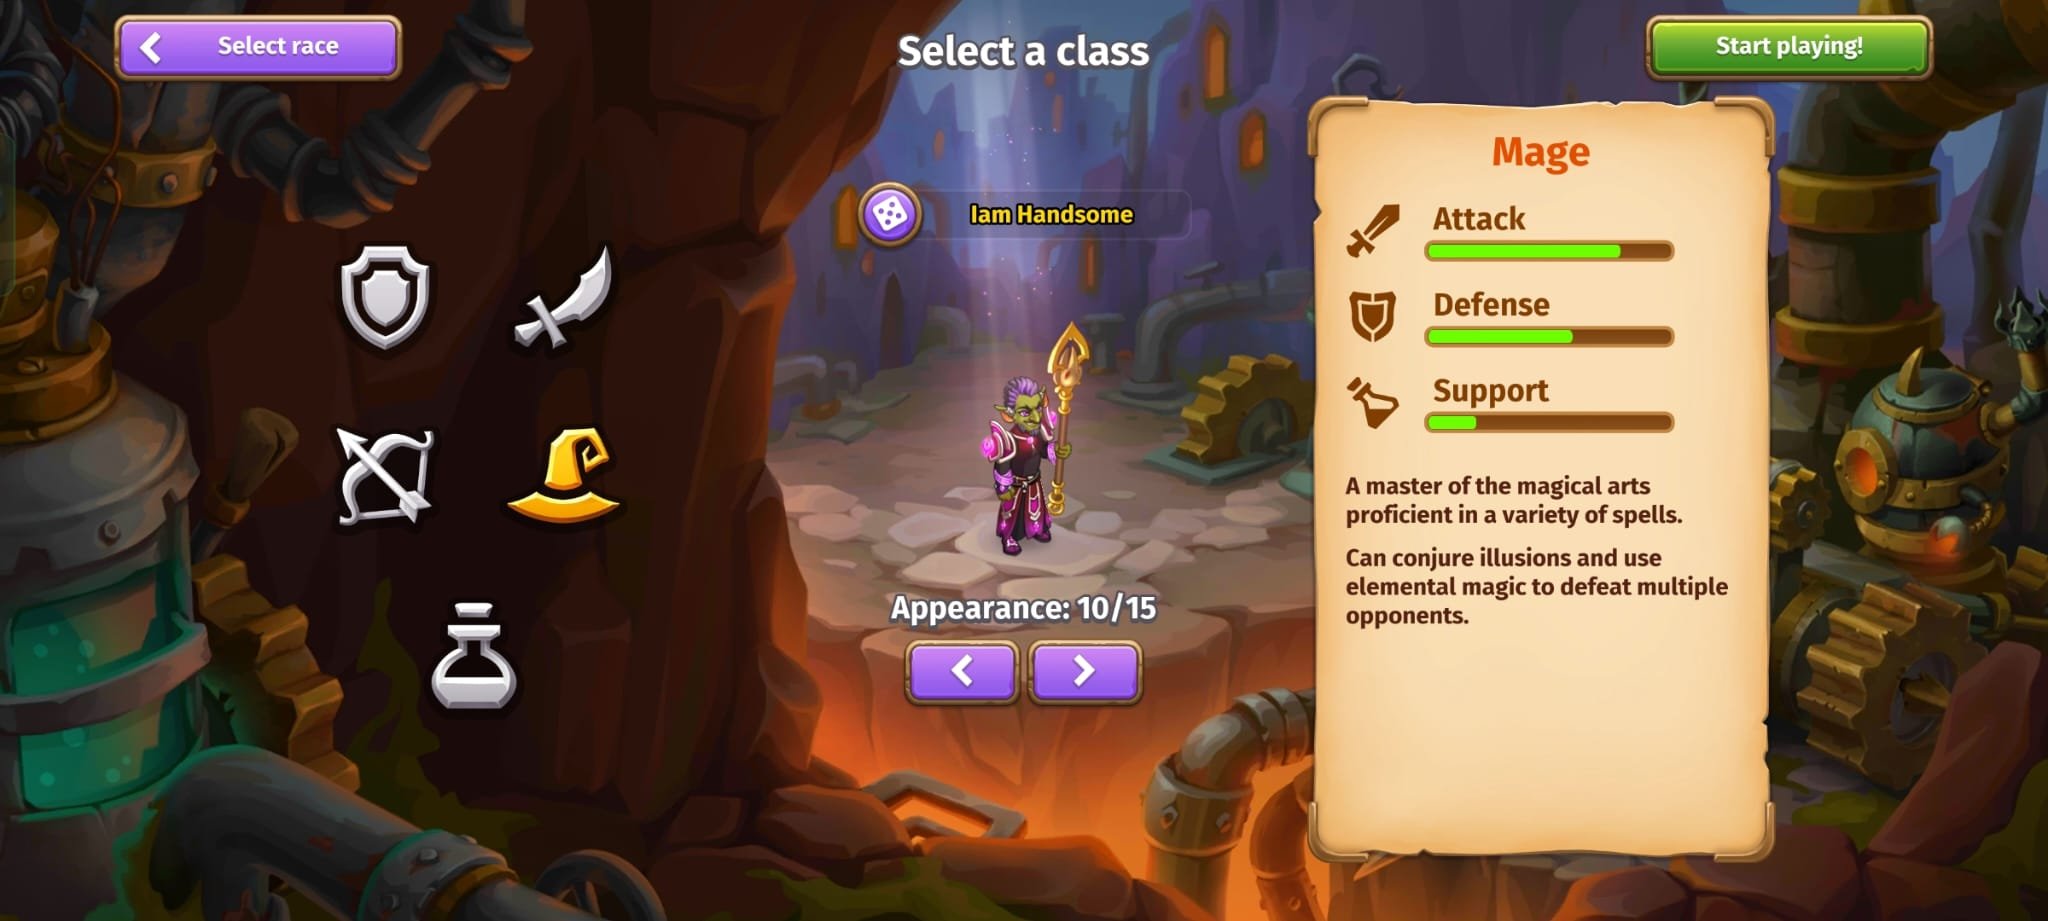


(1).thumb.gif.71ffb07ecd811ad56c2957600669ef33.gif)